Building SWUpdate Inside RootFS From Yocto
Introduction
This guide demonstrates how to build a Linux system with SWUpdate support and create update images for Over-The-Air (OTA) firmware updates. SWUpdate provides a reliable framework for updating embedded Linux systems with features like cryptographic verification, rescue partition support, and remote update capabilities via hawkBit server.
Prerequisites
- Yocto Version: Yocto 5.2 (Walnascar) or later
- Yocto Build Environment: Ensure your development system is configured to build Yocto projects. Refer to:
- Hardware: Target board with sufficient storage (eMMC or SD card)
- Network: Ethernet or WiFi connectivity for OTA updates
- Encryption Keys: RSA key pair for signing update images. A set of default keys is built in, but it must be updated for mass production. See SWUpdate Customization - Generate Encryption Keys for detailed instructions.
Step 1: Clone Yocto Source Code
Create a workspace directory and initialize the Yocto repository:
mkdir edm_yocto && cd edm_yocto
repo init -u https://github.com/TechNexion/tn-imx-yocto-manifest.git -b walnascar_6.12.y-next -m imx-6.12.34-2.1.0.xml
repo sync
Step 2: Set Up the Build Environment
Configure the build environment for your target board. This example uses edm-g-imx8mp:
WIFI_FIRMWARE=y DISTRO=fsl-imx-xwayland MACHINE=edm-g-imx8mp source tn-setup-release.sh -b build-xwayland-edm-g-imx8mp
Replace edm-g-imx8mp with your specific board model if different.
Step 3: Configure SWUpdate and Suricatta Settings
Suricatta is SWUpdate's daemon for communicating with OTA update servers like hawkBit.
Add the following configuration to conf/local.conf:
echo "DISTRO_FEATURES:append = \" swu-single\"" >> conf/local.conf
echo "SWU_TARGETID = \"edm-g-imx8mp\"" >> conf/local.conf
echo "SWU_SERVER = \"http://<server ip>:8080\"" >> conf/local.conf
echo "SWU_TARGETTOKEN = \"f0f605b5e37bcae5a7549b9c89352161\"" >> conf/local.conf
echo "SWU_TARGET_IMAGE = \"imx-image-full\"" >> conf/local.conf
echo "SWU_TARGET_BLOCK_DEVICE = \"mmcblk1\"" >> conf/local.conf
Configuration Parameters
| Parameter | Description | Example |
|---|---|---|
SWU_TARGETID | Unique controller ID in hawkBit server | "edm-g-imx8mp" |
SWU_SERVER | hawkBit server URL | "http://192.168.1.100:8080" |
SWU_TARGETTOKEN | Security token for hawkBit authentication | 32-character alphanumeric string |
SWU_TARGET_IMAGE | Base Yocto image name | "imx-image-full" or "imx-image-multimedia" |
SWU_TARGET_BLOCK_DEVICE | Target storage device | "mmcblk2" (eMMC) or "mmcblk1" (SD card) |
Generating a Target Token
Generate a secure random token:
cat /dev/urandom | tr -dc 'A-Za-z0-9' | head -c 32
Step 4: Build the Base Image with SWUpdate
Build both the SWUpdate rescue image and the main system image:
# Build SWUpdate rescue ramfs image
bitbake swupdate-image

# Build main Yocto target image
bitbake imx-image-full
This produces a .wic.xxx (or .sdcard.xxx) file containing both the main system and SWUpdate rescue partition.
Step 5: Build an Update Image
Create a .swu update package that can be deployed to devices:
bitbake update-image
This generates a file like update-image-edm-g-imx8mp.rootfs.swu in your deploy directory.
You can adjust the content of the update image by modifying the sw-description file. This file defines what components are included in the update package, target partitions, and update scripts.
Image Types
| Image Type | Extension | Purpose |
|---|---|---|
| Base Image | .wic.xxx or .sdcard.xxx | Initial flash to device, contains bootloader, kernel, rootfs, and rescue partition |
| Update Image | .swu | OTA update package containing signed filesystem and metadata |
Step 6: Flash Base Image to Target Board
Write the base image to your target board using one of the following methods:
Method A: Using USB Mass Storage (UMS)
- Boot the board into U-Boot
- Enable UMS mode to expose storage as USB drive
- Flash from host PC:
xzcat imx-image-full-edm-g-imx8mp.rootfs.wic.xz | sudo dd of=/dev/sdX bs=1M status=progress
Replace /dev/sdX with your actual device (e.g., /dev/sdb). Verify with lsblk before flashing.
Method B: Using UUU Tool
For eMMC flashing, use NXP's Universal Update Utility (UUU). Refer to: Using 'uuu' to flash eMMC
Do NOT use bmaptool for flashing. It may skip writing the rescue partition, causing boot failures.
Step 7: Testing SWUpdate
Boot into Rescue Mode
- Interrupt U-Boot during boot
- Set boot slot to rescue mode:
u-boot=> setenv bootslot singlerescue
u-boot=> boot
- The system will boot into the SWUpdate rescue environment
Verify Network Configuration
Once booted into rescue mode:
# Check network interface and IP address
ip address show
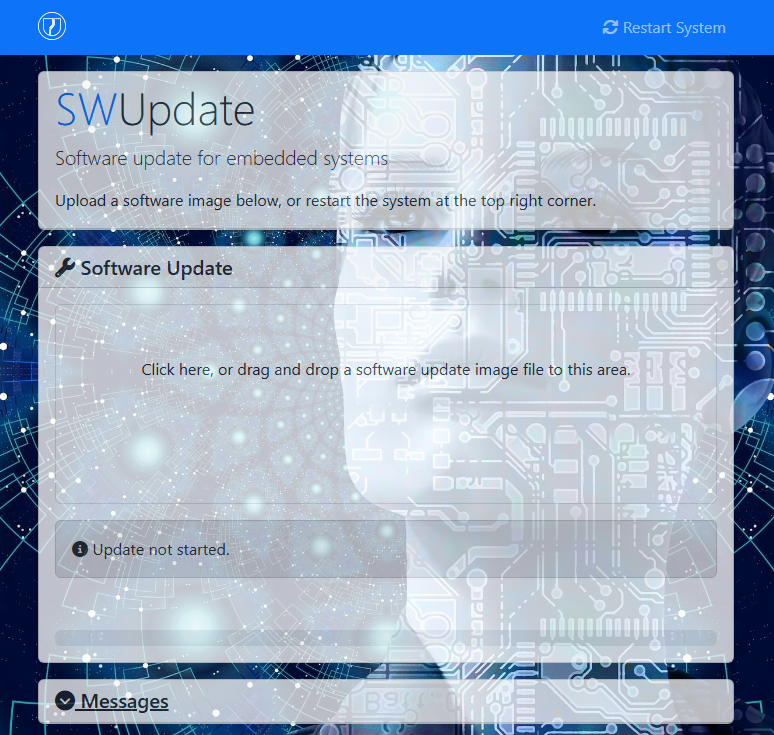
Access Mongoose Web Interface
From your host PC, open a web browser and navigate to:
http://<board-ip>:8080
You should see the Mongoose web interface where you can upload .swu files for testing.
Alternative: Command-Line Update
For debugging purposes, you can update directly via command line:
# Transfer .swu file to target (via scp, USB, etc.)
# Then run:
swupdate -v -i update-image-edm-g-imx8mp.rootfs.swu
The -v flag enables verbose output for debugging.
Troubleshooting
Synchronous Abort Error on Boot
If you see this error when booting into rescue mode:
Starting kernel ...

"Synchronous Abort" handler, esr 0x96000000, far 0x8025ff8d0008
elr: ffffffff831d1434 lr : ffffffff831d149c (reloc)
...
Resetting CPU ...
Cause: The SWUpdate rescue partition is corrupted or not properly written.
Solution: Reflash the complete base image using uuu or dd as described in Step 6.
Insufficient Free Space Error
If you encounter this error:
ERROR util.c : check_free_space : 1359 : Not enough free space to extract
imx-image-full-axon-imx93.rootfs.ext4.gz (needed 1320750976, got 1003913216)
Image invalid or corrupted. Not installing ...
Cause: The update image is being extracted to /tmp in the ramfs, which is limited by available RAM.
Solution: Add the following to your sw-description file:
images: (
    {
        filename = "imx-image-full.ext4.gz";
        device = "/dev/mmcblk1p2";
        installed-directly = true;
        ...
    }
);
The installed-directly = true flag writes the image directly to the target partition without extracting to temporary storage.
No Space Left on Device
If you encounter this error during update:
ERROR cpio_utils.c : copy_write : 175 : cannot write 10644 bytes: No space left on device
Cause: The partition image size does not match the target partition size. When overwriting a partition (e.g., rootfs.ext4 to /dev/mmcblk0p2), the image size must exactly equal the partition size.
Possible Reasons:
-
Incorrect image specified in sw-description: Wrong image is being written to a partition, causing size mismatch. For example, attempting to update from
imx-image-fulltoimx-image-corewhere the images have different sizes. -
Partition size miscalculation: Partitions were created with incorrect size units (e.g., using KB instead of MB), resulting in partition sizes that don't match the expected image size.
Solution:
- Verify the
sw-descriptionfile specifies the correct image for each partition - Check partition sizes match the image sizes.
- Recreate partitions with correct sizes if needed, then reflash the base image
EXT4-fs Error During Update
If this error appears in the kernel log during update:
[ 90.239631] EXT4-fs error (device mmcblk1p2): ext4_lookup:1813: inode #31409: comm (d-logind): iget: checksum invalid
Cause: You are attempting to update the same partition that SWUpdate is currently running from. This causes filesystem corruption because the system is trying to modify a mounted, active filesystem.
Example: SWUpdate is running from /dev/mmcblk0p2 and trying to write the update image to /dev/mmcblk0p2.
Solution:
- Always run SWUpdate from the rescue partition (not the main rootfs)
- Boot into rescue mode before updating.
- Verify you're in rescue mode before updating.
Update Image Verification Failure
Symptoms: Update fails with signature verification error
Possible Causes:
- Public key on device doesn't match private key used for signing
- Update image corrupted during transfer
- Incorrect passphrase used during build
Solution: Verify key pair matches and rebuild the update image.
Additional Resources
- SWUpdate Official Documentation
- NXP Application Note AN13872 - Detailed SWUpdate implementation guide
- hawkBit Documentation - OTA update server setup
Next Steps
After successfully testing SWUpdate:
- Configure a production hawkBit server for OTA updates
- Implement automated update policies (e.g., update windows, rollback strategies)
- Set up monitoring and logging for update operations
- Plan your partition and rescue strategy for production deployments
- Implement update verification and health checks