Set Up an OTA Server
Introduction
This guide demonstrates how to set up a hawkBit OTA (Over-The-Air) server using Docker containers on Ubuntu Linux. hawkBit is an Eclipse IoT project that provides a domain-independent back-end framework for rolling out software updates to constrained edge devices and managing large-scale deployments.
Prerequisites
- Docker: Ensure Docker is installed on your development system. Follow the official Docker installation guide for your operating system.
- Docker Compose: Ensure Docker Compose is installed on your development system. Follow the official Docker Compose installation guide for your operating system.
- Storage: At least 15GB of free disk space for Docker images and update files.
- System: A Linux-based development host (Ubuntu recommended) with necessary packages installed.
- Device: Target device must include SWUpdate system. Refer to Building SWUpdate Inside RootFS From Yocto to build your image or use our pre-built images.
- Network: Server and target devices must be on the same network or have network connectivity.
Step 1: Clone hawkBit Software
Clone the hawkBit repository from GitHub:
git clone https://github.com/eclipse-hawkbit/hawkbit.git
cd hawkbit
Step 2: Configure hawkBit Docker Settings
Modify the Docker Compose configuration to increase upload size limits and allocate sufficient memory for handling large update files.
Apply the following changes to docker/mysql/docker-compose-monolith-with-simple-ui-mysql.yml:
diff --git a/docker/mysql/docker-compose-monolith-with-simple-ui-mysql.yml b/docker/mysql/docker-compose-monolith-with-simple-ui-mysql.yml
index fccd56a13..7783fa3fa 100644
--- a/docker/mysql/docker-compose-monolith-with-simple-ui-mysql.yml
+++ b/docker/mysql/docker-compose-monolith-with-simple-ui-mysql.yml
@@ -20,7 +20,10 @@ services:
   hawkbit-simple-ui:
     image: "hawkbit/hawkbit-simple-ui:latest"
     environment:
-      - 'SPRING_APPLICATION_JSON={"hawkbit.server.mgmtUrl": "http://hawkbit:8080"}'
+      - 'SPRING_APPLICATION_JSON={"hawkbit.server.mgmtUrl": "http://hawkbit:8080", "hawkbit.server.security.dos.max-artifact-size": "5368709120"}'
+      - 'SPRING_SERVLET_MULTIPART_MAX_FILE_SIZE=2048MB'
+      - 'SPRING_SERVLET_MULTIPART_MAX_REQUEST_SIZE=2048MB'
+      - '_JAVA_OPTIONS=-Xms1g -Xmx4g -XX:+UseG1GC -XX:MaxGCPauseMillis=200'
     restart: always
     ports:
       - 8088:8088
Configuration Parameters Explained
| Parameter | Value | Purpose |
|---|---|---|
max-artifact-size | 5368709120 (5GB) | Maximum size for uploaded artifacts |
MAX_FILE_SIZE | 2048MB | Maximum individual file upload size |
MAX_REQUEST_SIZE | 2048MB | Maximum total request size |
_JAVA_OPTIONS | -Xms1g -Xmx4g | Allocate 1GB-4GB heap memory for Java |
These settings are essential for uploading large .swu update images. Adjust values based on your update file sizes and available server resources.
Step 3: Create and Run hawkBit Server
Start the hawkBit server using Docker Compose:
cd docker
docker compose -f mysql/docker-compose-monolith-with-simple-ui-mysql.yml up -d
This command will:
- Download required Docker images
- Create and start MySQL database container
- Create and start hawkBit server container
- Create and start hawkBit Simple UI container
Verify containers are running:
docker compose -f mysql/docker-compose-monolith-with-simple-ui-mysql.yml ps
Step 4: Access hawkBit Web Interface
Open a web browser and navigate to:
http://localhost:8088
Default credentials:
- Username:
admin - Password:
admin

Step 5: Enable Target Configuration
Configure hawkBit to accept connections from target devices:
- Navigate to Config in the hawkBit UI
- Enable authentication.targettoken.enabled and authentication.header.enabled
- Configure polling intervals and connection settings as needed
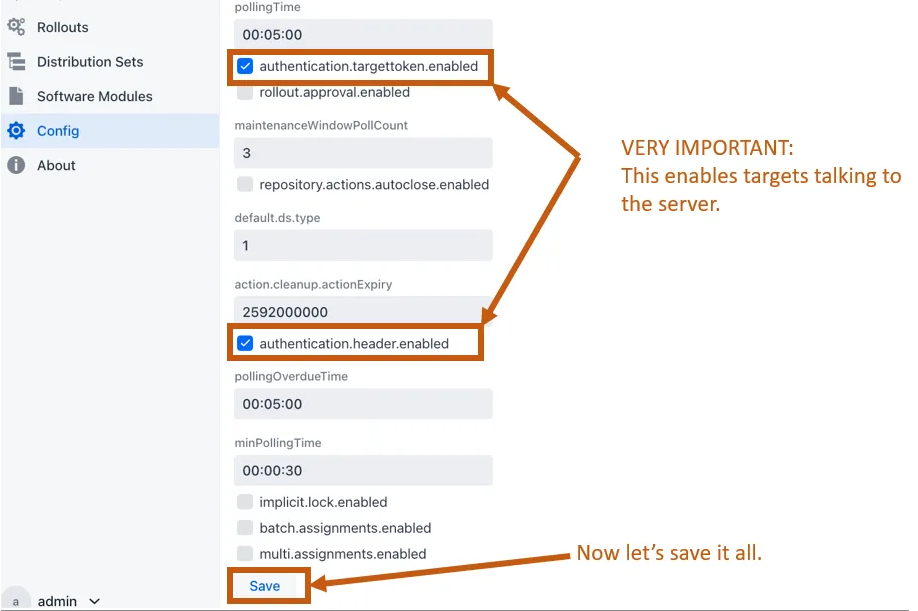
For production deployments, use security tokens and certificate-based authentication instead of disabling security credentials.
Step 6: Create Target Device
The new UI has limitations for security token management, so we'll use the Management API instead.
Using the Swagger Management API
-
Navigate to the Management API interface:
http://localhost:8080 or http://<server ip>:8080 -
Select "Management API" from the dropdown menu

-
Locate and expand POST /rest/v1/targets ("Create target(s)")
-
Click "Try it out" button

-
Replace the request body with your target configuration. Example for
edm-g-imx8mp:[
{
"name": "edm-g-imx8mp",
"description": "EDM-G-IMX8MP development board",
"controllerId": "edm-g-imx8mp",
"address": "http://192.168.1.100",
"securityToken": "f0f605b5e37bcae5a7549b9c89352161",
"requestAttributes": true,
"targetType": ""
}
]Field Descriptions
Field Description Example nameDisplay name for the target "edm-g-imx8mp"controllerIdUnique identifier matching device config "edm-g-imx8mp"addressDevice IP address (optional) "http://192.168.1.100"securityTokenAuthentication token (must match device) Generate using cat /dev/urandom | tr -dc 'A-Za-z0-9' | head -c 32 -
Click "Execute" to create the target
-
Verify the response shows "Successfully created"
-
Return to the hawkBit web UI and navigate to Targets to see the newly added target
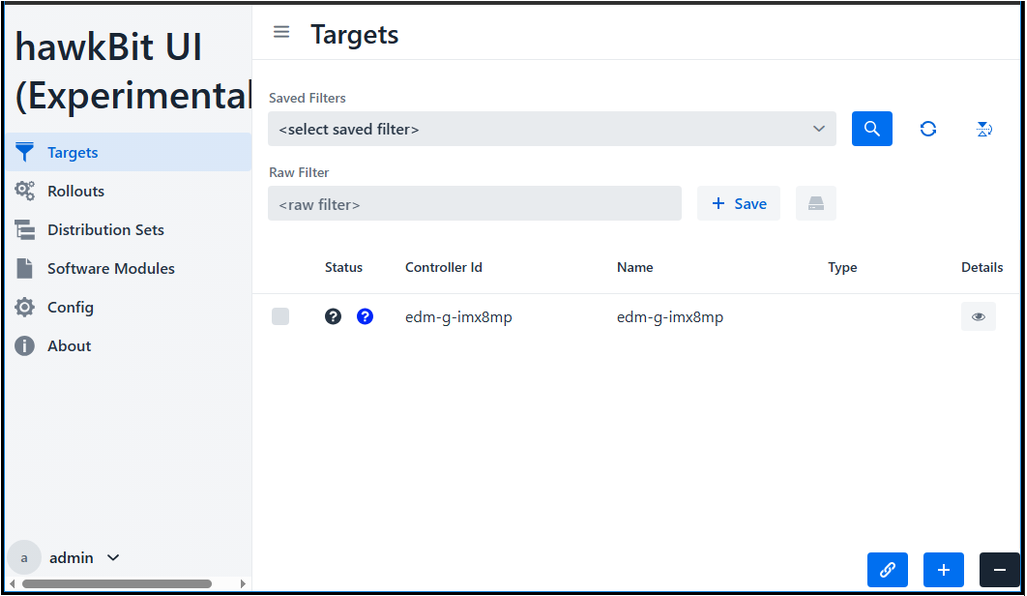
Step 7: Configure Target Filter
Target filters allow you to organize and manage devices by groups.
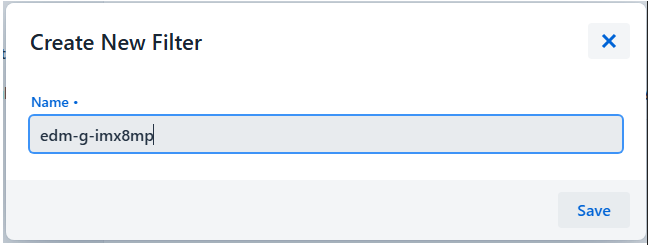
Create a Target Filter
-
Navigate to Targets
-
Configure the filter:
- Raw Filter: Define filter criteria (e.g.,
controllerId==*imx8mp*for all IMX8MP boards)

- Raw Filter: Define filter criteria (e.g.,
-
Click "Save" to apply the filter
controllerId==edm-*: All devices with controllerId starting with "edm-"
Step 8: Configure Target Device
Prepare the Target Device
You have two options to prepare your target device with SWUpdate support:
Option 1: Build Your Own Image Follow the instructions in Building SWUpdate Inside RootFS From Yocto to build a custom image with SWUpdate integrated.
Option 2: Use Pre-built Image For quick testing and evaluation, you can use our pre-built images that already include SWUpdate support. Download the appropriate image for your board model and flash it to your device.
Using pre-built images is the fastest way to verify hawkBit server functionality before investing time in building custom images.
Boot Device into SWUpdate Rescue Mode
Follow the instructions in Step 7 of Building SWUpdate Inside RootFS From Yocto to boot your device into SWUpdate rescue mode:
u-boot=> setenv bootslot singlerescue
u-boot=> boot
Verify Server Connection
Once the device boots into rescue mode, check the SWUpdate service status:
# Check systemd service status
systemctl status swupdate
Expected output should show the service as active (running) and connected to the hawkBit server.
Manual Connection Test (Optional)
For debugging purposes, you can manually test the connection:
# Stop the systemd service
systemctl stop swupdate

# Run SWUpdate manually with verbose logging
swupdate -l 5 -u '-t default -u http://<server-ip>:8080 -i edm-g-imx8mp -k f0f605b5e37bcae5a7549b9c89352161'
Replace <server-ip> with your hawkBit server's IP address.
The -l 5 flag enables verbose logging (log level 5) for debugging purposes.
Step 9: Configure and Deploy Update
Now that the device is connected to the server, you can create a deployment to push updates to target devices.
9.1 Create Software Module
Software modules contain the actual update artifacts (.swu files).
-
Navigate to Software Modules
-
Fill in the module details:
- Type: Select "OS" for full system updates
- Name: Descriptive name (e.g., "IMX8MP Full Image v2.0")
- Version: Version number (e.g., "2.0.0")
- Vendor: Your organization name (optional)
- Description: Update description (optional)
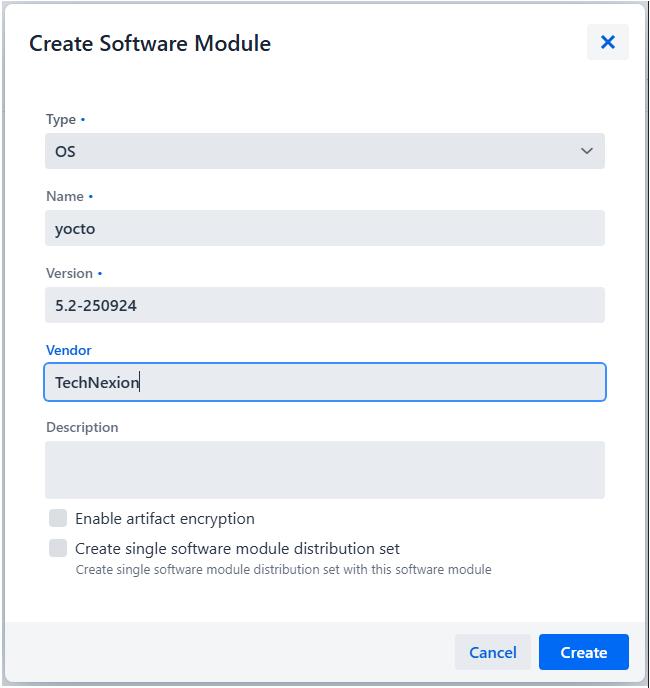
-
Click "Create"
-
Upload the
.swuupdate file:- Click "Upload Files" or drag and drop your
.swufile - Wait for upload to complete
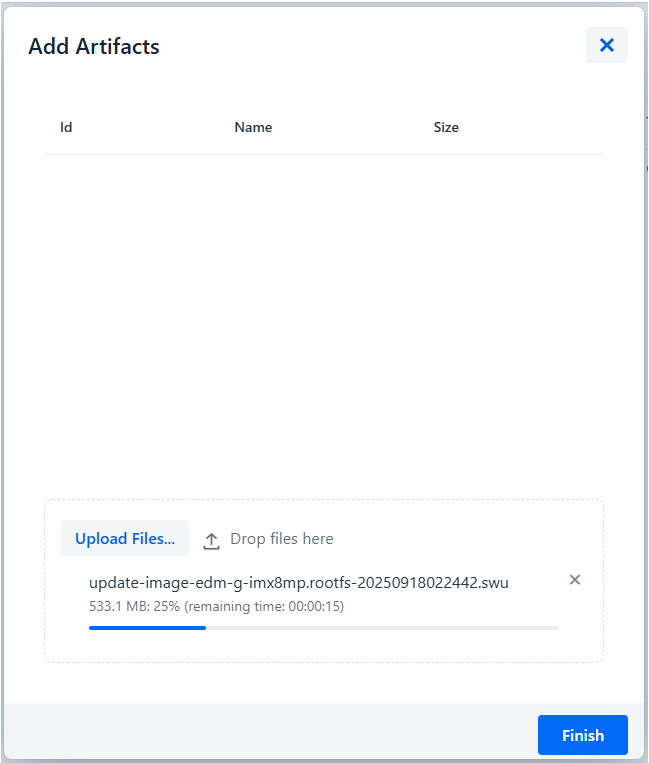
- Click "Upload Files" or drag and drop your
9.2 Create Distribution Set
Distribution sets define which software modules are deployed together.
-
Navigate to Distribution Sets
-
Configure the distribution set:
- Type: Select "OS" or "App(s)" or "OS with app(s)" based on update type
- Name: Descriptive name (e.g., "IMX8MP Update v2.0")
- Version: Version identifier (e.g., "2.0.0")
- Description: Deployment description (optional)
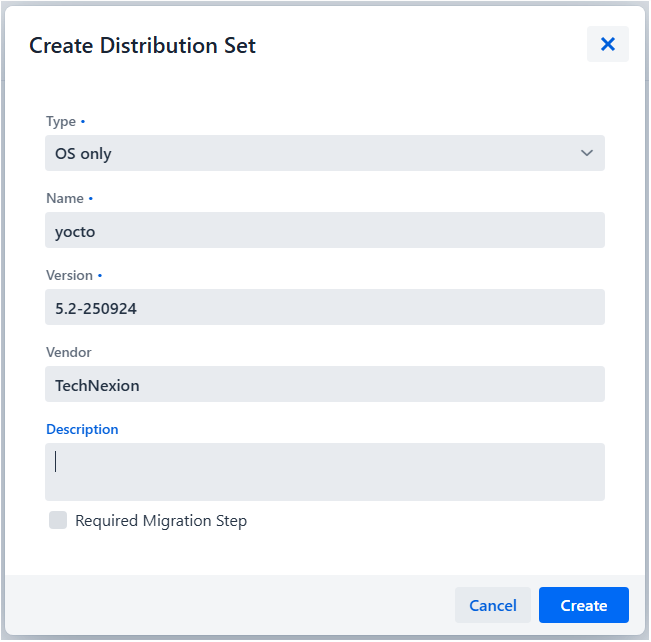
-
Click "Create"
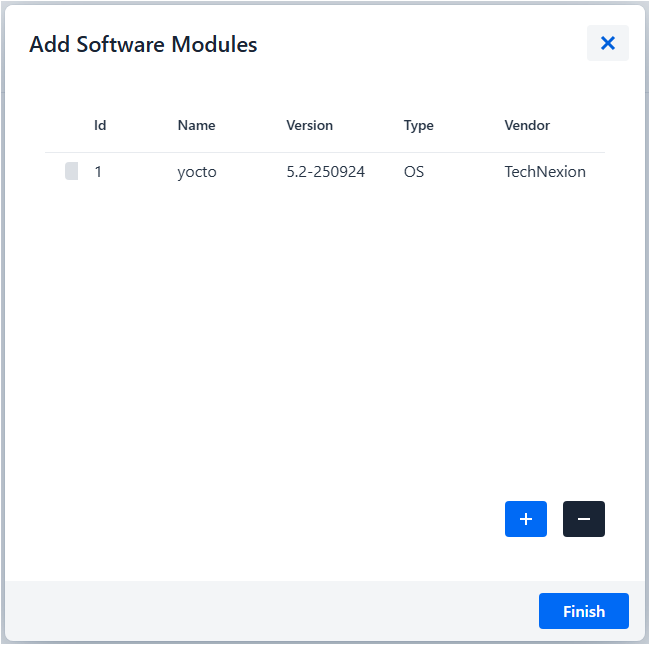
-
Add the software module to the distribution set:
- click "[+]" and select your software module
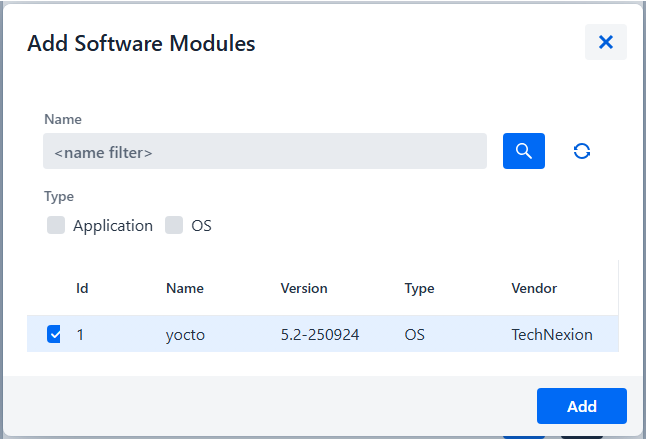
-
Click "Add"
-
Verify the distribution set contains the correct software module
9.3 Create Rollout
Rollouts manage the deployment process across multiple targets.
-
Navigate to Rollouts
-
Click "[+]" button
-
Configure the rollout:
- Name: Rollout name (e.g., "Update IMX8MP to v2.0")
- Distribution Set: Select the distribution set created earlier
- Target Filter: Select the target filter or specific targets
- Description: Rollout description (optional)
- Action Type: Choose update strategy:
- Forced: Update immediately without user confirmation
- Soft: Wait for device confirmation
- Download Only: Download but don't install
- Start Type: Manual or Auto or scheduled
- Group number: Number of groups to divide targets into for staged rollout (e.g., 1 for single group, 5 for five stages)
- Trigger Threshold: Percentage of successful updates required
- Error Threshold: Maximum allowed failure rate
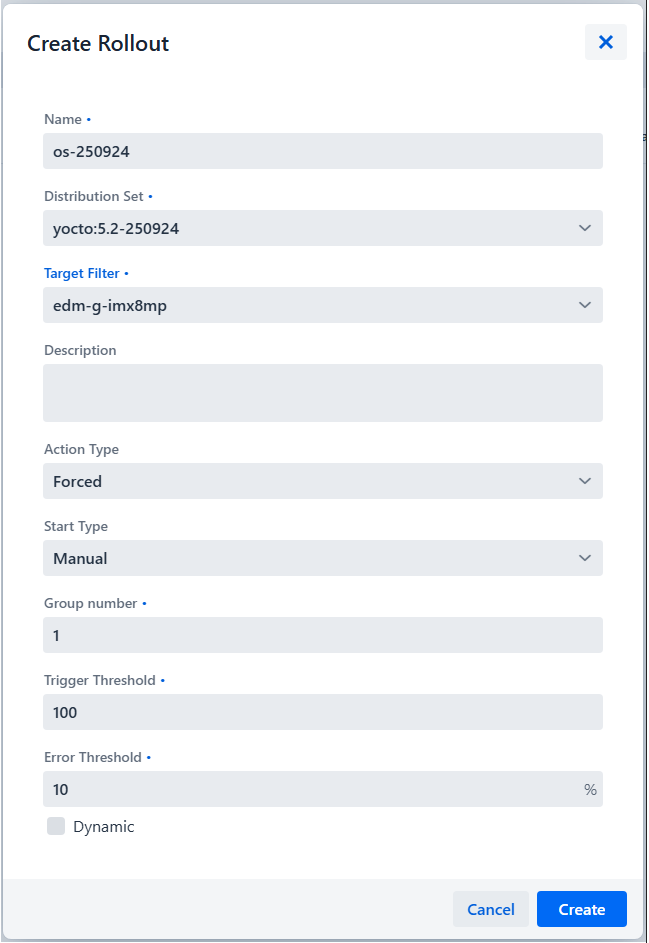
-
Click "Create" to create the rollout
-
Click "Start" to begin the deployment
9.4 Monitor Deployment Status
-
Navigate to Rollouts to view rollout progress
-
Click on the rollout name to see detailed statistics:
- ready: Ready to updates
- running: Updates in progress
- finished: Update successful or failed
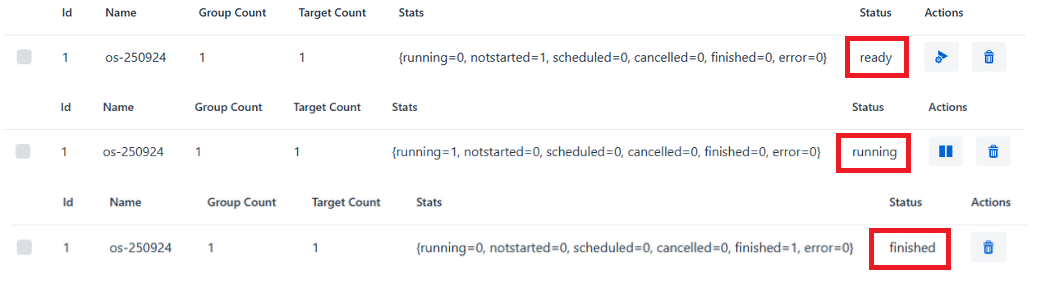
-
Monitor individual target status in Targets
- Check Statistics for overall deployment health
Troubleshooting
Error Status in Statistics
If the statistics display error=1 or show update failures:

Solution: Check the device logs to identify the root cause:
# View SWUpdate service logs
journalctl -u swupdate

# View recent logs with follow mode
journalctl -u swupdate -f

# View logs for specific time period
journalctl -u swupdate --since "10 minutes ago"
Common Causes:
-
Invalid sw-description: Syntax errors or incorrect partition specifications in the
sw-descriptionfile- Verify JSON/libconfig syntax
- Check partition paths match device configuration
-
Network connectivity issues: Device cannot reach hawkBit server
- Verify network connectivity:
ping <server-ip> - Check firewall rules on server and device
- Verify network connectivity:
-
Security token mismatch: Token on device doesn't match hawkBit configuration
- Verify
SWU_TARGETTOKENin device matchessecurityTokenin hawkBit
- Verify
-
Corrupted update file: The
.swufile is incomplete or damaged- Verify file integrity with checksums
- Re-upload the artifact to hawkBit
-
Insufficient storage: Not enough space to download or apply update
- Check available space:
df -h - Clean up temporary files if needed
- Check available space:
Device Not Appearing in hawkBit
Symptoms: Device is running SWUpdate but doesn't show up in Targets list
Possible Causes:
- Incorrect
controllerIdconfiguration - Wrong server URL in device configuration
- Security token mismatch
- Network connectivity issues
Solution:
- Verify device configuration in
/etc/swupdate.cfgor systemd service parameters - Check network connectivity to hawkBit server
- Review SWUpdate logs:
journalctl -u swupdate - Manually test connection using the command in Step 8
Update Download Fails
Symptoms: Update fails during download phase
Solution:
- Check network bandwidth and stability
- Verify hawkBit server has sufficient resources (CPU, memory, disk)
- Check Docker container logs:
docker compose -f mysql/docker-compose-monolith-with-simple-ui-mysql.yml logs hawkbit-simple-ui - Increase timeout values in device configuration if needed
Update Installation Fails
Symptoms: Download succeeds but installation fails
Common Causes:
- Incorrect partition specified in
sw-description - Partition size mismatch (see No Space Left on Device)
- Invalid signature verification
- File system corruption
Solution: Review device logs and refer to Troubleshooting section in Building SWUpdate guide
Best Practices
Security Recommendations
- Change default credentials: Update the admin password immediately after initial setup
- Use HTTPS: Configure SSL/TLS certificates for production deployments
- Rotate security tokens: Regularly update device security tokens
- Enable authentication: Always use security tokens in production
- Network isolation: Run hawkBit on a secure network segment
Deployment Strategies
- Staged rollouts: Update devices in phases (e.g., 10%, 50%, 100%)
- Test deployments: Always test updates on a small group first
- Monitor closely: Watch the first few devices for errors before proceeding
- Maintain rollback capability: Keep previous firmware versions available
- Schedule updates: Perform updates during maintenance windows
Maintenance Tasks
- Regular backups: Backup hawkBit database and configuration
- Monitor disk space: Ensure sufficient space for artifacts and logs
- Clean up old artifacts: Remove obsolete software modules and distribution sets
- Review logs: Regularly check for errors or warnings
- Update hawkBit: Keep the server updated with latest security patches
Additional Resources
Next Steps
After successfully setting up hawkBit:
- Explore advanced rollout strategies (canary deployments, A/B testing)
- Integrate hawkBit with your CI/CD pipeline for automated updates
- Set up monitoring and alerting for update operations
- Configure backup and disaster recovery procedures
- Plan for scaling to handle larger device fleets