Create Images and Flash
Befor you begin, following are parameters descriptions:
Base on your modules, select the <board-name>.
| Product name | <board-name> | Boot device |
|---|---|---|
| TEK6100-ORIN-NX(Micron dram) | tn-tek6100-orin | NVMe/ USB |
| TEK6040-ORIN-NANO | tn-tek6040-orin | NVMe/ USB |
Base on your condition, select the <rootdev>.
| Boot device | <rootdev> |
|---|---|
| NVMe | nvme0n1p1 |
| USB | sda1 |
<board-name> : specifies the configuration of the target device.
<rootdev> : specifies the device on which the root file system is located.
Enter Recovery Mode
When it comes to using 'flash.sh', make sure you enter the Recovery mode first.
- Connect to computer via M-USB1.
- Plug the storage you want to flash system image.
- Press 'Recovery' button and 'Reset' button at the same time.
- Release 'Reset' button.
- Relesee 'Recovery' button.
- Check wether the device is connected.
$ lsusb
Bus 003 Device 026: ID 0955:7323 NVIDIA Corp. APX
Prepare JetPack host environment
Please follow [host environment setting] to download codebase and compile images.
When you prepare Jetpack, download script will create system.img,
you can flash into device directly.
Flash on Recovery Mode
Please flash using Nvidia script for ORIN series
Run this command from the Linux_for_Tegra folder:
$ cd <nvidia_folder>/Linux_for_Tegra/
$ sudo ./tools/kernel_flash/l4t_initrd_flash.sh <option> <board-name> <rootdev>
<option> : is one or more command line options for flash.sh script.
DO NOT create new system.img, flash only
You can follow section: Create new system.img, DO NOT flash to create system.img.
# use '--flash-only' option
$ sudo ./tools/kernel_flash/l4t_initrd_flash.sh \
        --external-device <rootdev> -c tools/kernel_flash/flash_l4t_external.xml \
        -p "-c bootloader/generic/cfg/flash_t234_qspi.xml" \
        --showlogs --flash-only --network usb0 <board-name> internal
Example: flash TEK6040-ORIN-NX with NVMe boot device.
$ sudo ./tools/kernel_flash/l4t_initrd_flash.sh \
        --external-device nvme0n1p1  -c tools/kernel_flash/flash_l4t_external.xml \
        -p "-c bootloader/generic/cfg/flash_t234_qspi.xml" \
        --showlogs --flash-only --network usb0 tn-tek6100-orin-nx internal
--flash-only limitationJetpack will storage the command that you previous create system image
in bootloader/flashcmd.txt
Example1: TEK6100-ORIN-NX: NVMe boot
./tegraflash.py ...
bpmp_fw bpmp_t234-TE980M-A1_prod_sigheader.bin.encrypt;
bpmp_fw_dtb tegra234-bpmp-3767-0000-a02-3509-a02_with_odm_sigheader.dtb.encrypt;
kernel_dtb tegra234-tek-orin+p3767-0000-nv.dtb
...
Example2: TEK6040-ORIN-NANO: NVMe boot
./tegraflash.py ...
bpmp_fw bpmp_t234-TE950M-A1_prod_sigheader.bin.encrypt;
bpmp_fw_dtb tegra234-bpmp-3767-0001-3509-a02_with_odm_sigheader.dtb.encrypt;
kernel_dtb tegra234-tek-orin+p3767-0003-nv.dtb
...
Most of the differences can be found in their board conf file.
In conclusion, when running --flash-only command, if the <rootdev> or <board-name> is not match the previous created one, flash script will be terminated.
When any of them changes, need to create system.img again.
Or you can just create new Jetpack with different system image command.
Create new system.img, and flash
$ sudo ./tools/kernel_flash/l4t_initrd_flash.sh \
        --external-device <rootdev> -c tools/kernel_flash/flash_l4t_external.xml \
        -p "-c bootloader/generic/cfg/flash_t234_qspi.xml" \
        --showlogs --network usb0 <board-name> internal
Create new system.img, DO NOT flash
# use `--no-flash` option
$ sudo ./tools/kernel_flash/l4t_initrd_flash.sh \
        --external-device <rootdev> -c tools/kernel_flash/flash_l4t_external.xml \
        -p "-c bootloader/generic/cfg/flash_t234_qspi.xml" \
        --showlogs --no-flash --network usb0 <board name> internal
You can flash to device follow by section:DO NOT create new system.img, flash only.
Create disk image and flash
You also can create disk image for flashing into external storage.
-
Run below commmand to
$ cd <nvidia_folder>/Linux_for_Tegra/
$ sudo ./tools/jetson-disk-image-creator.sh -o <output-img> -b <board-name> -d <rootdev>
For example:
sudo ./tools/jetson-disk-image-creator.sh -o TEK6100_nvme.img -b tn-tek6100-orin-nx -d NVMe
This command will create a TEK6100_nvme.img. Could beddinto storage. -
Generate bmaptool files
$ sudo bmaptool create <output-img> -o <output-img>.bmap
$ sudo bzip2 -z <output-img> -
Connect the storage to computer and flash to block device
# get your storage block device, it maybe shown sdX
$ lsblk -d
sdb      8:16   0 232.9G  0 disk

# umount block device. Based on above example, <BLOCK_DEVICE> is sdb
$ sudo umount /dev/<BLOCK_DEVICE>?

# flash demo image into block device
$ sudo bmaptool copy <output-img>.bz2 /dev/<BLOCK_DEVICE>
NVMe storageWe recommand using 'SSD Enclosure Adapter' to transform NVMe SSD to USB block device.
-
Plug the storage back to device and boot.
Multiple storage connectedMake sure you select the right boot device in NVIDIA UEFI stage.
Create QSPI image
After Jetpack 6, we can use generate_qspi_for_flash.sh to create QSPI image.
When you upgrade UEFI firmware to Jetpack 6(R36.4.ga), you CAN NOT downgrade to Jetpack 5(R35.3.ga) for now.
-
generate qspi package
$ cd <nvidia_folder>/Linux_for_Tegra/
$ sudo ./tools/qspi_flash/generate_qspi_for_flash.sh <board-name>
The output file is host_tegraflash_${VERSION}.tbz2.
${VERSION} is R36.4.3 for Jetpack 6.2. -
Device enter to recovery mode
-
unzip host_tegraflash_${VERSION}.tbz2 and flash
$ tar -xvf host_tegraflash_${VERSION}.tbz2
$ sudo hostflash/host_flash_qspi.sh
Flash new pinmux image
-
Edit the xlsm pinmux file via windows environment. TechNextion source file:
<nvidia_folder>/Linux_for_Tegra/sources/TEK-ORIN_Orin-Nano_pinmux/Jetson_Orin_NX_and_Orin_Nano_series_Pinmux_Config_Template.xlsmORIN-EVKDownload xlsm pinmux file from NVIDIA server.
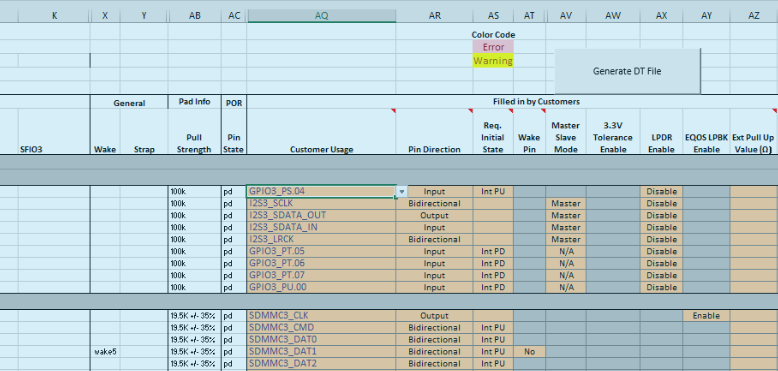
Use the scroll bar right to select the pinmux of the cell(pin).
watch out the sheet- You should work on
HDMIsheet, there are slightly different between them. - Please enable macro before you edit pinmux table.
If done, click the above Macro(Generate DT file) to generate pinmux file.
-cec389ea4c7df8f1ab552cd0d1cbf0ba.png)
- You should work on
-
Type the <name> twice. tek-orin-a1 for TEK-ORIN series
-e7ac129dcf1433b4705c490f7089a10b.png)
You will see this result.
-e163a81584339c882361dfcb969f63a8.png) There are 3 dtsi files generated.
There are 3 dtsi files generated. -
Copy generated dtsi to
bootloader/folder$ sudo cp -rp Orin-tek-orin-a1-gpio-default.dtsi Linux_for_Tegra/bootloader/
$ sudo cp -rp Orin-tek-orin-a1-pinmux.dtsi Linux_for_Tegra/bootloader/generic/BCT/ -
Update NVIDIA QSPI for pinmux follow the Create and flash new QSPI image only.
Those only update by file system
You may want to see this article before you changing files.
Those part below can't be changed by flash.sh. Need to change the file by:
- ssh (scp)
- USB stick
Update new kernel Image
Copy from:
<nvidia_folder>/Linux_for_Tegra/source/kernel_out/kernel/kernel-jammy-src/arch/arm64/boot/Image
to device:
/boot/
Update new kernel modules
Copy from
<nvidia_folder>/Linux_for_Tegra/rootfs/usr/lib/modules/
to device:
/lib/
Update device tree
From:
<nvidia_folder>/Linux_for_Tegra/source/kernel_out/kernel-devicetree/generic-dts/dtbs/<target>.dtb
to device:
/boot/<target>.dtb
Change default device-tree
On device:
$ vi /boot/extlinux/extlinux.conf
LABEL primary
      MENU LABEL primary kernel
+     FDT /boot/<target>.dtb
      LINUX /boot/Image
      INITRD /boot/initrd
      APPEND ${cbootargs} root=/dev/mmcblk0p1 rw rootwait rootfstype=ext4 console=ttyTCU0,115200n8 console=tty0 fbcon=map:0 net.ifnames=0