Usage Guide
Overview
- Enumerate and list all video devices
- Change streaming format
- Display the current frame rate per second
- Control extension settings (UVC/ISP modes)
- Set AGC exposure mode to maintain constant framerate
- Limit Exposure Range in Auto Exposure Mode
- Update Technexion camera firmware
- Recondition Tool
- Manage OS and On Sensor Profiles (OSP)
- GMSL Margin Test
- Preview features (Grid and IMU Preview)
- Record videos and capture photos
- Simulate multiple cameras
- Route configuration for IMX93/95
- Customize layout with drag-and-drop
- Change color theme
- Set custom logo
- Access support resources
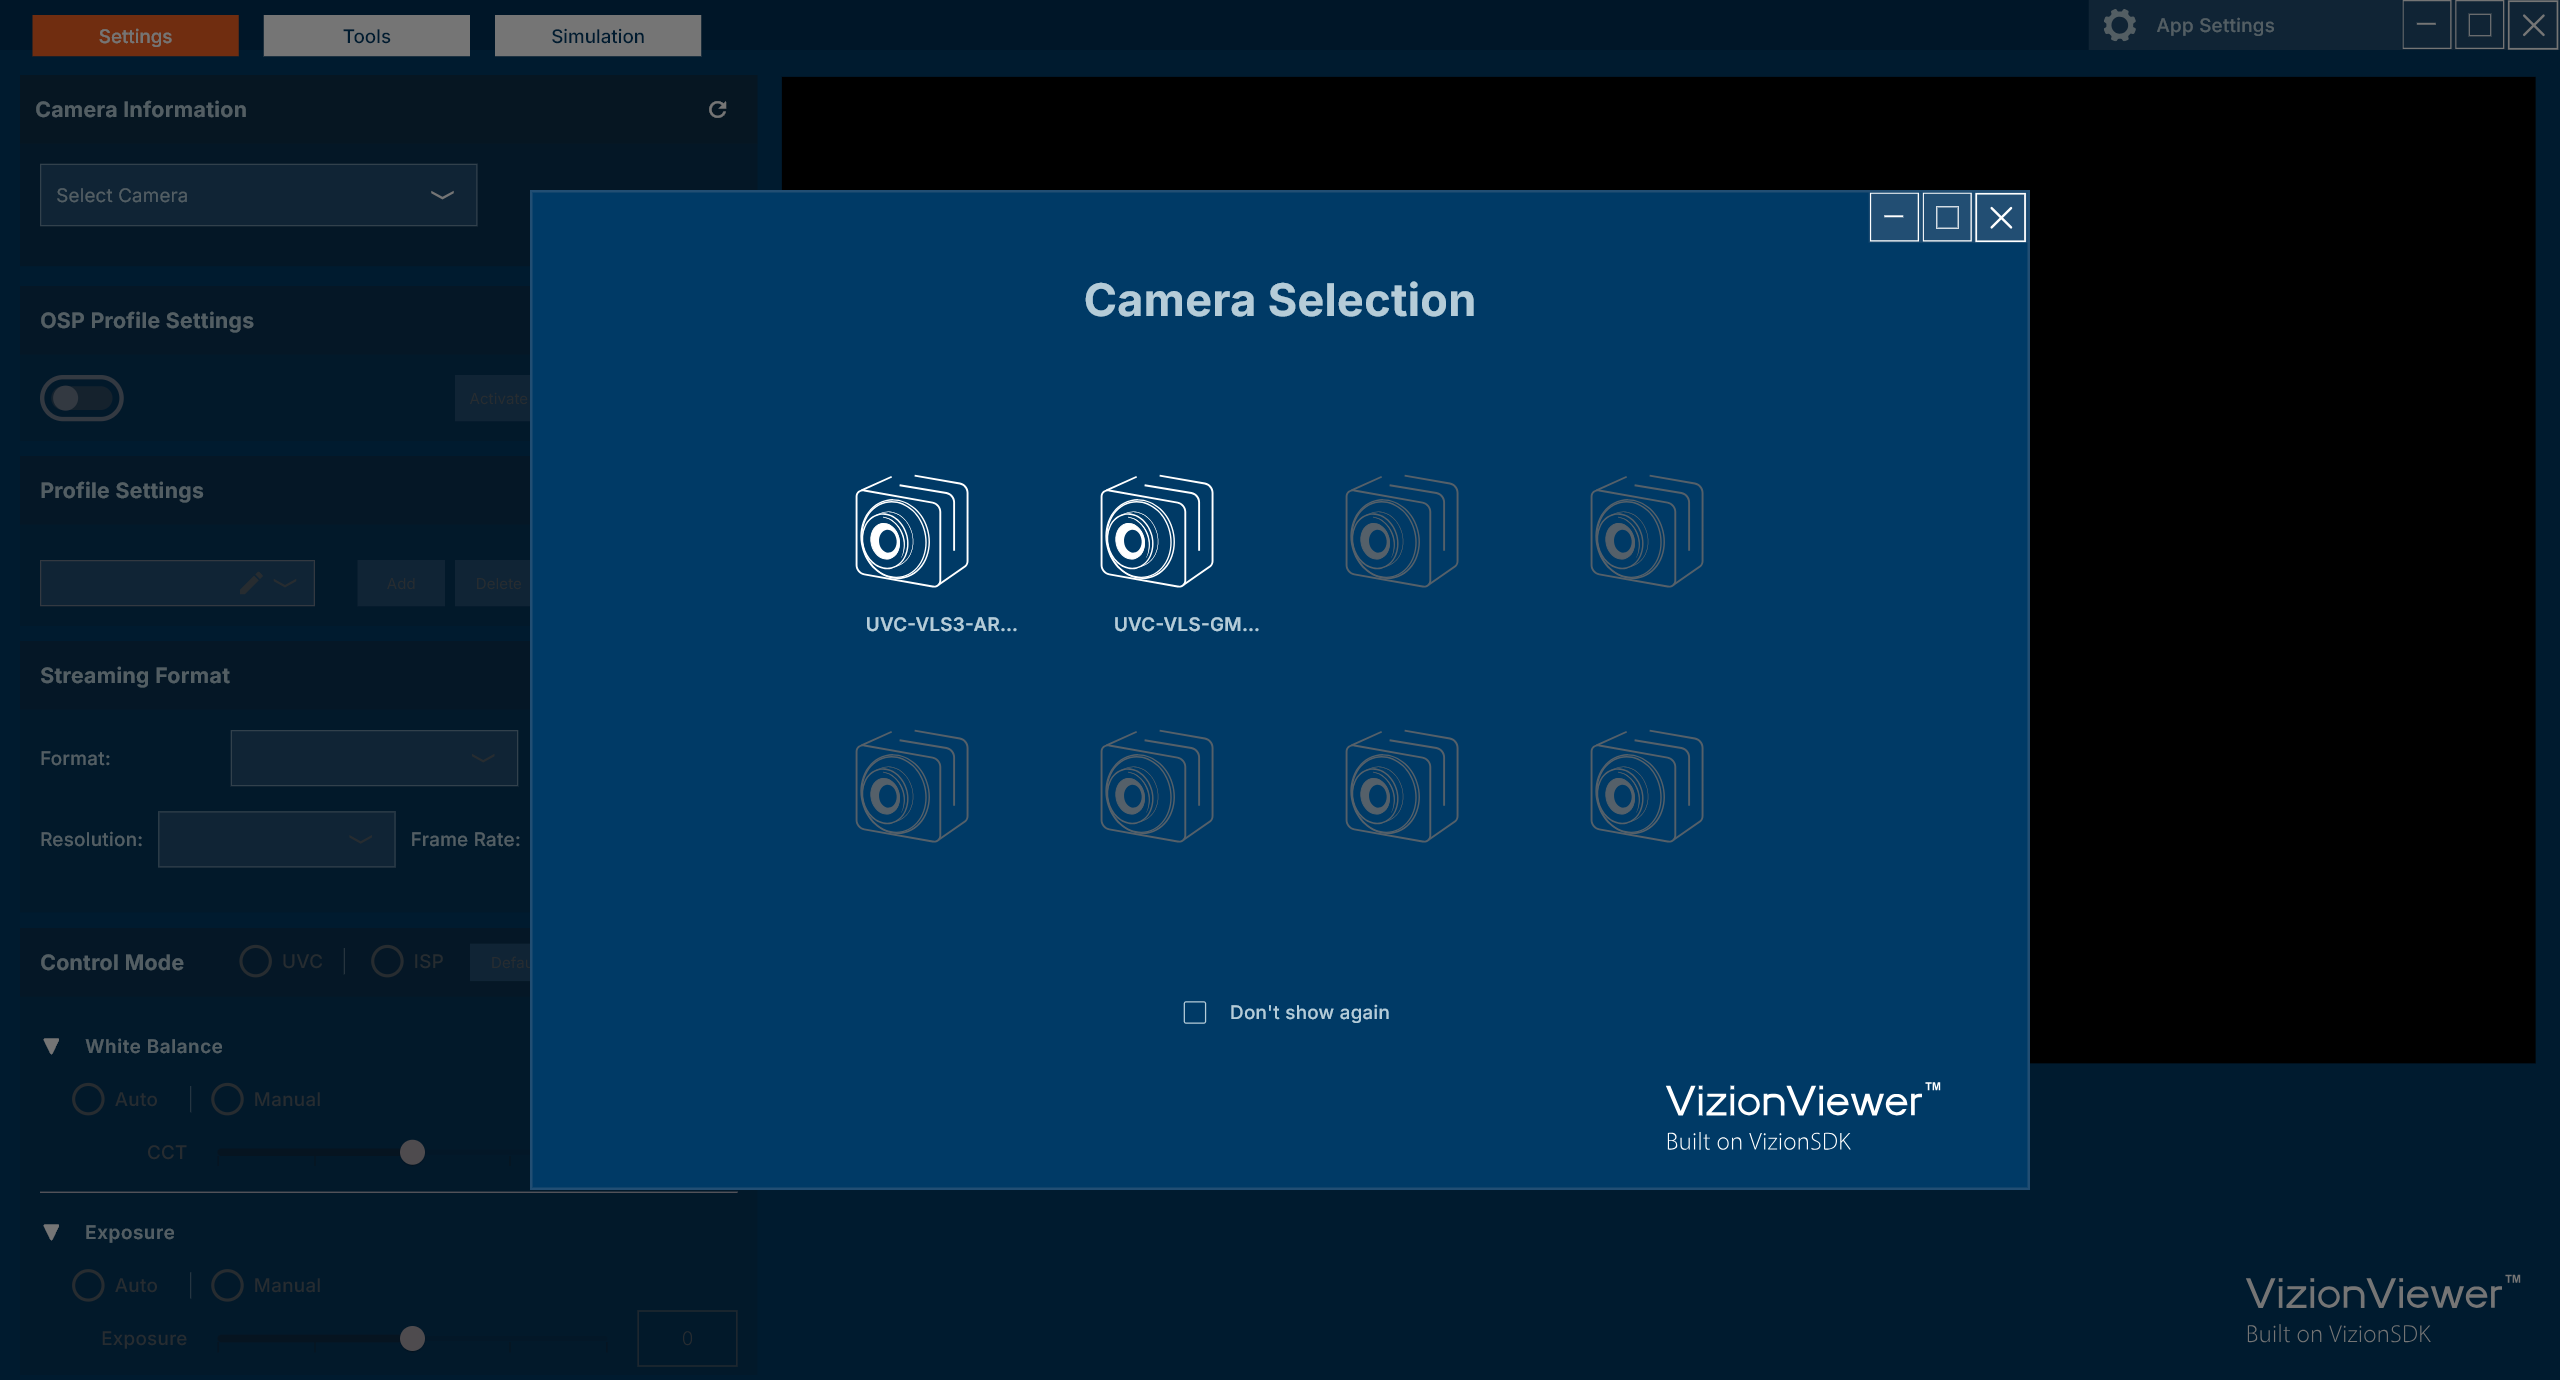
Enumerate and List All Video Devices
When VizionViewer™ starts, it displays an initial screen showing all available video devices. You can select a camera either from this device list or from the dropdown menu. The device list refreshes every second.
Change Streaming Format
Color Space / Compression
After selecting a camera, the color space/compression dropdown displays all supported formats. Supported formats include UYVY, YUY2, NV12, and MJPG.
Resolution
Once a color space/compression is chosen, the resolution dropdown lists all supported resolutions for the selected camera.
Framerate
After selecting a resolution, the framerate dropdown displays all supported framerates.
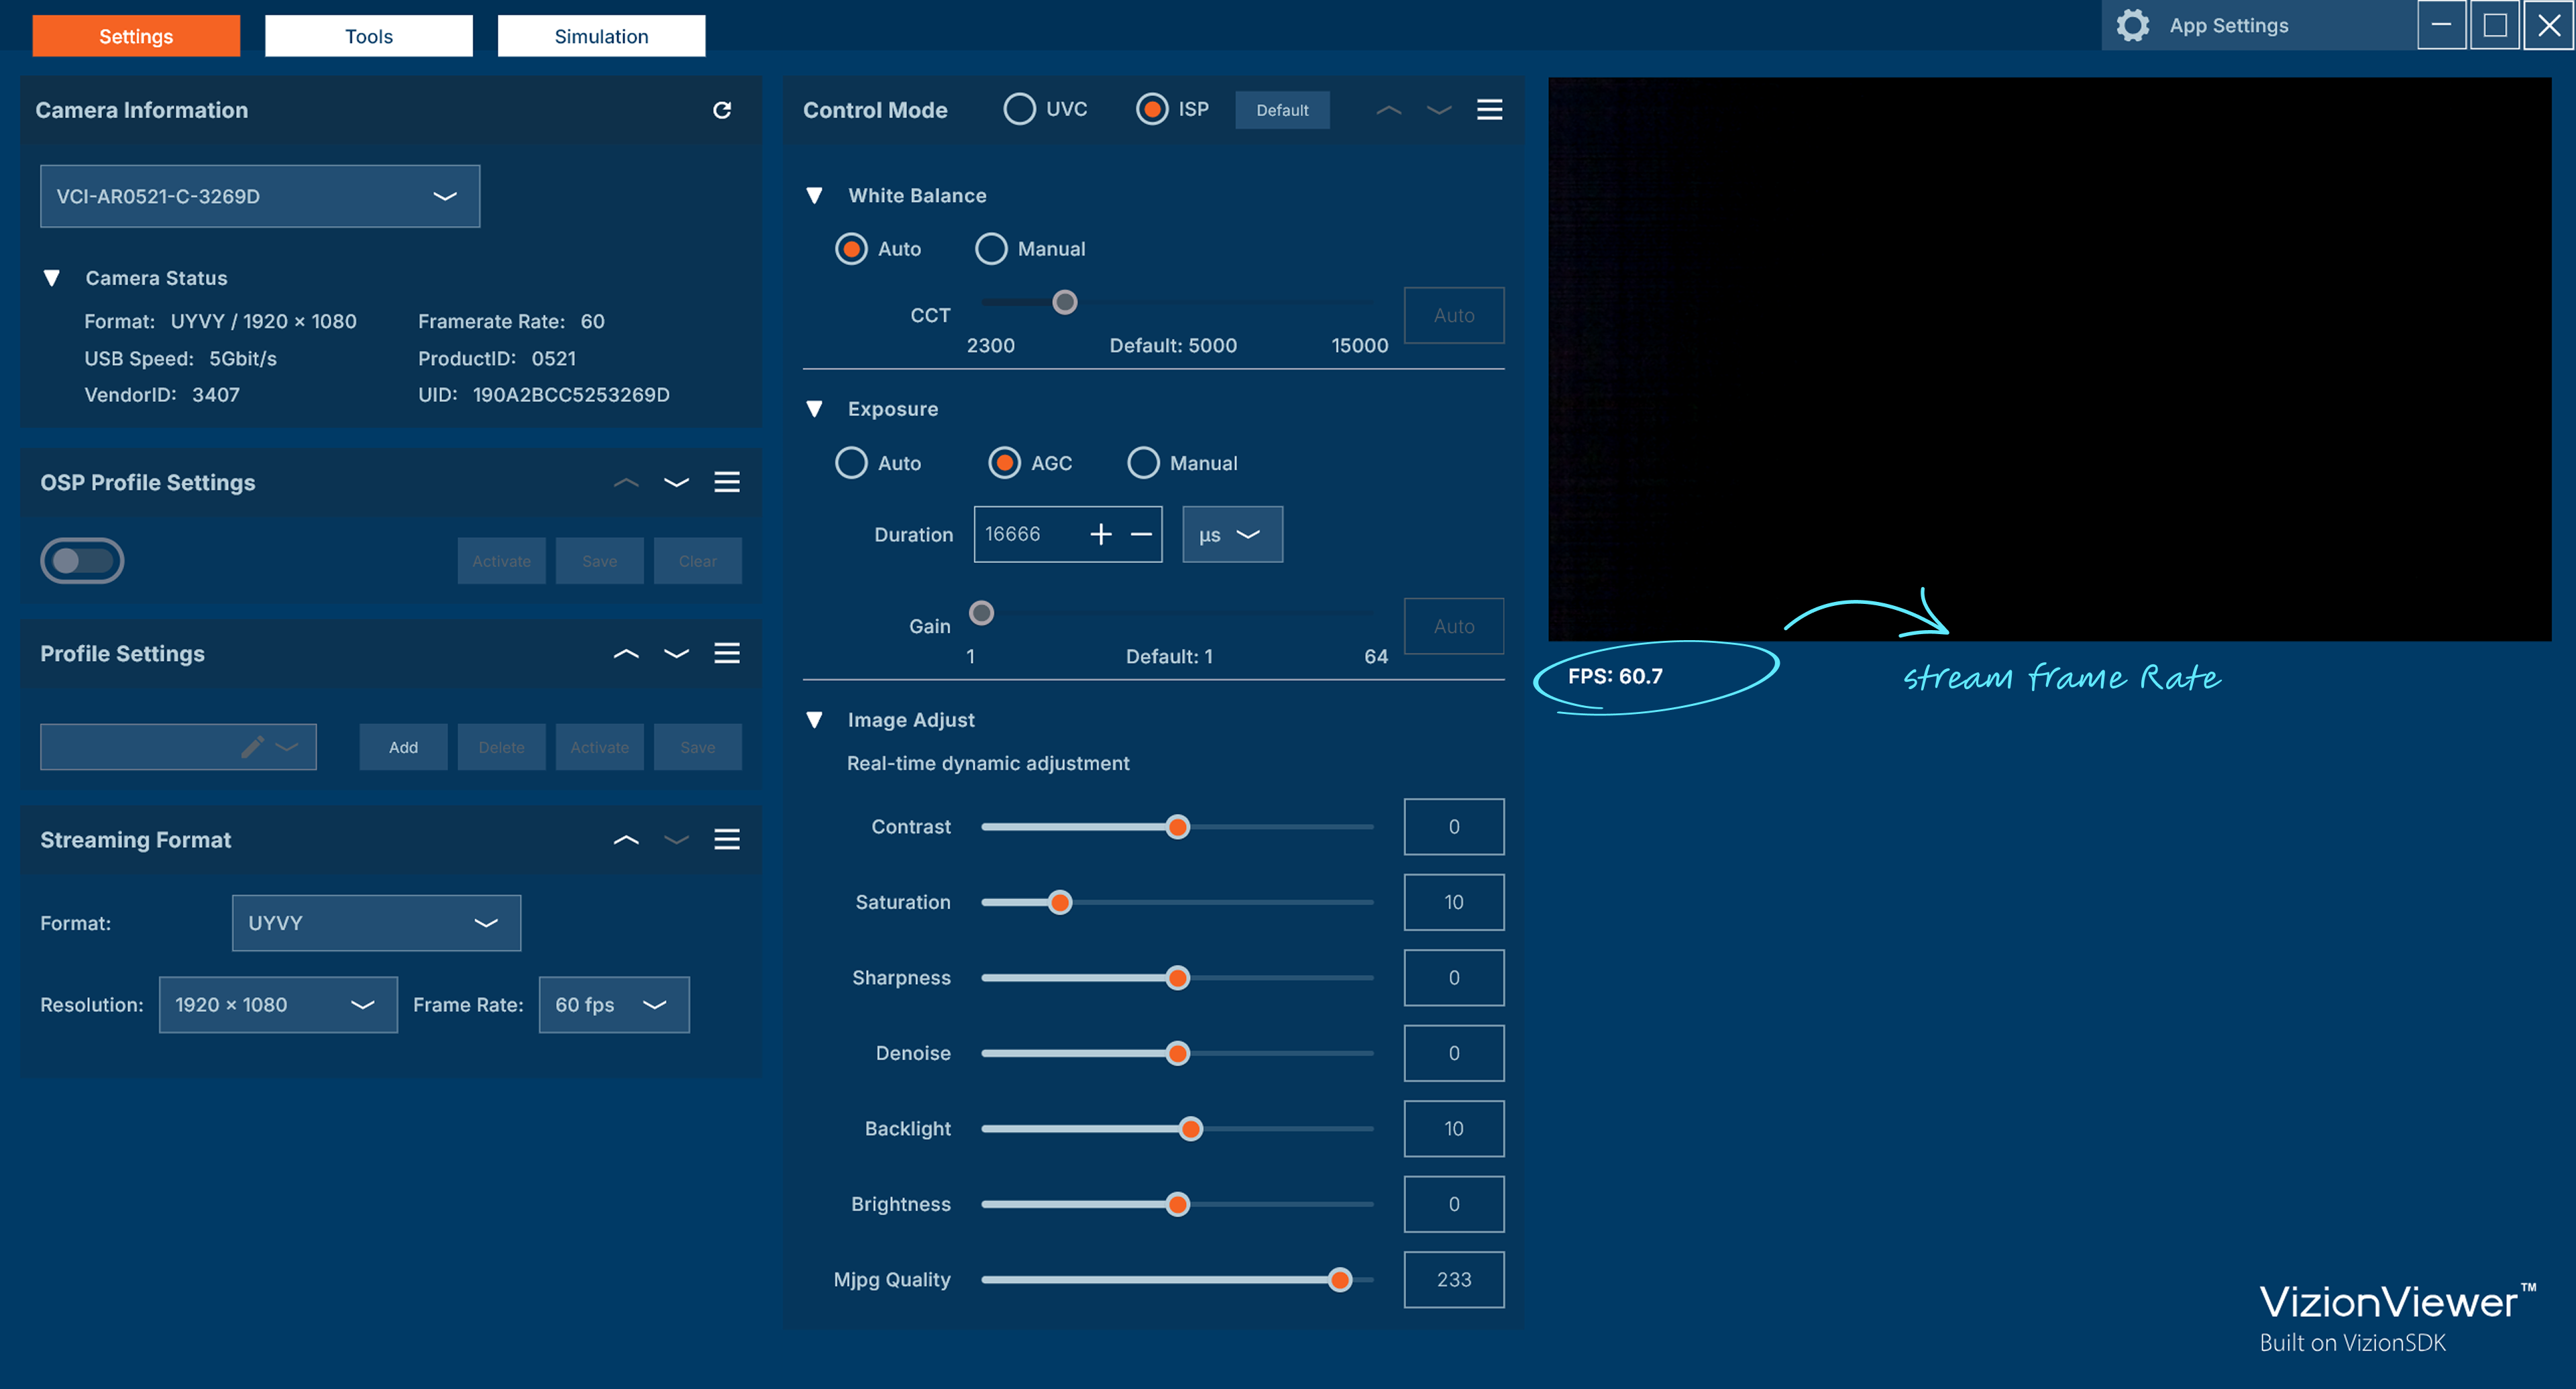
Display the Current Frame Rate Per Second
"Stream Frame Rate" refers to the camera's streaming output rate, not the rendering rate of VizionViewer™.
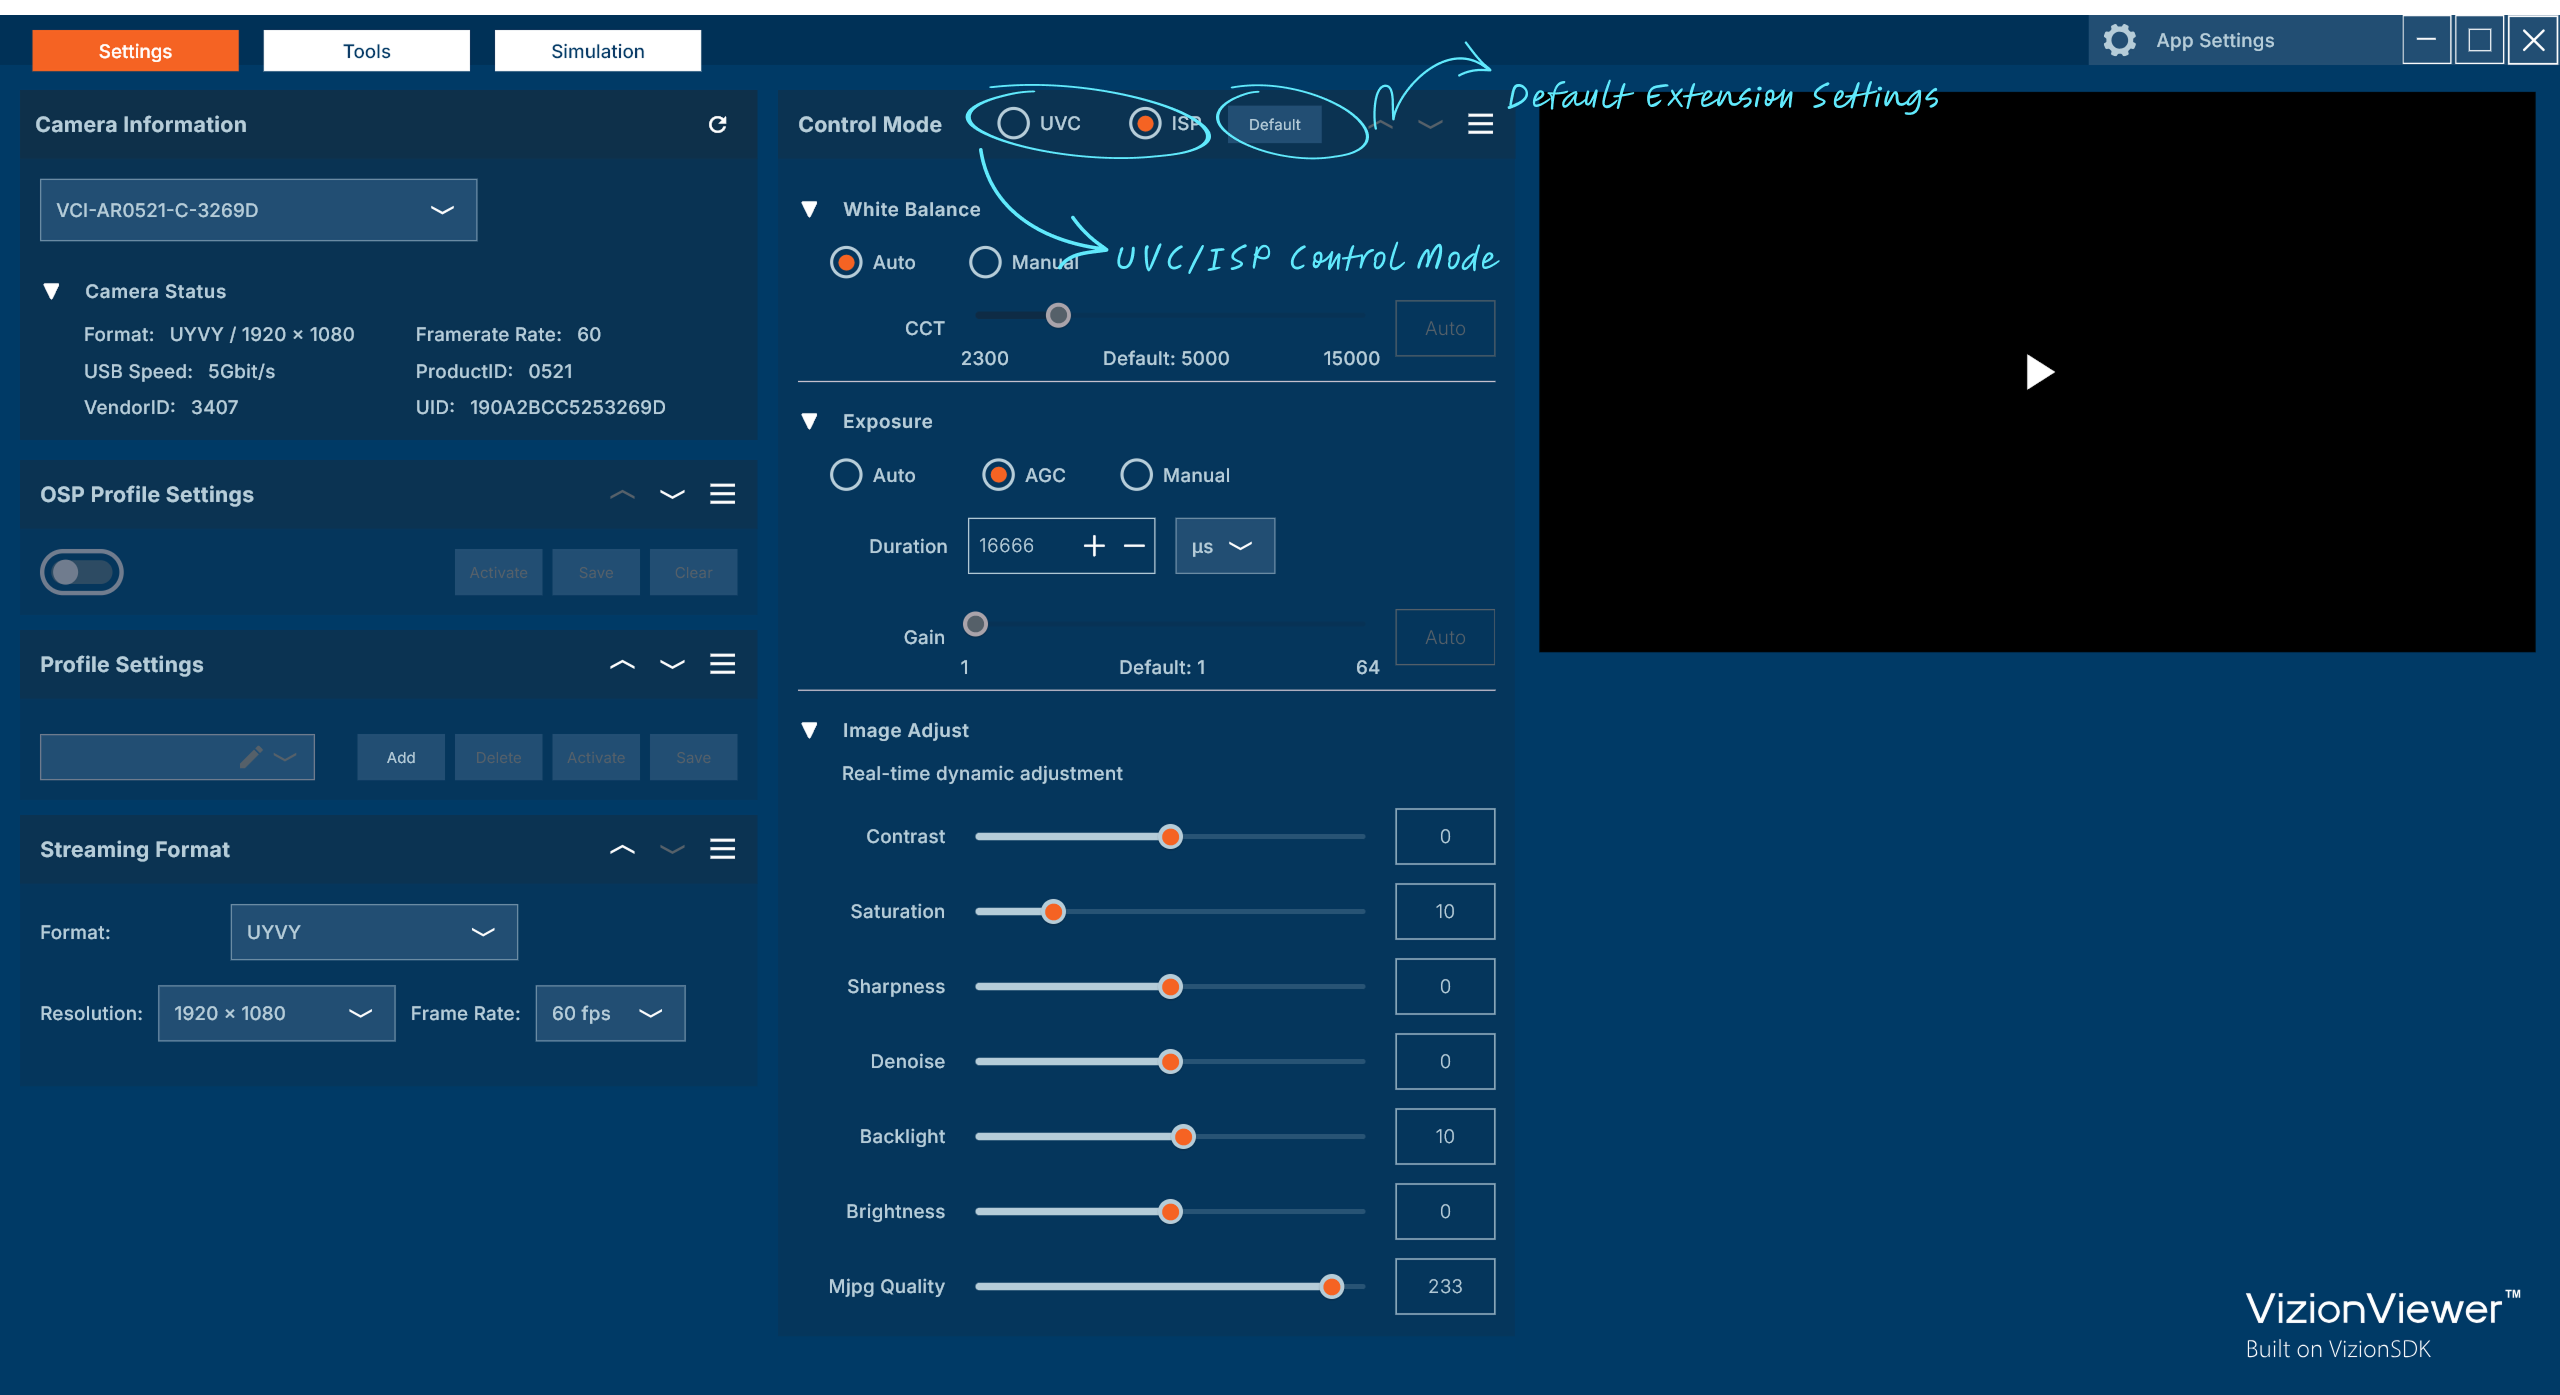
Extension Settings Control
Switching the Control Mode to UVC will reset ISP Extension settings to default. Switching to ISP mode will reset UVC Extension settings to default.
UVC Mode Extensions
Supported controls:
- White Balance (Auto / Manual)
- Exposure / Gain (Auto / Manual)
- Contrast
- Saturation
- Sharpness
- Gamma
- Brightness
- Hue
- Backlight
- Focus
- Iris
- Zoom
- Pan
- Tilt
- Roll
ISP Mode Extensions
White Balance (Auto / Manual)
EHDR Settings (Note: Supported only on device models 0821 and 0822)
- State: Enable / Disable
- Exposure: Set Min/Max Number
- Ratio: Set Min/Max Ratio
Exposure / Gain (Auto / AGC / Manual)
Image Adjustment
Supported controls:
- Contrast
- Saturation
- Sharpness
- Denoise
- Backlight Compensation
- Brightness
- JPEG Quality
- Filter: Apply visual effects (Black and White, Grayscale, Negative, Sketch)
- Flick Mode: Reduce flickering under artificial lighting (Disable, 50Hz, 60Hz, Auto)
Region of Interest
Control the camera's field of view:
- Zoom: Adjust the zoom level
- Pan: Move the view horizontally
- Tilt: Move the view vertically
- Flip Mode: Rotate or mirror the image (Vertical, Horizontal, Rotate 180°)
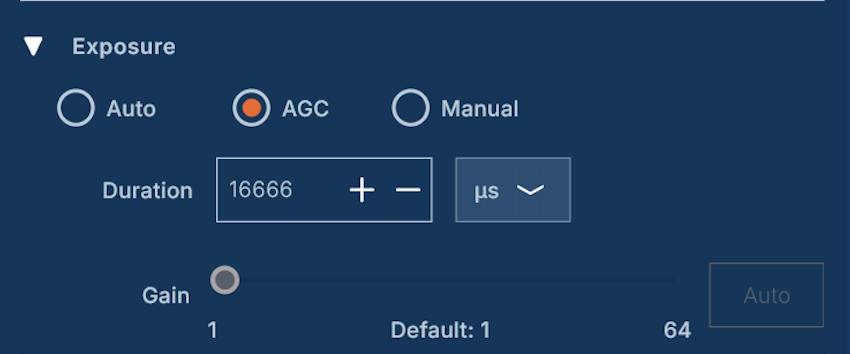
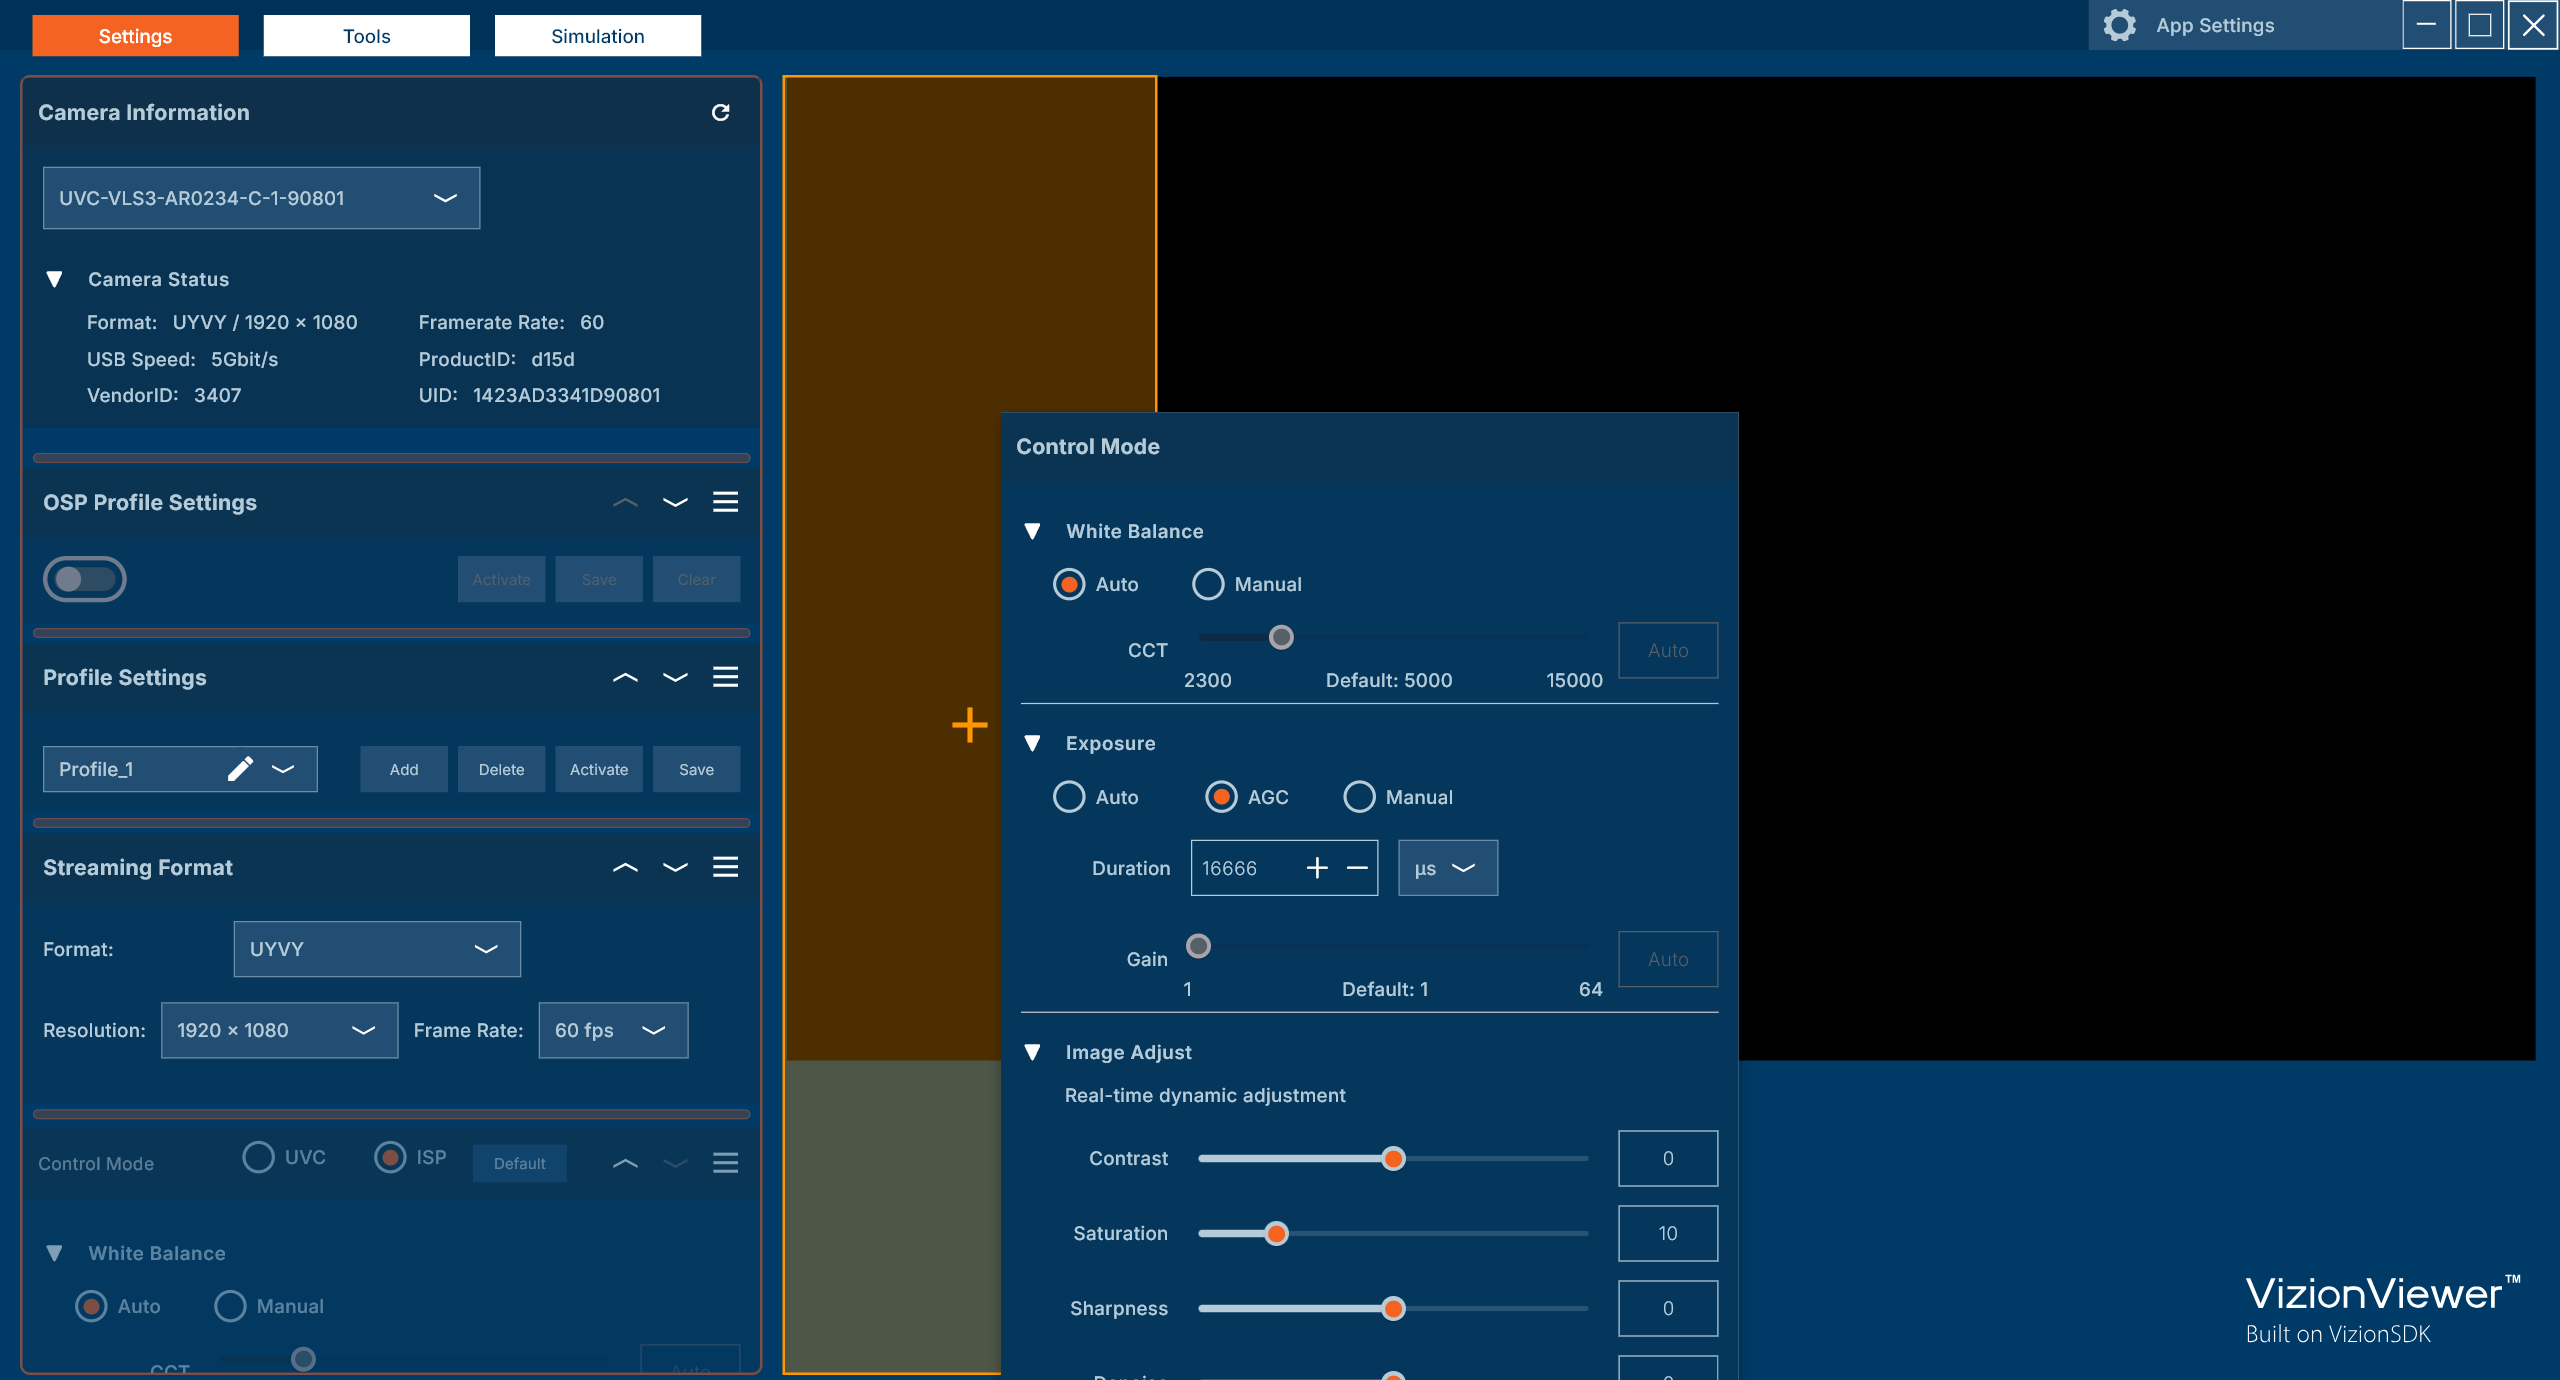
Set Up AGC Exposure Mode to Maintain Constant Framerate
For low-light applications, the camera increases exposure time in automatic exposure mode to maintain image quality.
You can switch to AGC exposure mode to keep the framerate constant.
Auto gain control, manual exposure time.
When AGC mode is enabled, gain is set automatically. The initial exposure value adjusts based on the current streaming framerate to maintain a constant framerate.
Limit Exposure Range in Auto Exposure Mode
(Default Exposure Range) When switching to Auto Exposure Mode, the Exposure Time Range is automatically set to the default range based on the selected streaming format.
You can limit the exposure range even in Auto Exposure Mode. This is useful when you want to avoid overexposure or motion blur in specific lighting conditions. The default exposure range varies depending on the selected resolution and framerate.
The current Exposure Time and Exposure Gain values are displayed after the camera starts streaming and are updated every second to reflect real-time changes.

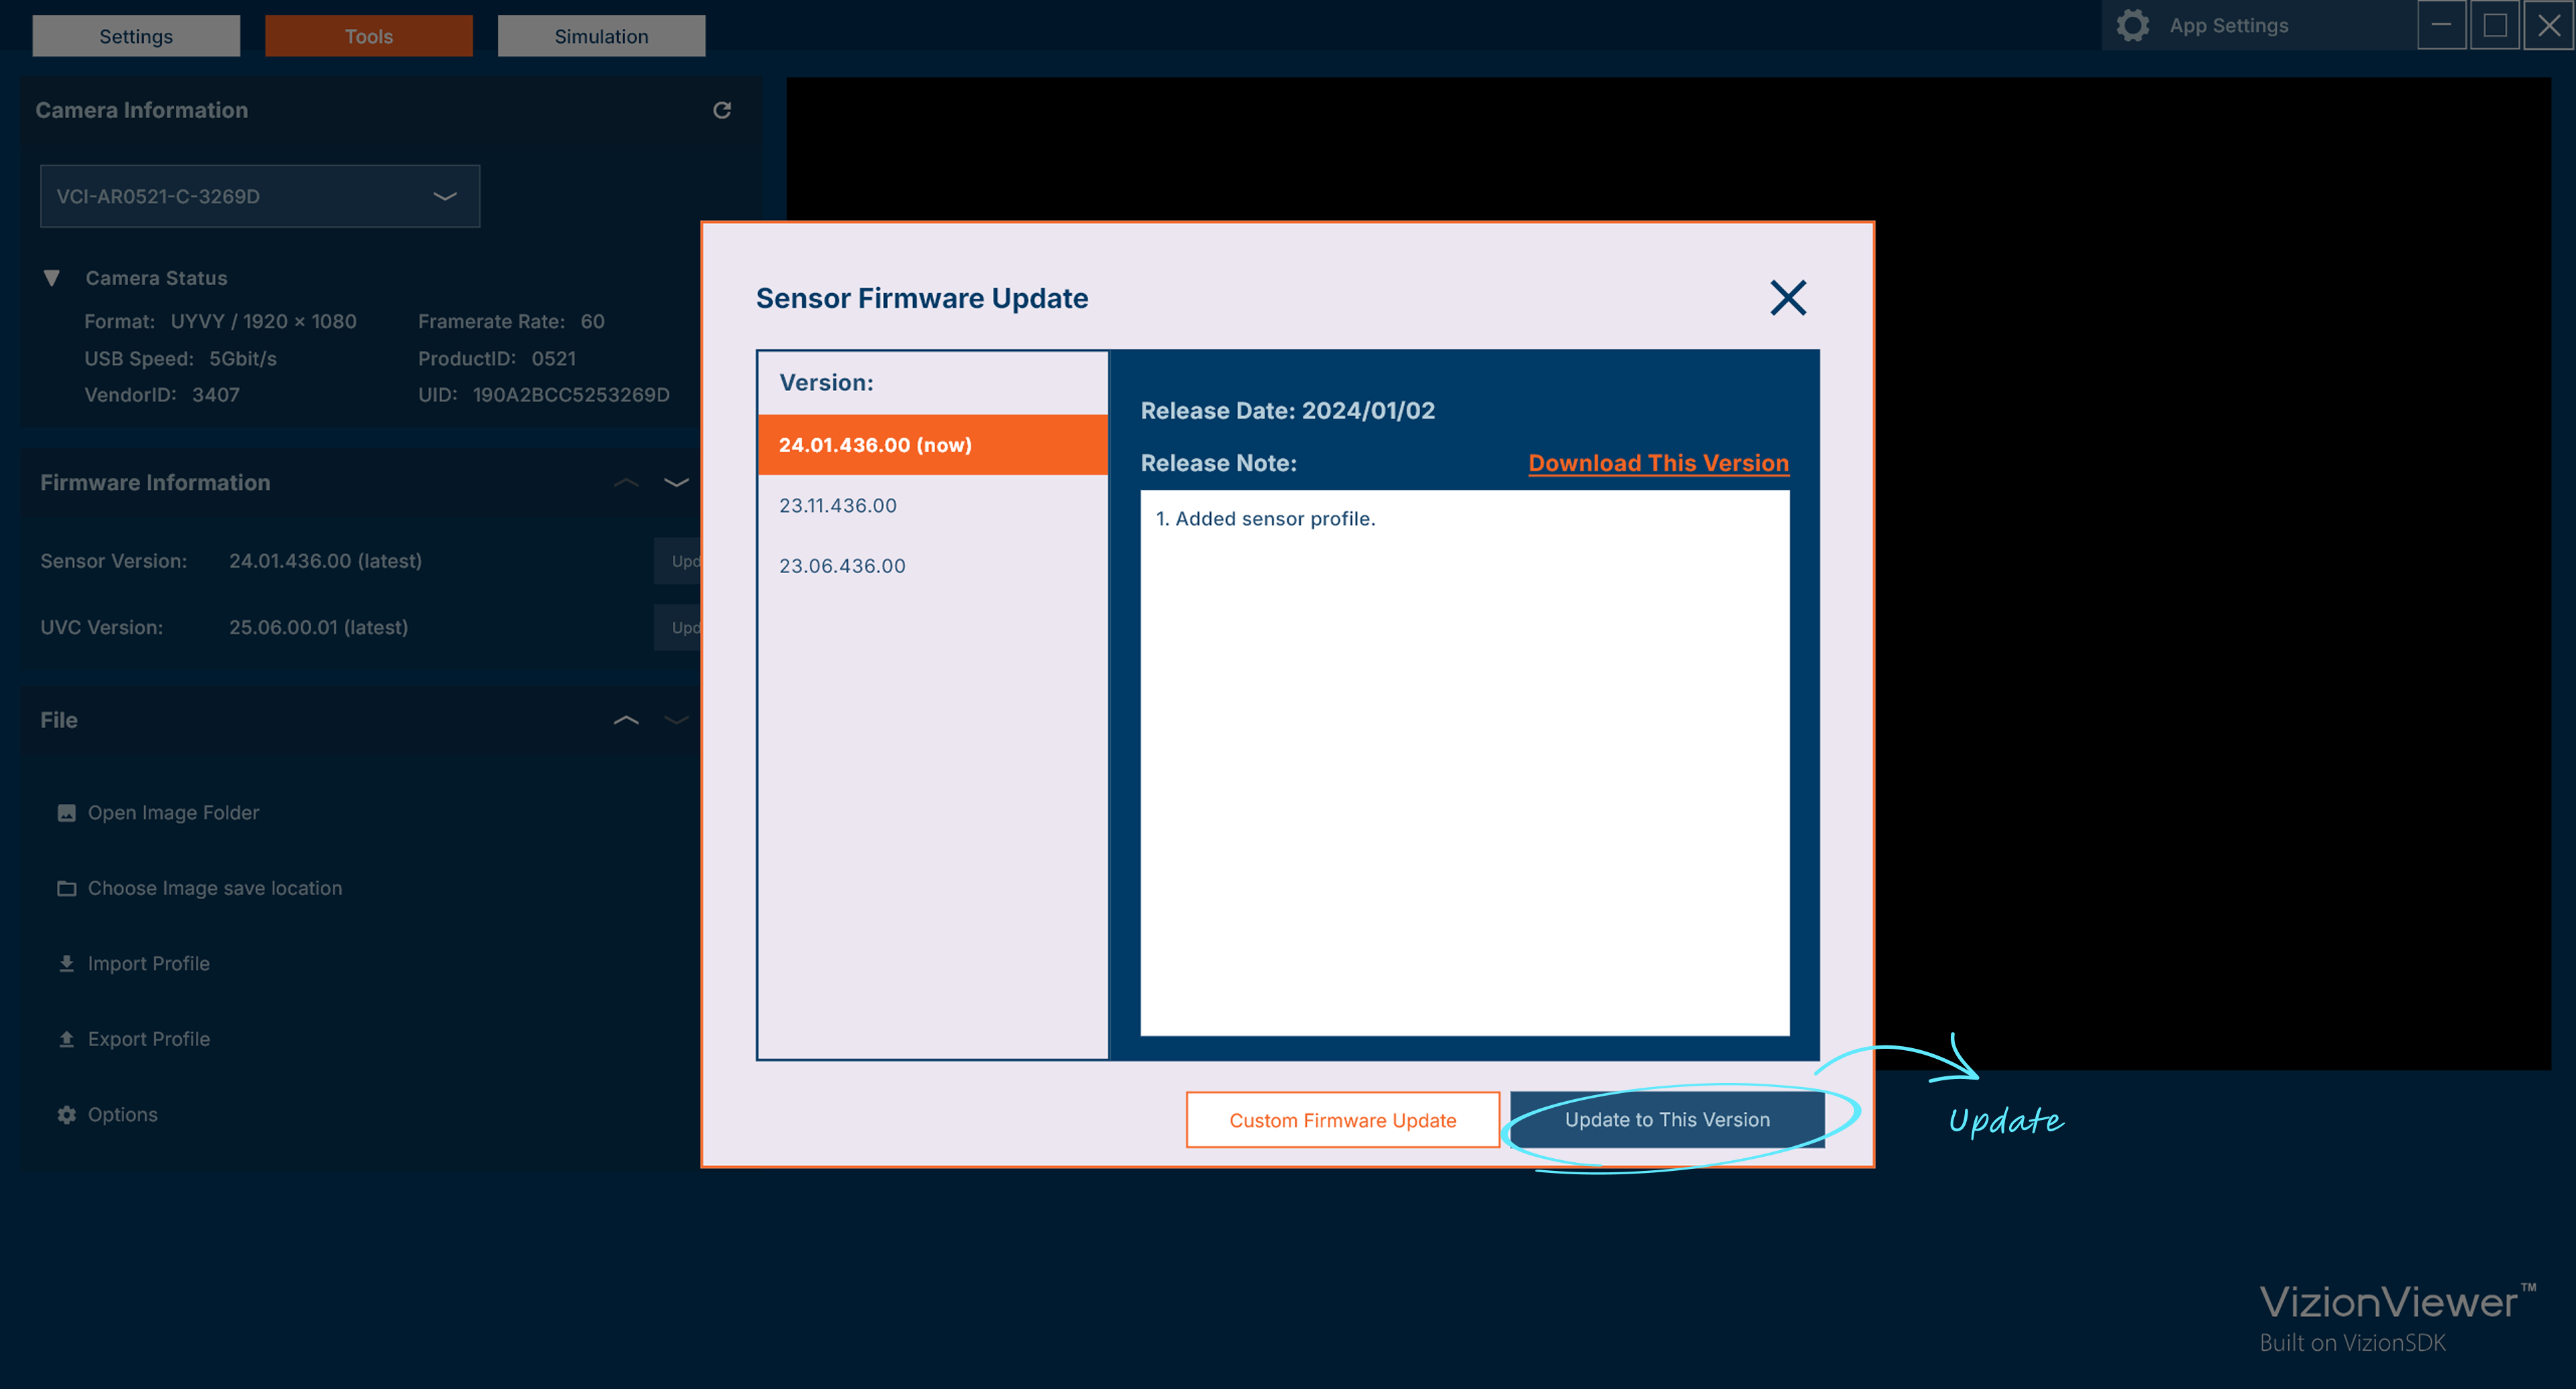
Update Technexion Camera Firmware
If firmware updates are available for the selected camera, the Update button becomes enabled. You can:
- Update your camera's firmware directly
- Download firmware for later installation

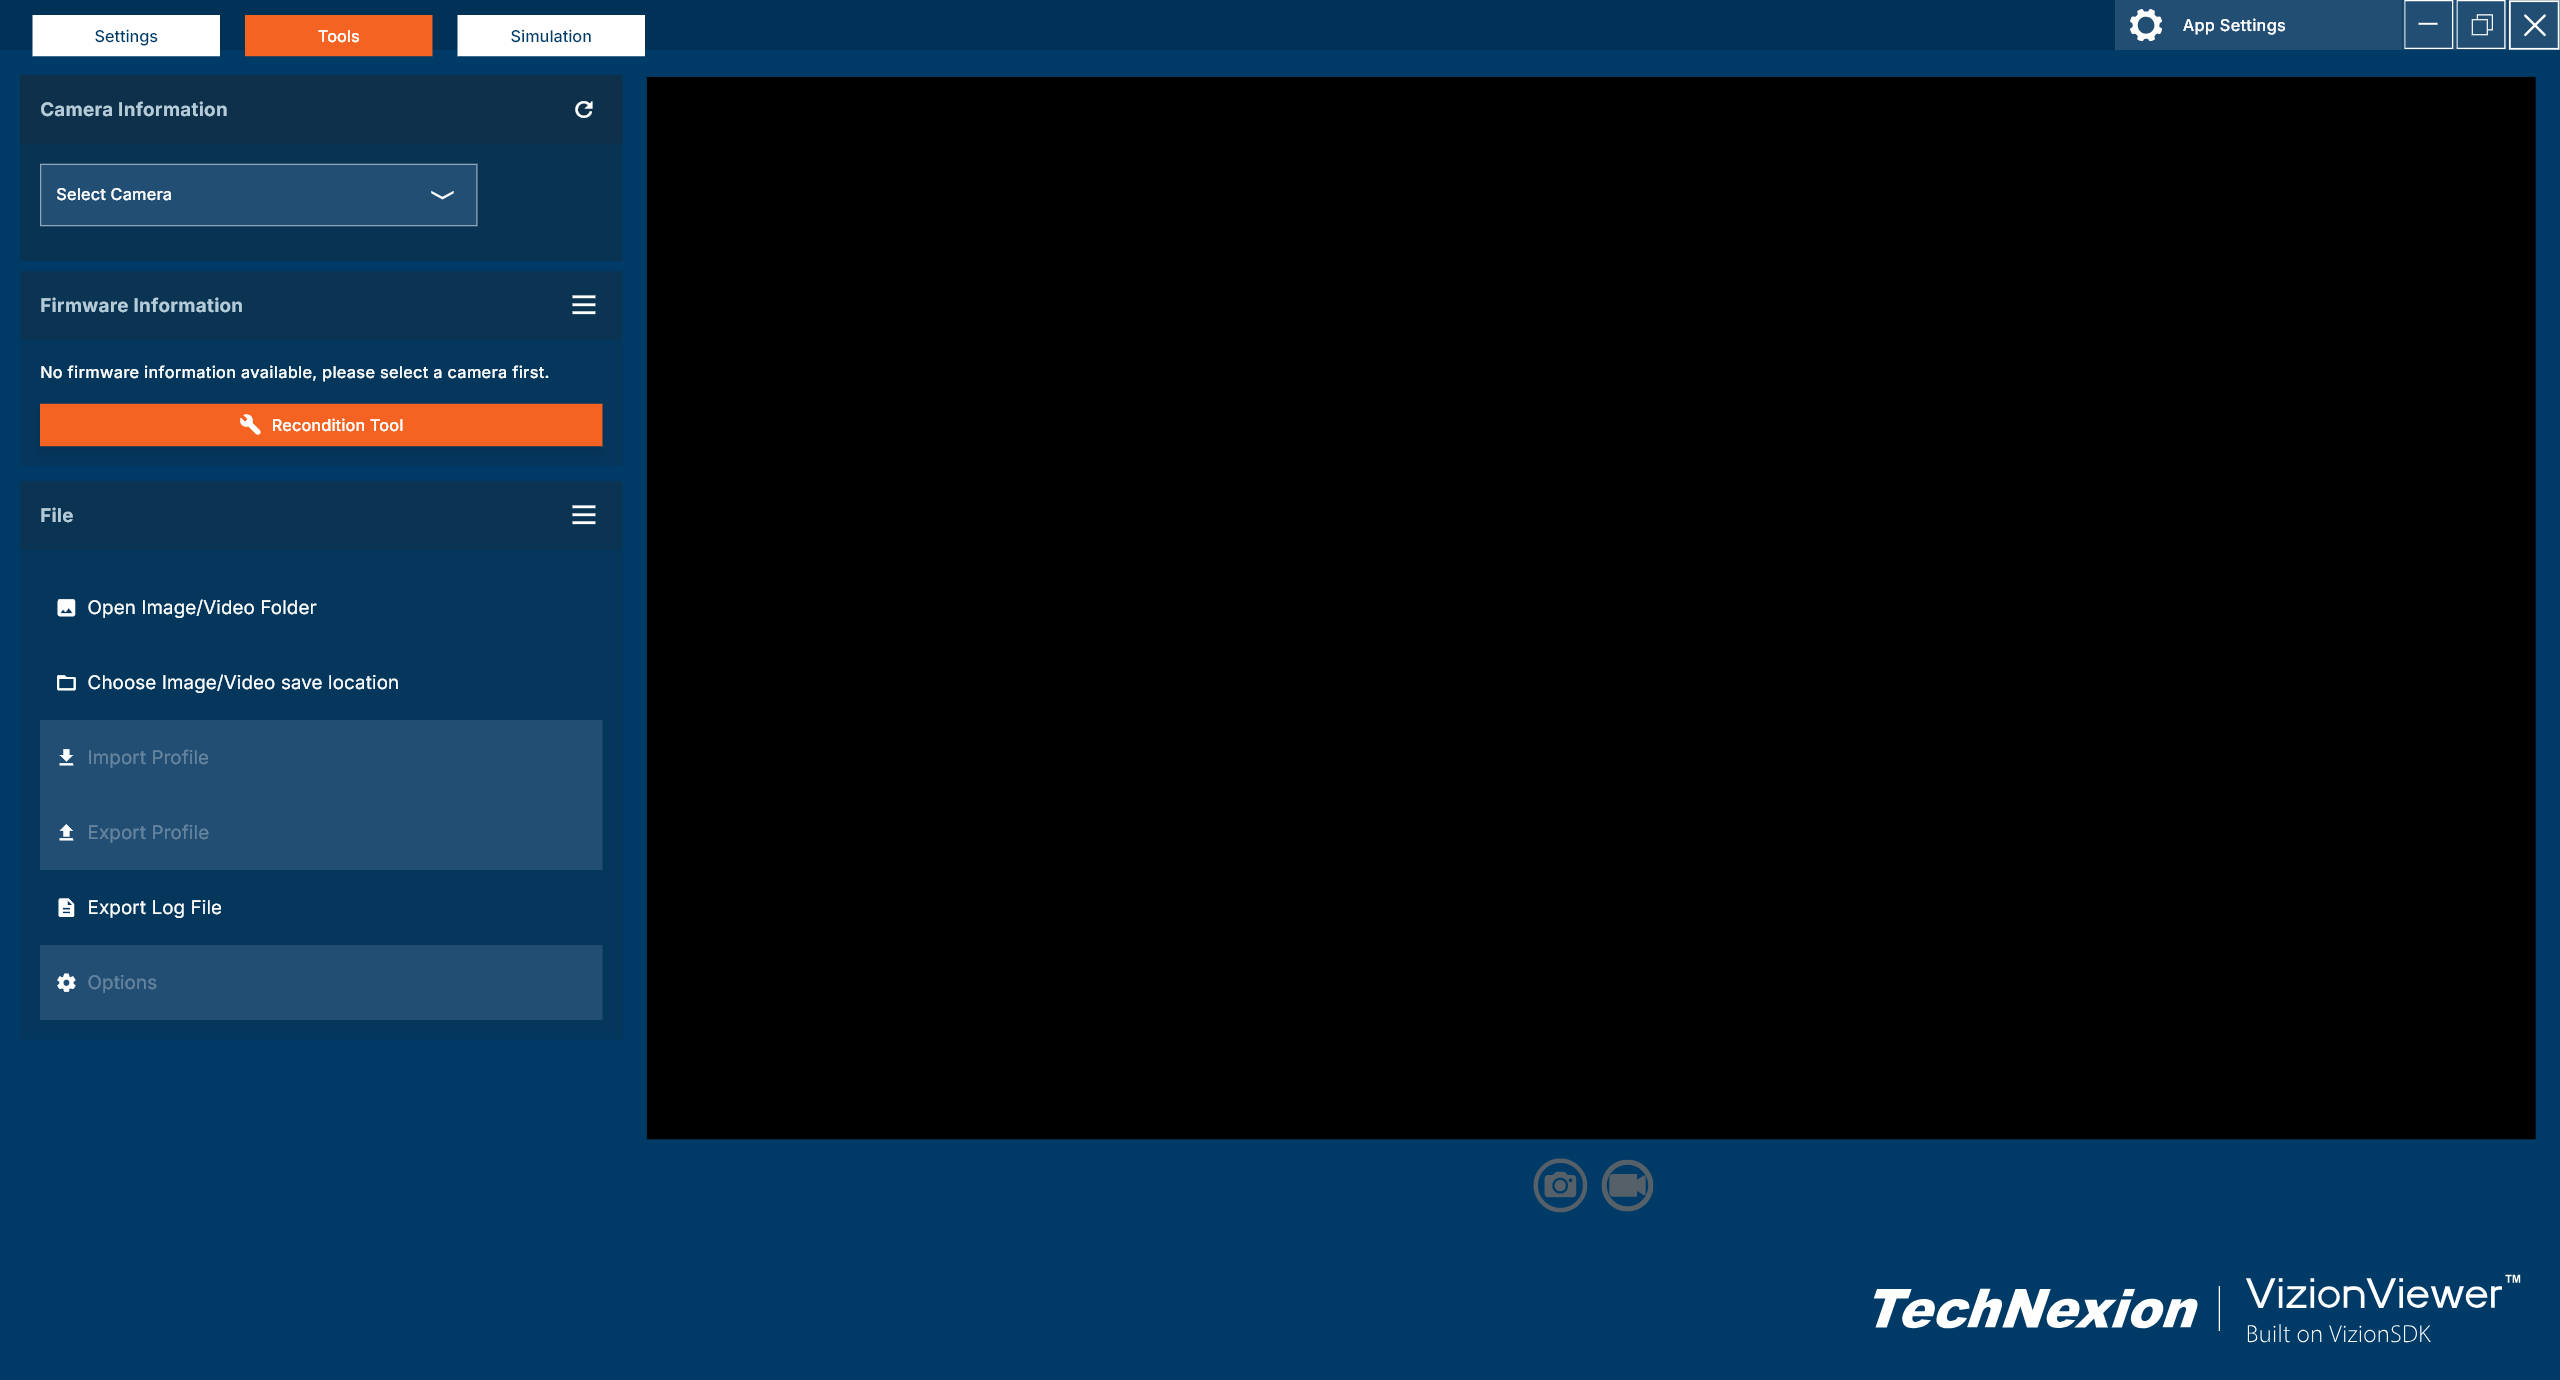
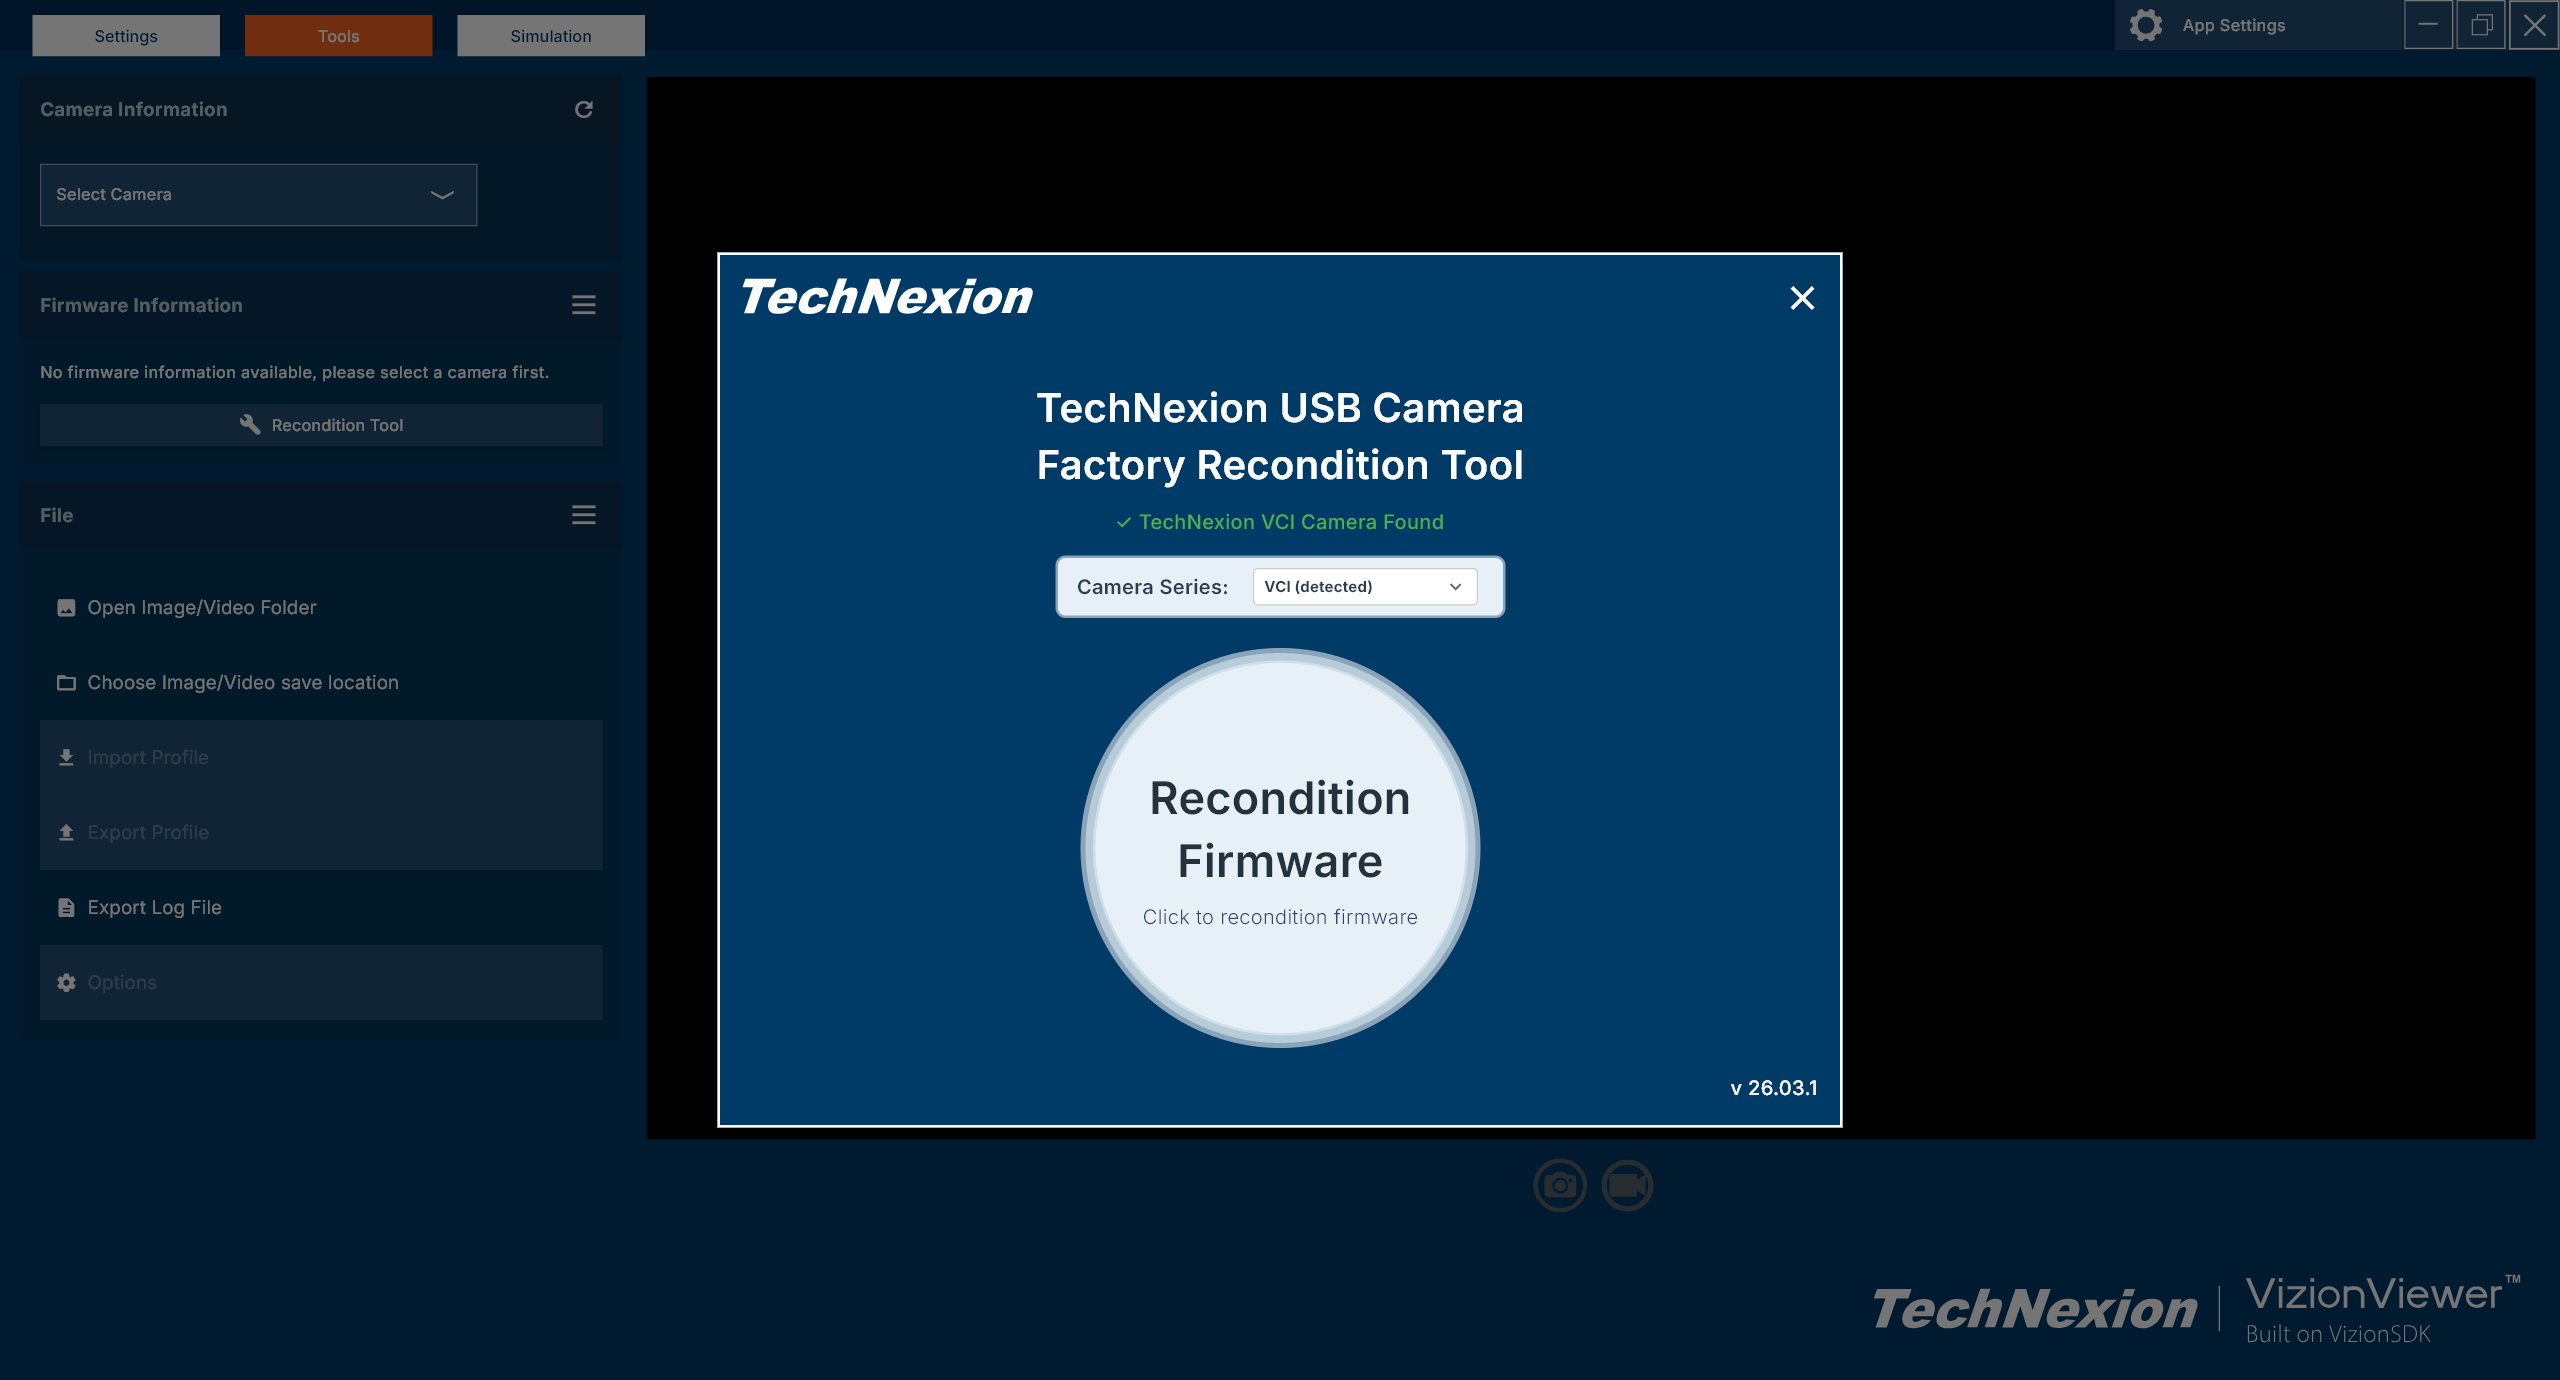
Recondition Tool
The Recondition Tool restores UVC cameras to factory settings — useful when a camera is misconfigured, unresponsive, or needs to be redeployed. It also supports serdes cameras via single-port USB serdes framegrabbers. Open it from the Recondition Tool button in the Firmware Information section.
Supported Products
| Product Type | Description |
|---|---|
| VCI series VCS series VCM series | USB3 cameras based on TEVI/TEVS/TEVM series image sensors. Also includes UVCI/UVCS/UVCM series (version without enclosure). |
| UVC-VLS3 UVC-VLM3 | (FPD Link III) series cameras using a single-port USB to FPD Link III frame grabber. |
| UVC-VLS-GM2 UVC-VLM-GM2 | VLS-GM2/VLM-GM2 (GMSL2) series cameras using a single-port USB to GMSL2 frame grabber. |
Manage OS Profiles
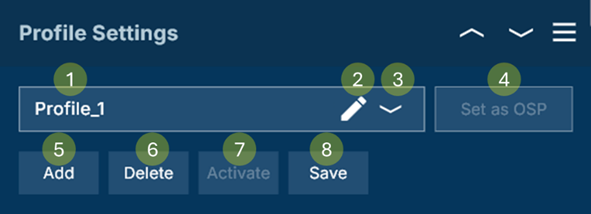
Profiles allow you to save video stream and extension settings for your camera. You can create and name multiple profiles for different scenarios, making it easy to apply predefined configurations.
| # | Item | Description |
|---|---|---|
| ① | Profile Name | The name assigned to this configuration profile. |
| ② | Modify | Click to edit the profile name. |
| ③ | Dropdown list | List all profiles on the local platform that match this sensor. |
| ④ | Set as OSP | Activates and saves the profile, then copies it to OSP. The button can only be pressed when camera is streaming. |
| ⑤ | Add | Creates a new configuration profile. |
| ⑥ | Delete | Deletes the currently selected configuration profile. |
| ⑦ | Activate | Enables the selected configuration profile. |
| ⑧ | Save | Saves the currently selected configuration profile. |
Manage OSP (On Sensor Profile)
Store profiles directly on the sensor. The camera will automatically apply your preset profile upon startup.

| # | Item | Description |
|---|---|---|
| ① | Profile Name | The name assigned to this configuration profile. Default as OSP_{last5 characters of uid} |
| ② | Modify | Click to edit the profile name. |
| ③ | Set as Profile | Activate and save the OSP setting, then create a new profile and copy the configuration for storage. If a profile with the same name already exists, it will be overwritten. |
| ④ | Activate | Enables the OSP profile. |
| ⑤ | Save | Saves the currently modified settings. |
| ⑥ | Clear | Reverts all unsaved changes. |
GMSL Margin Test
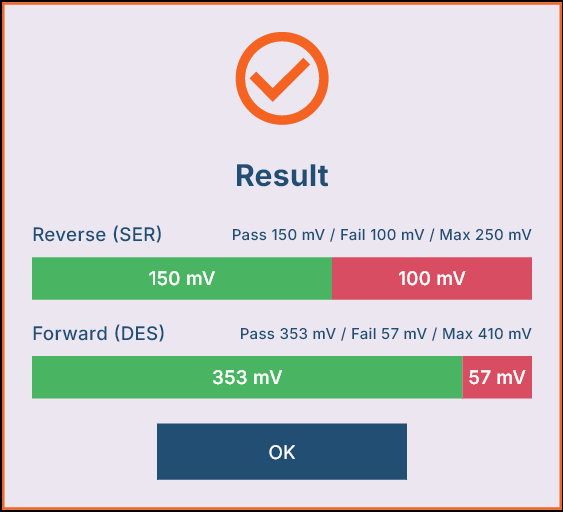
Measures the forward (DES) and reverse (SER) link margin to verify signal integrity between the serializer and deserializer.
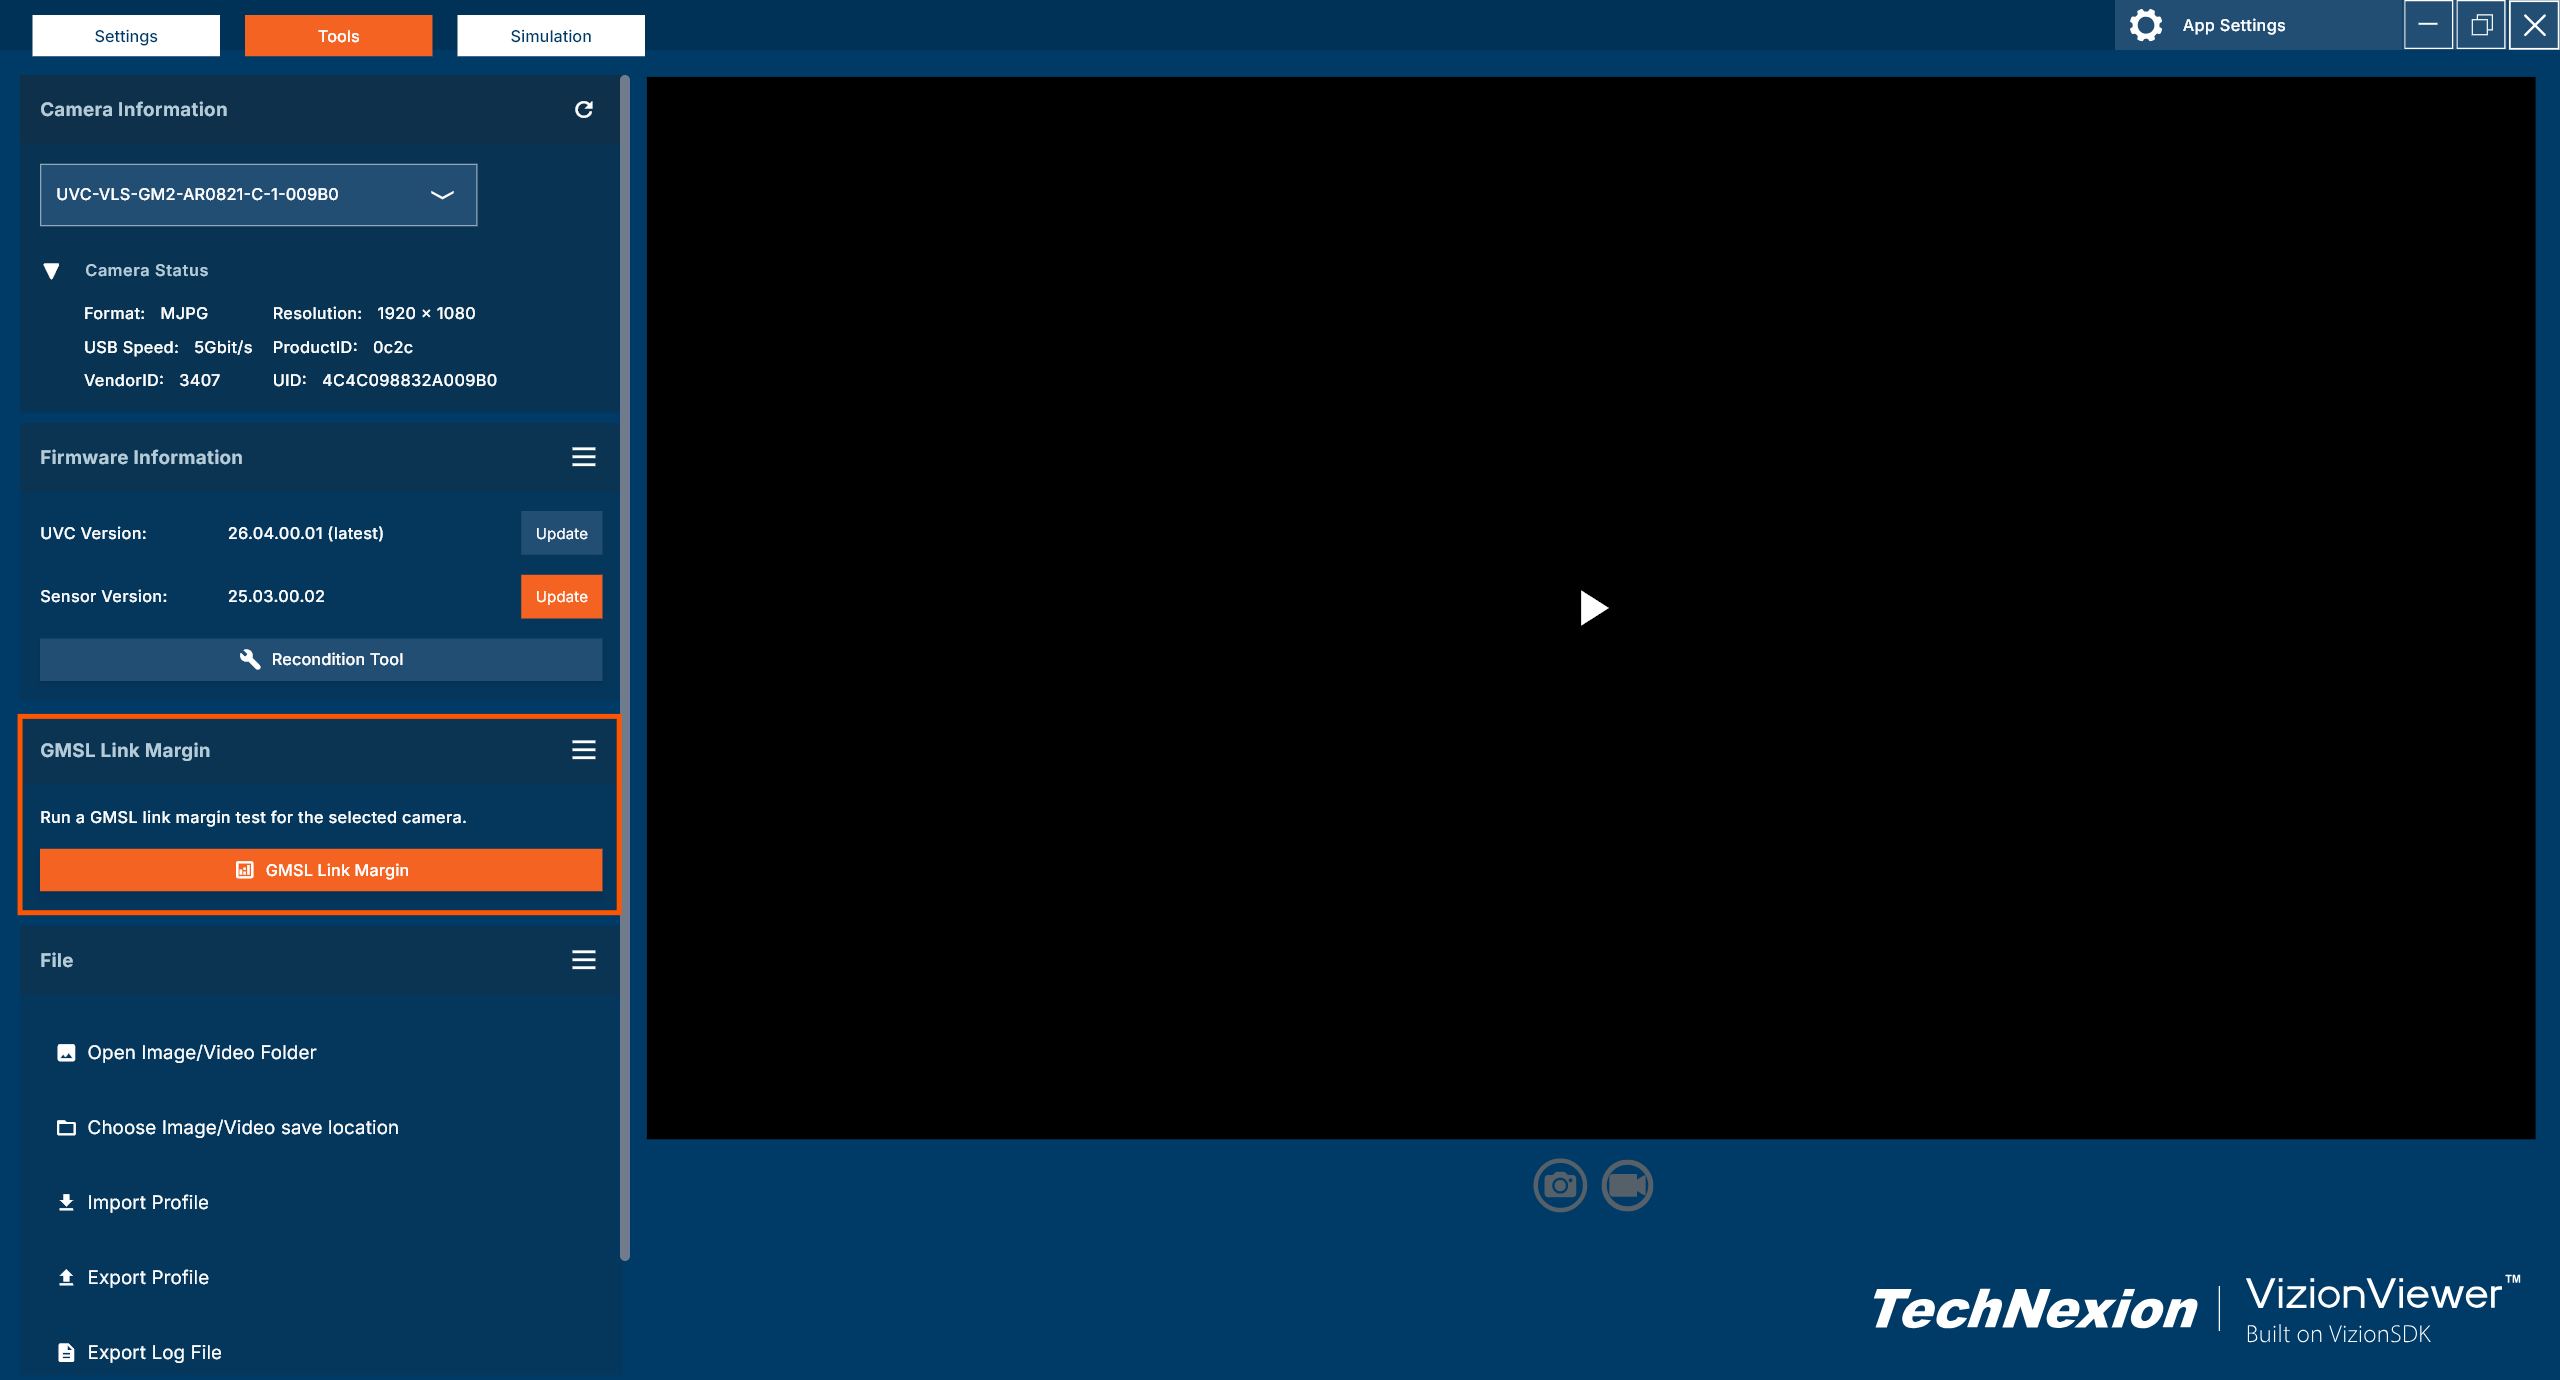
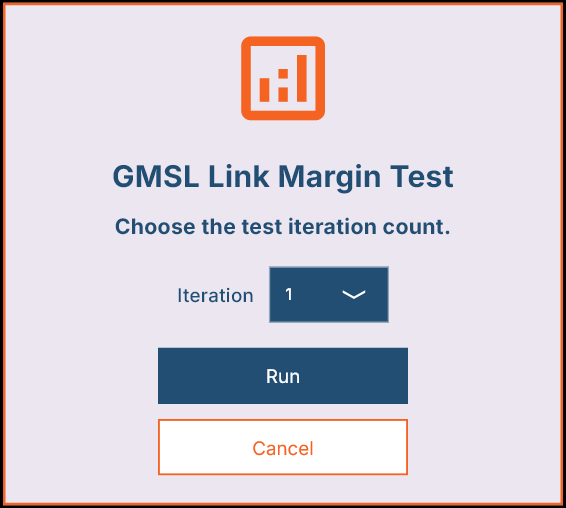
Click the button to open the test dialog, select the number of iterations (1–3), then click Run to start the test.
Result Example
Preview Features
Grid Overlay
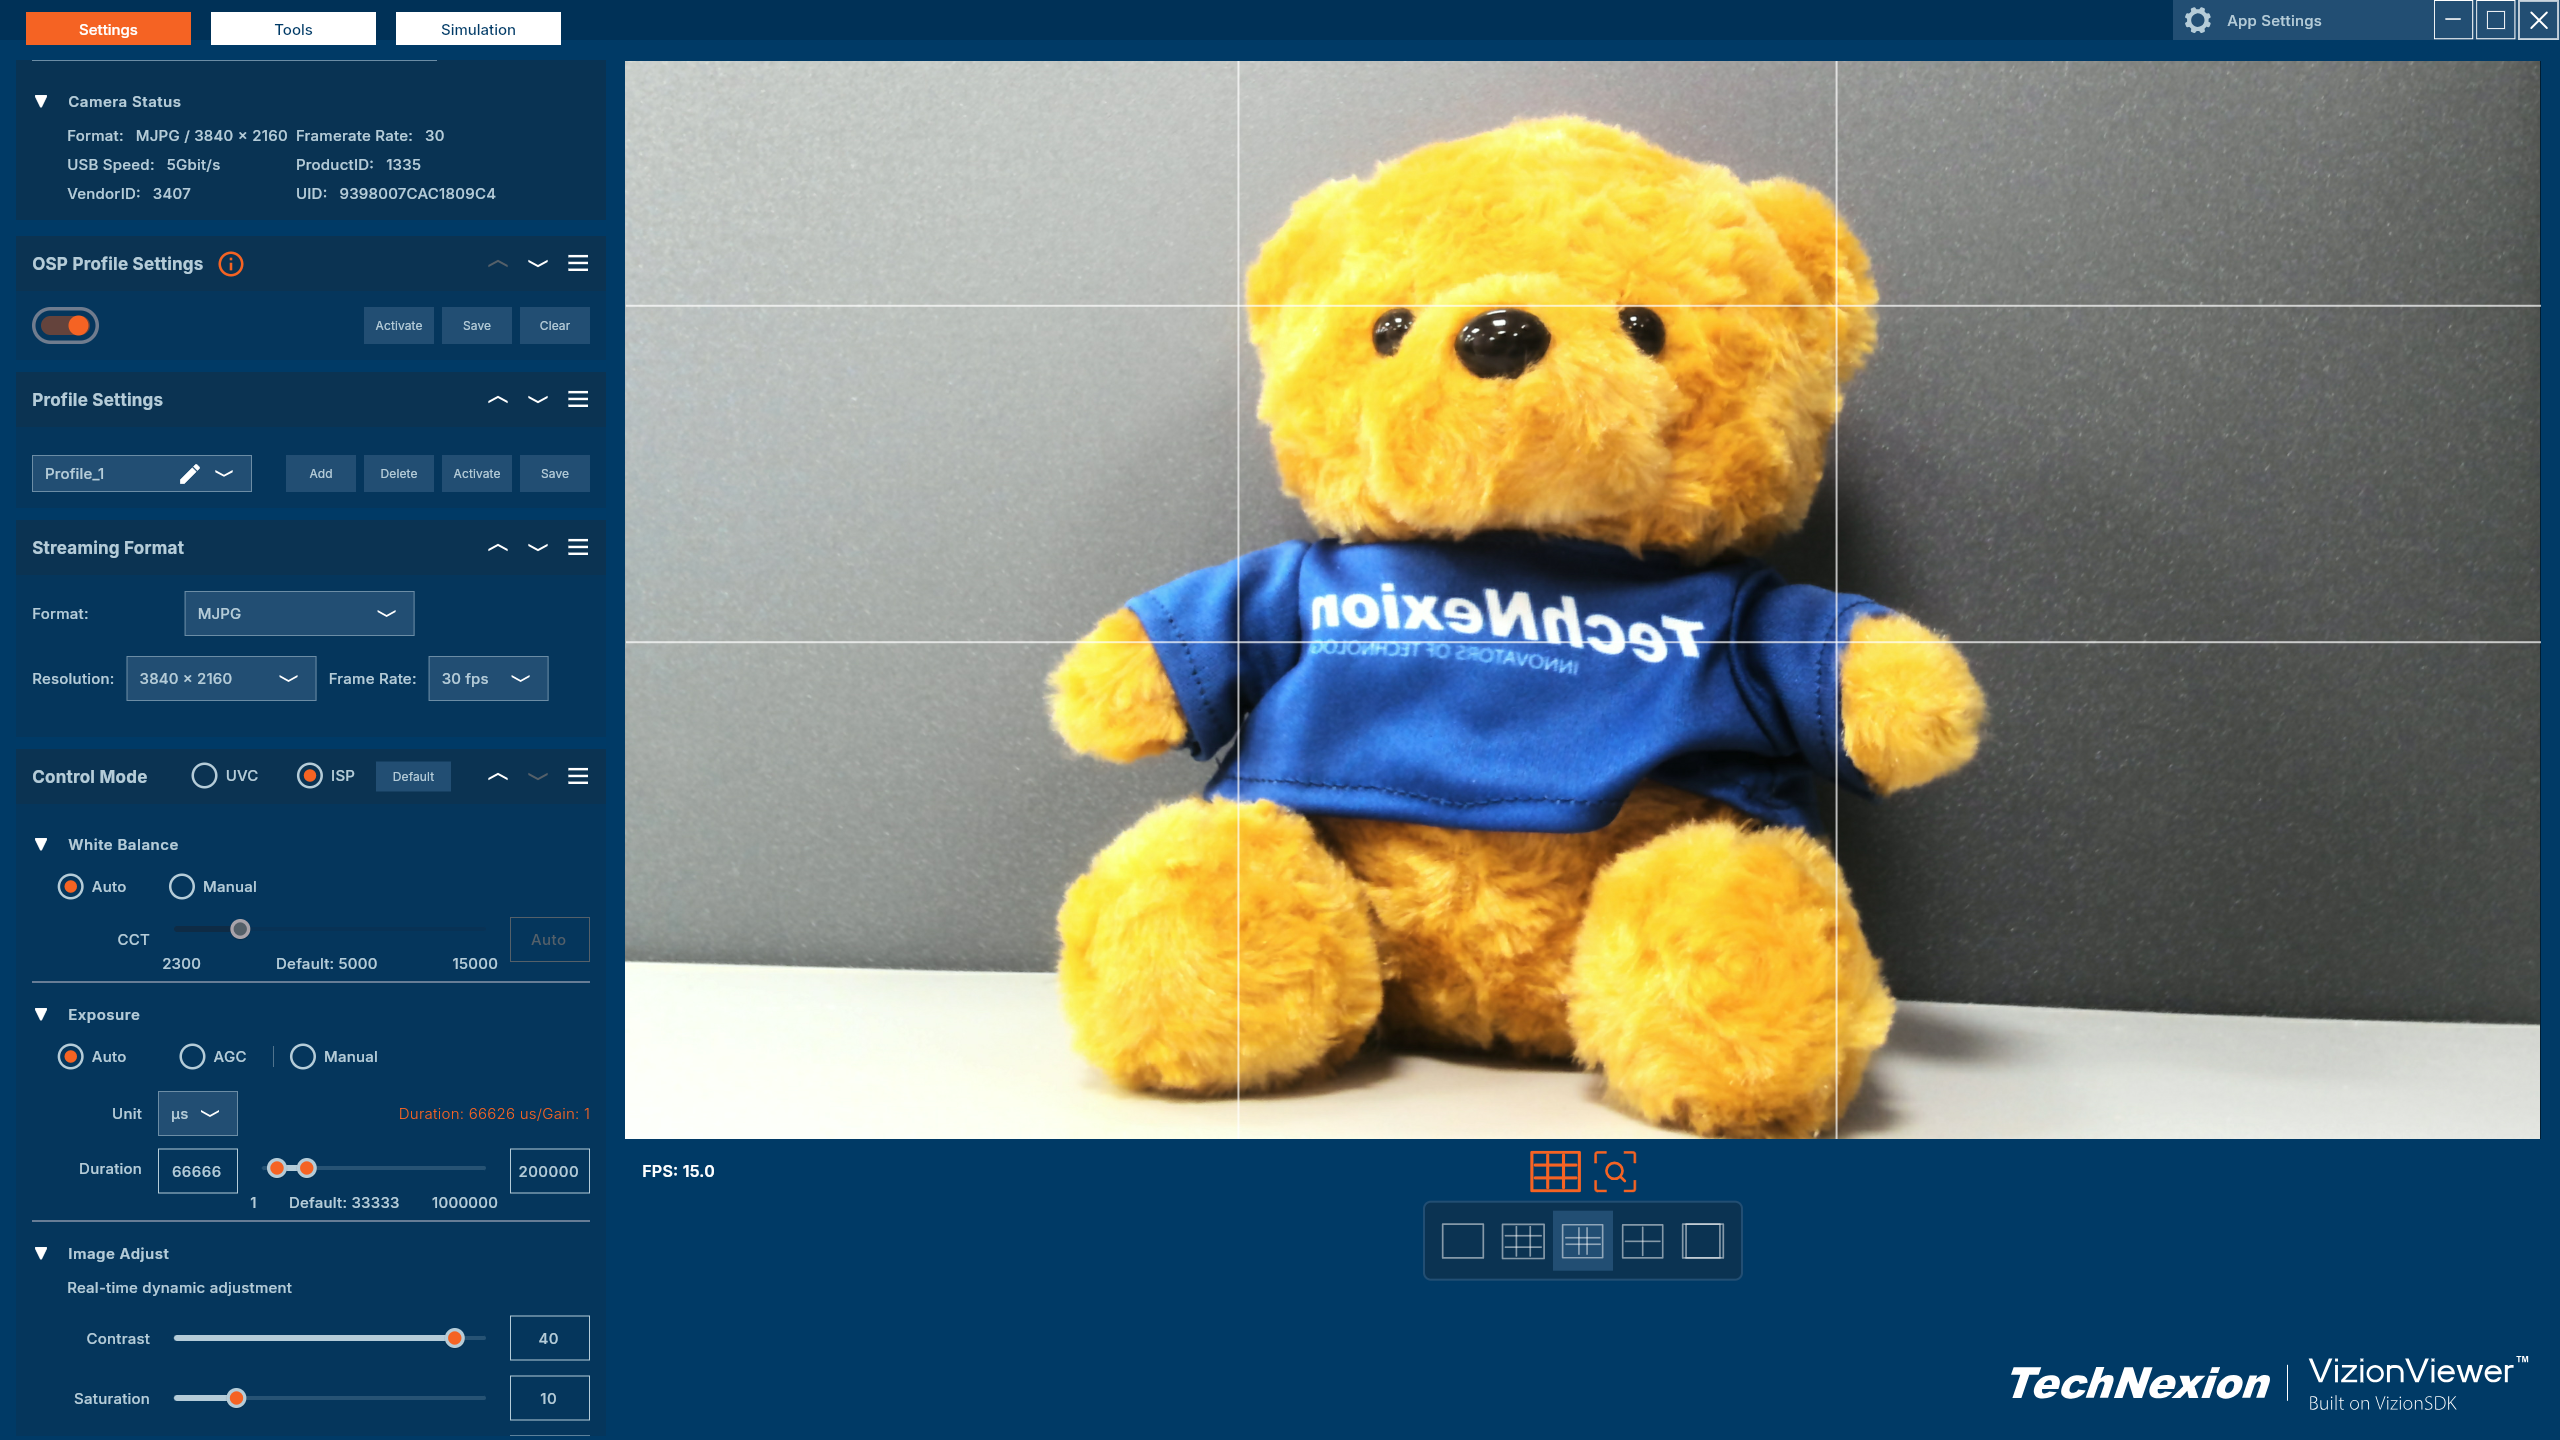
Display composition guides on the camera preview to help with framing and alignment. Choose from multiple grid types:
- Off: No grid overlay
- Rule of Thirds: Classic 3×3 grid for balanced composition
- Golden Ratio: Grid based on the golden ratio for aesthetic framing
- Crosshairs: Center cross for precise alignment
- Square: Centered square guide
IMU 3D Preview
This feature is only available on VCM/TEVM cameras.
- Enable IMU 3D Preview: Click the button to enable the feature
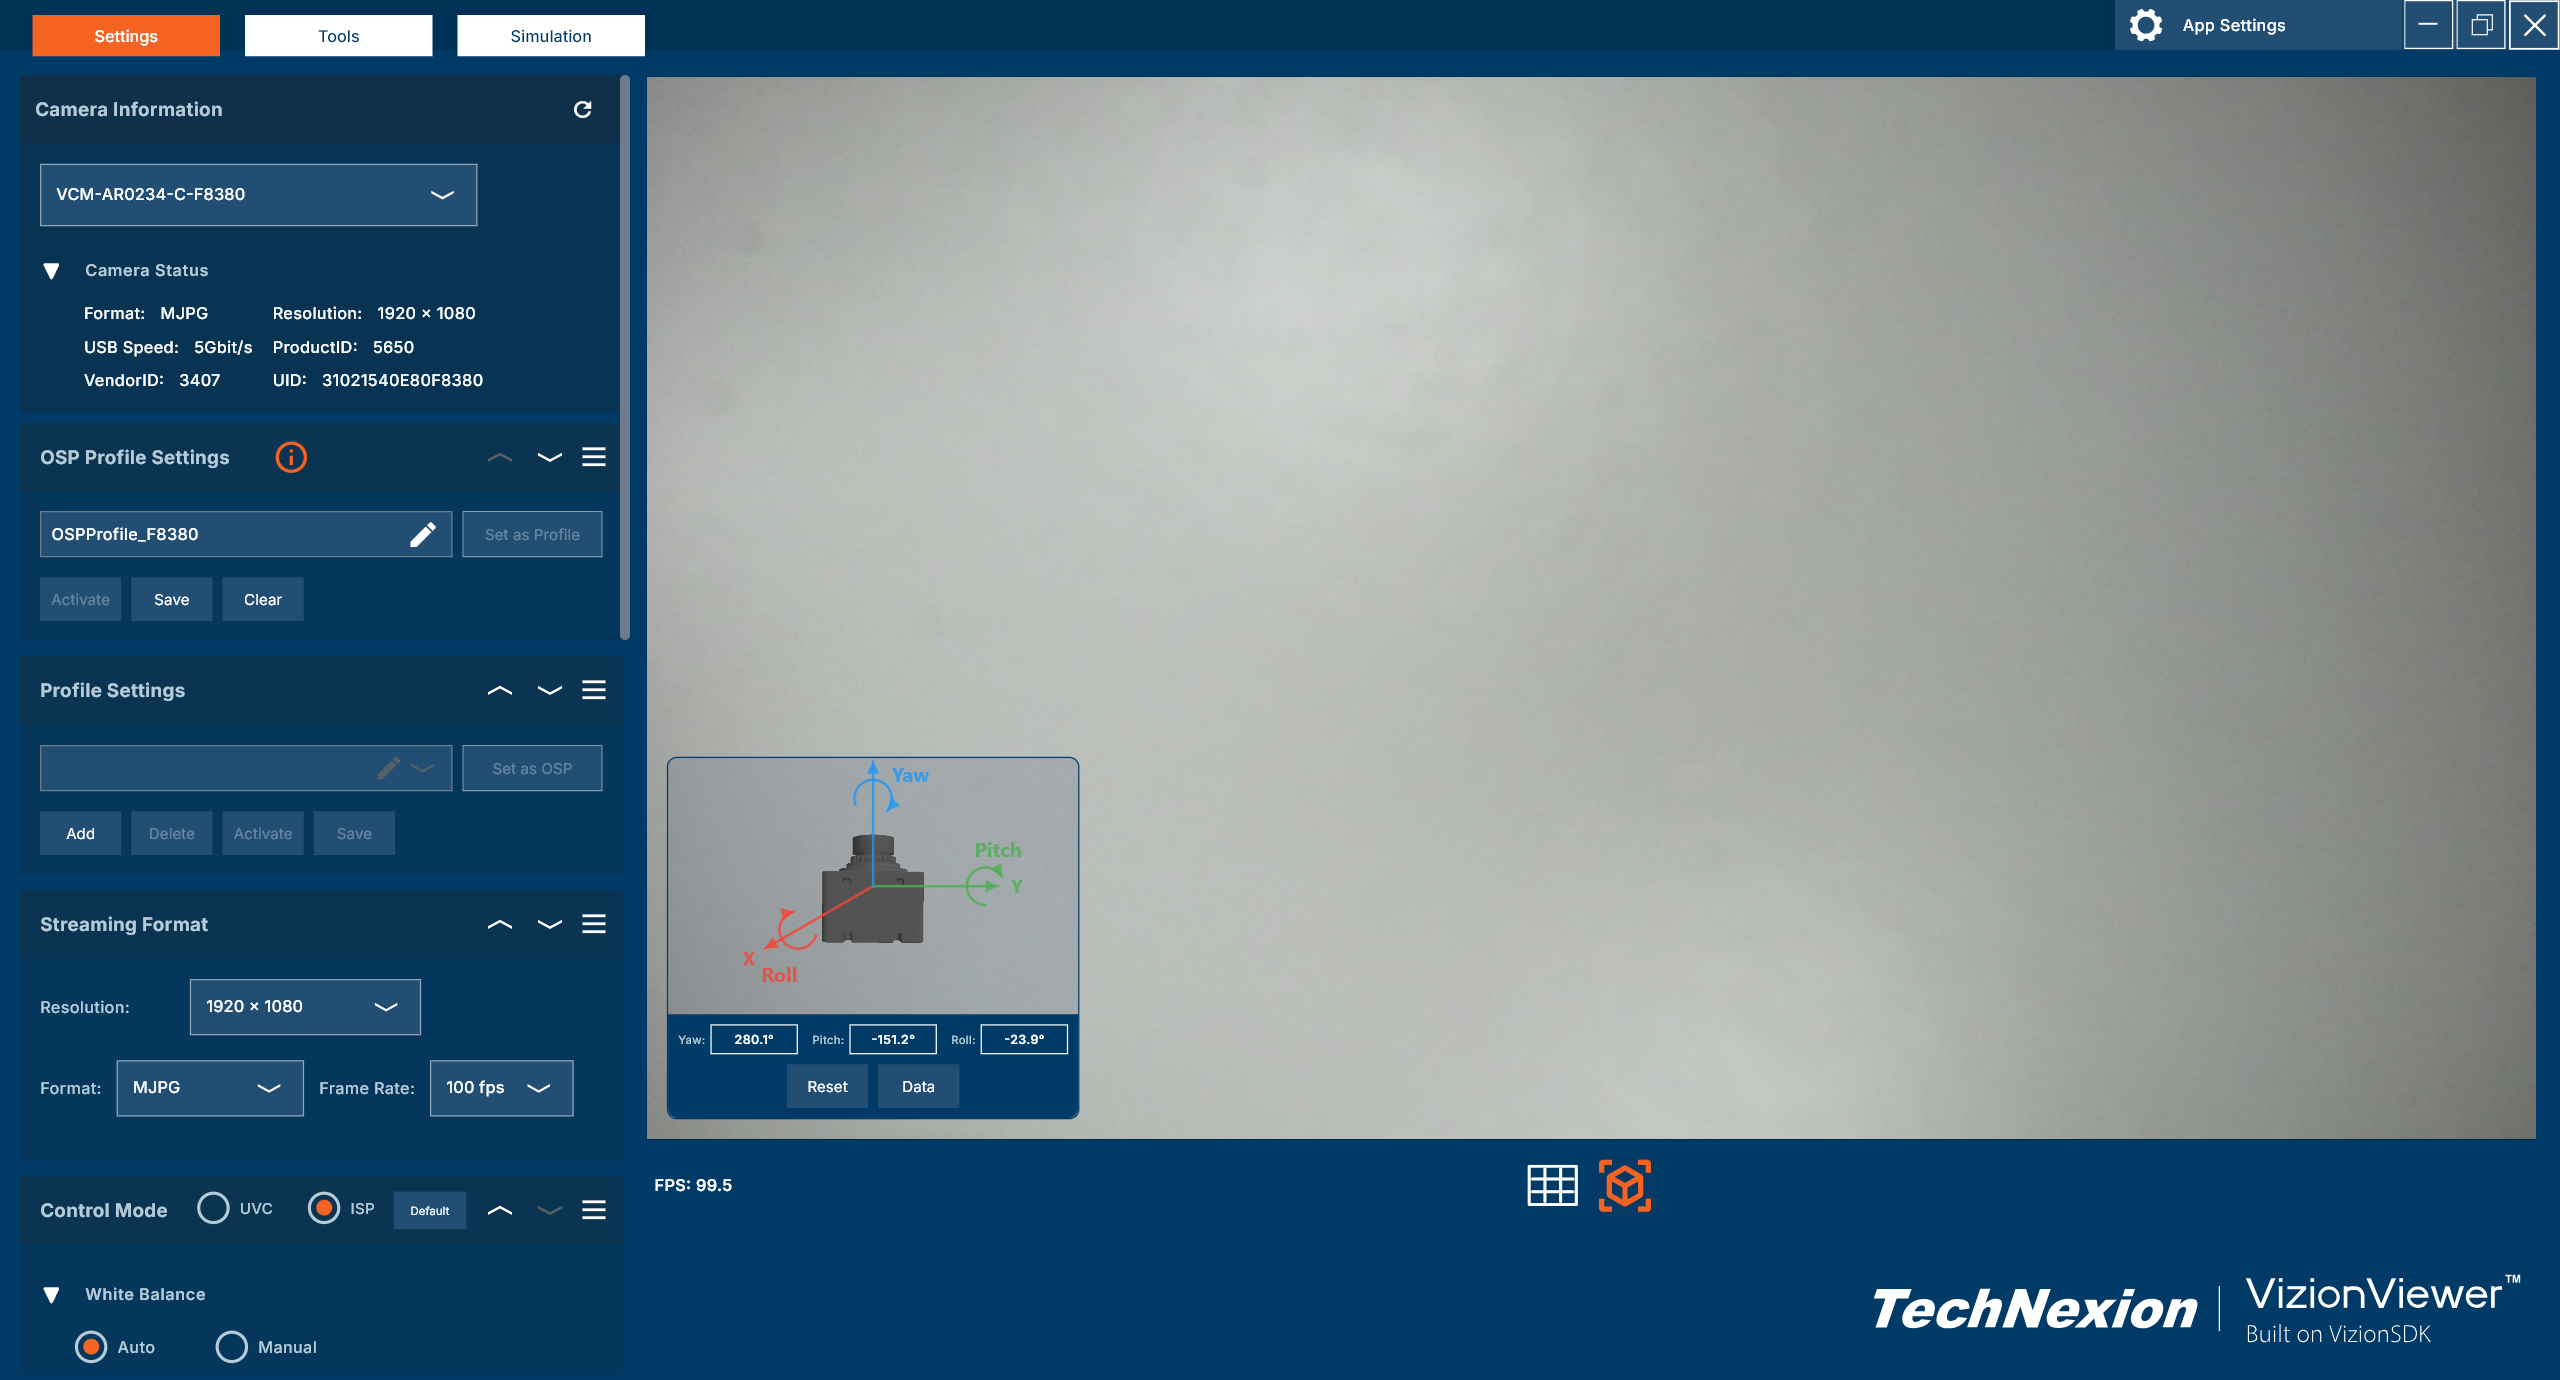
-
Reset Model: Click 'Reset' to reset the preview model display to origin (camera IMU data remains unchanged)
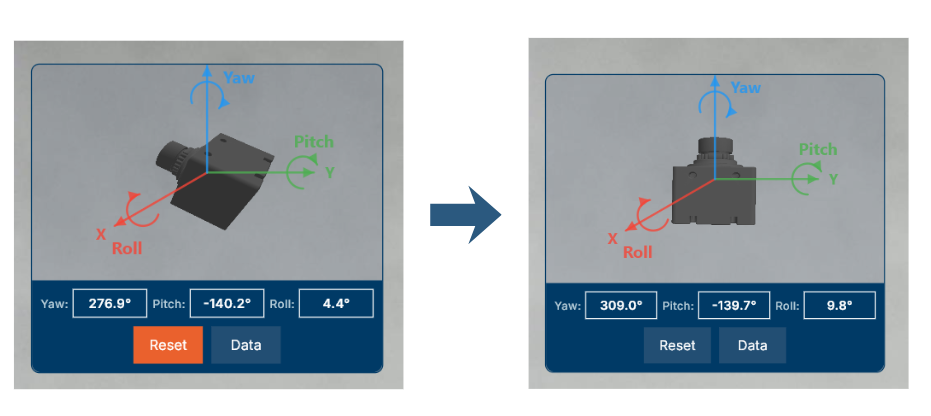
-
IMU Data Display: Cick ‘Data’ to show live imu data stream
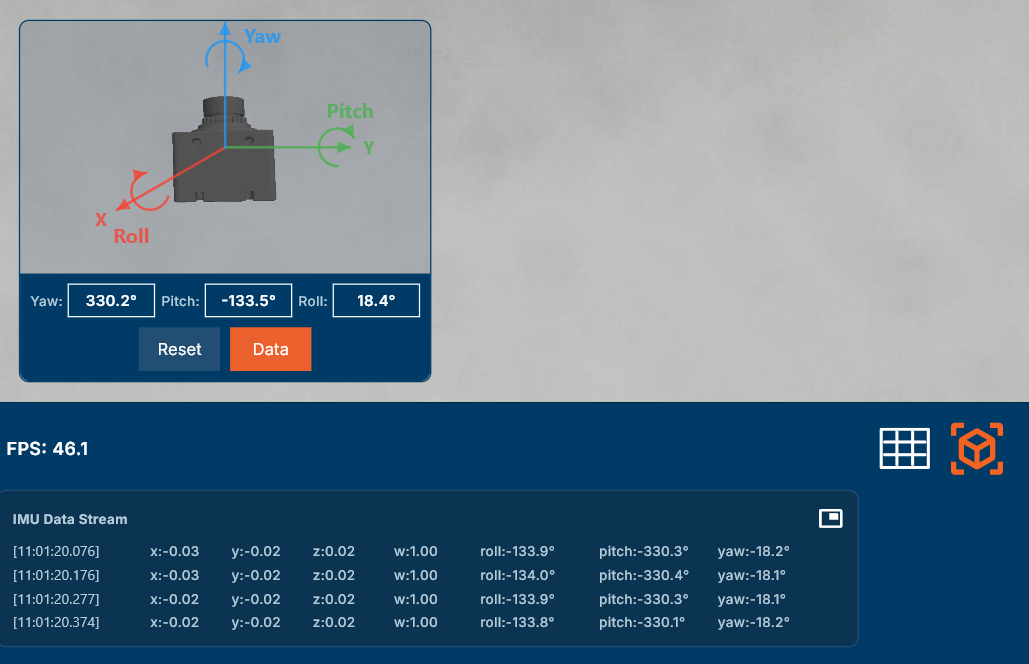
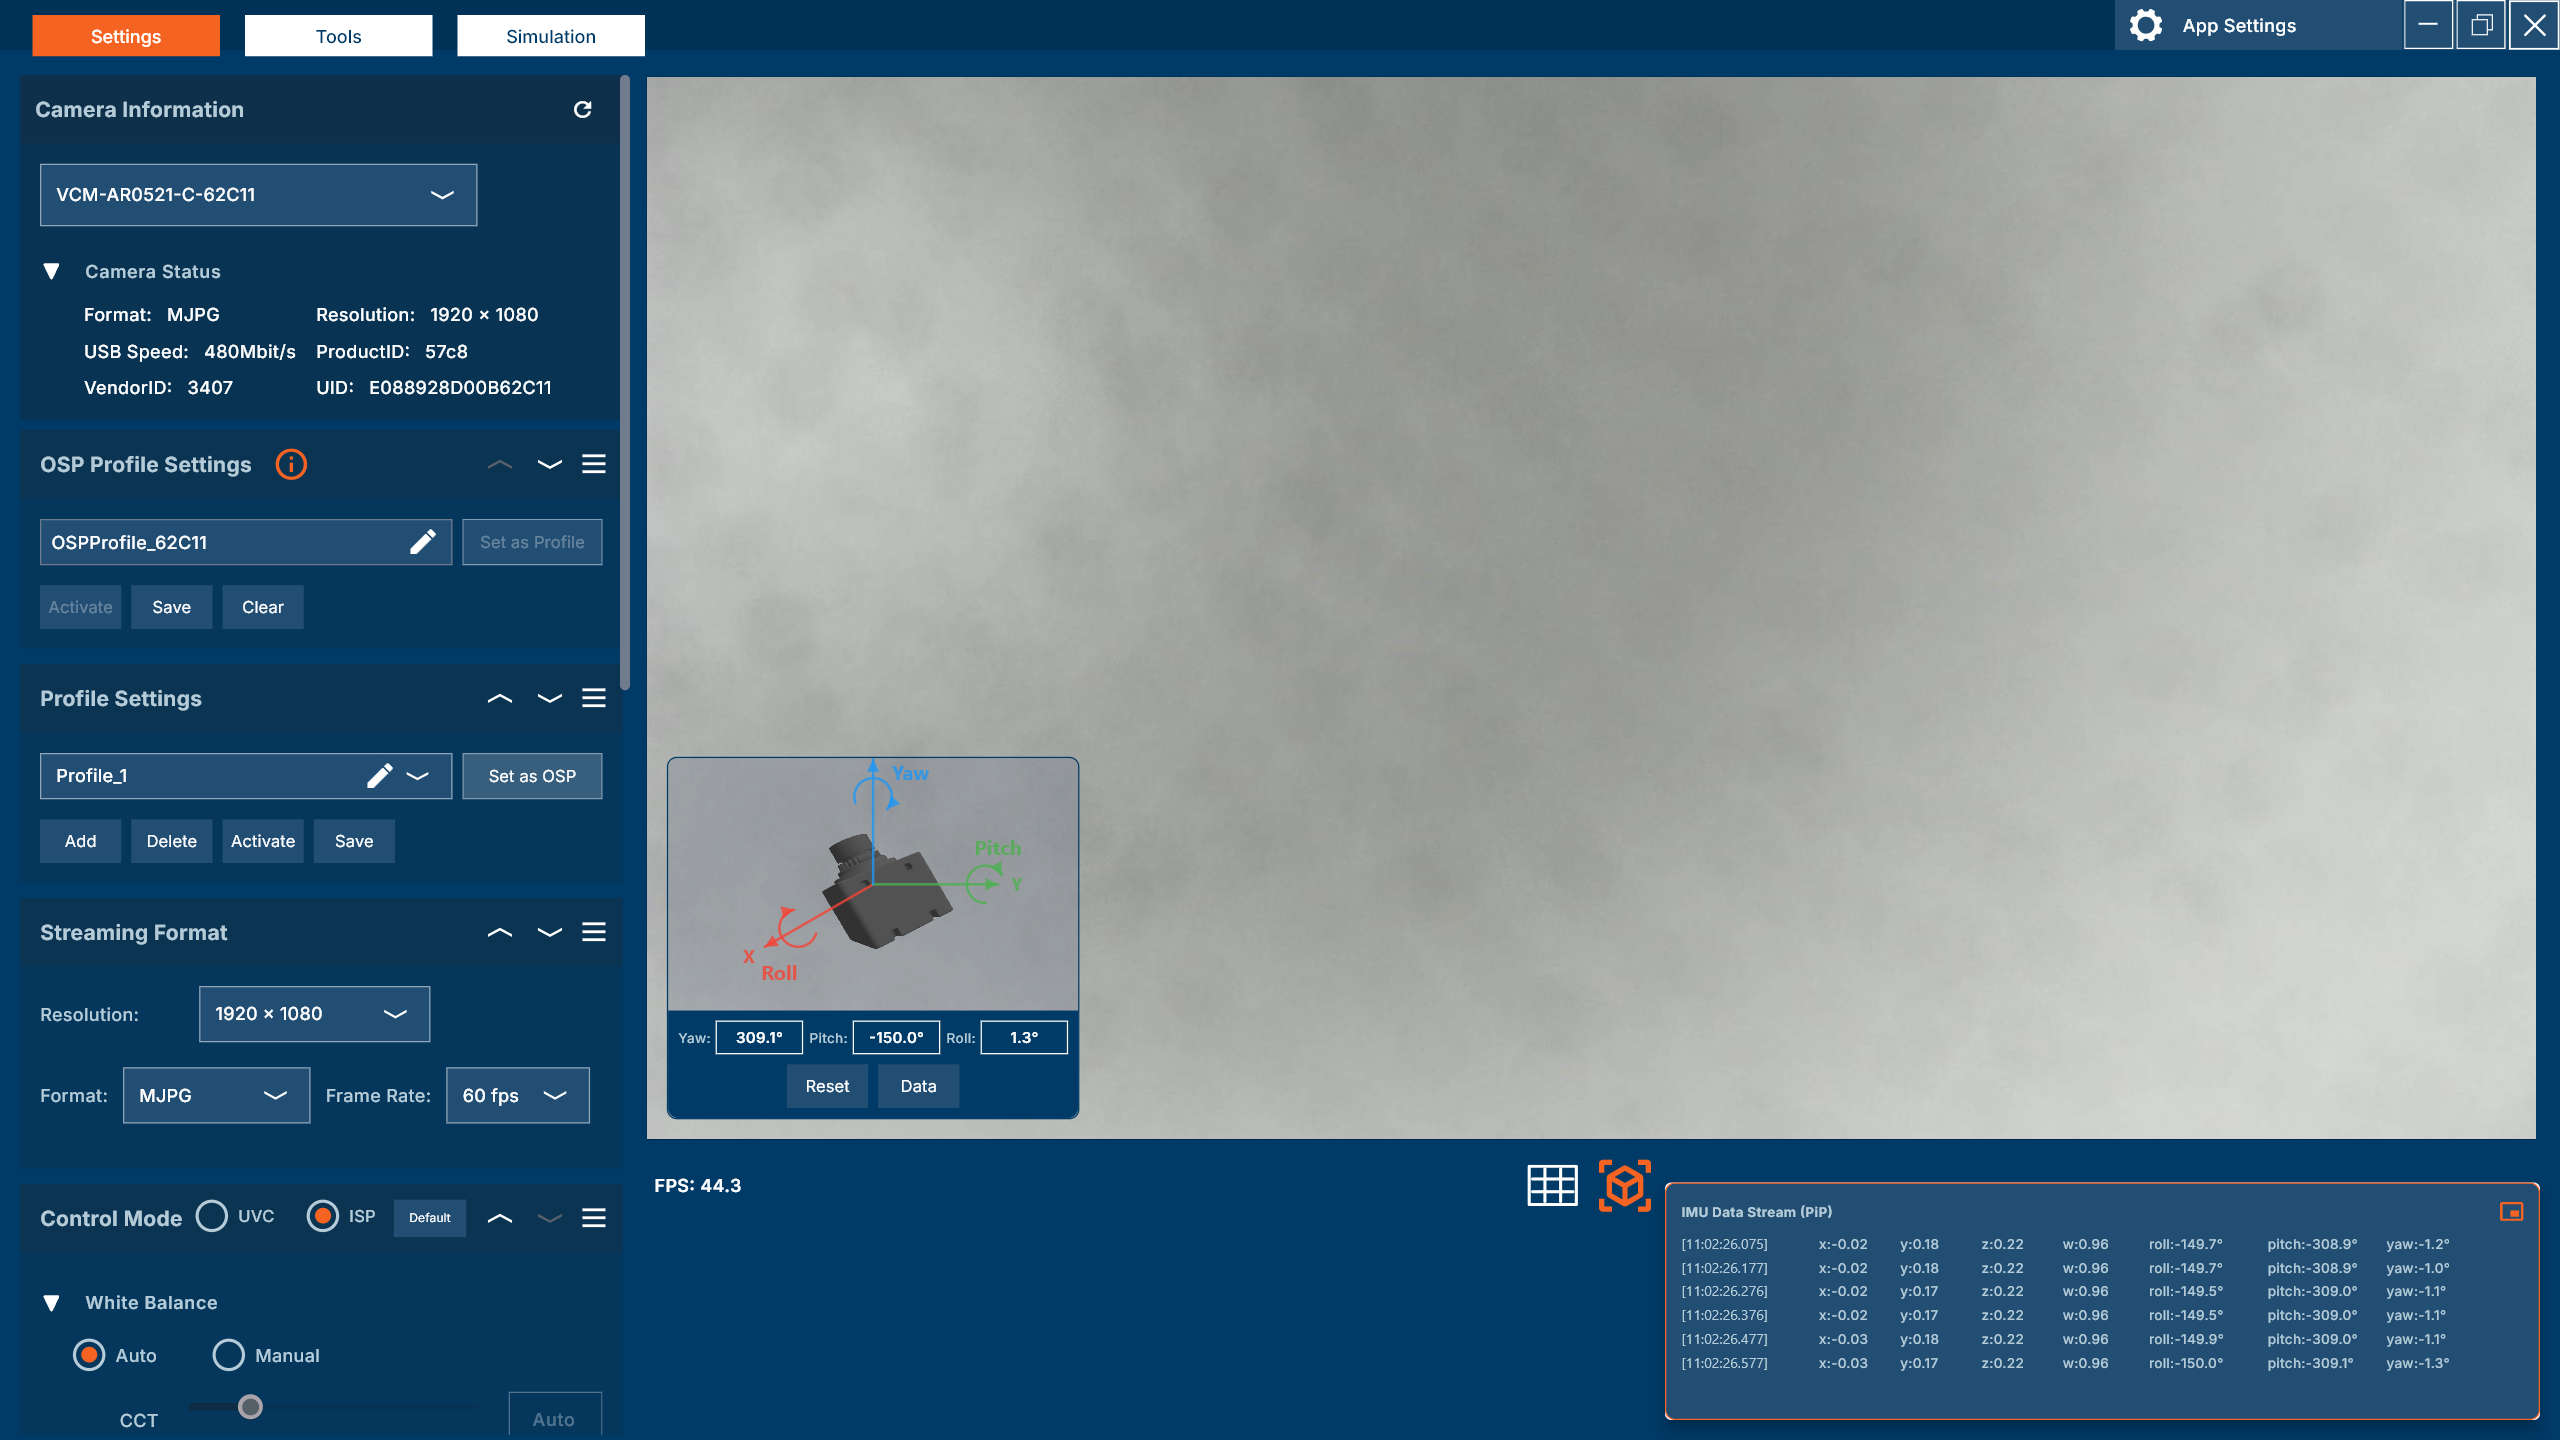
- PIP IMU Data: Click ‘PIP’ button to make IMU data PIP
Record Videos and Capture Photos
Record Videos
On embedded platforms, the maximum recording resolution is 1920x1200.
- Video Codec Options: Choose between H264 (compressed, smaller file size) or FFV1 (lossless, larger file size)
- Filenames follow the format:
yyyyMMdd_hh_mm_ss_zzz.avi - Default storage location: system default path (Tools → File → Open Video Folder)
- To change codec or storage location: Tools → File → Options
Take Photos
- Image Format Options: Choose from BMP, PNG, JPG, or Direct Buffer (raw)
- Filenames follow the format:
yyyyMMdd_hh_mm_ss_zzz.[format] - Default storage location: system default path (Tools → File → Open Image Folder)
- To change format or storage location: Tools → File → Options
Stream Format Preference
Configure your preferred camera stream format for optimal performance:
- YUY2: Packed YUV 4:2:2 format, good quality with moderate bandwidth
- UYVY: Packed YUV 4:2:2 format, similar to YUY2 with different byte order
- NV12: Planar YUV 4:2:0 format, efficient for video processing
- MJPEG: Motion JPEG format, compressed with lower bandwidth usage
Access these settings through Tools → File → Options.
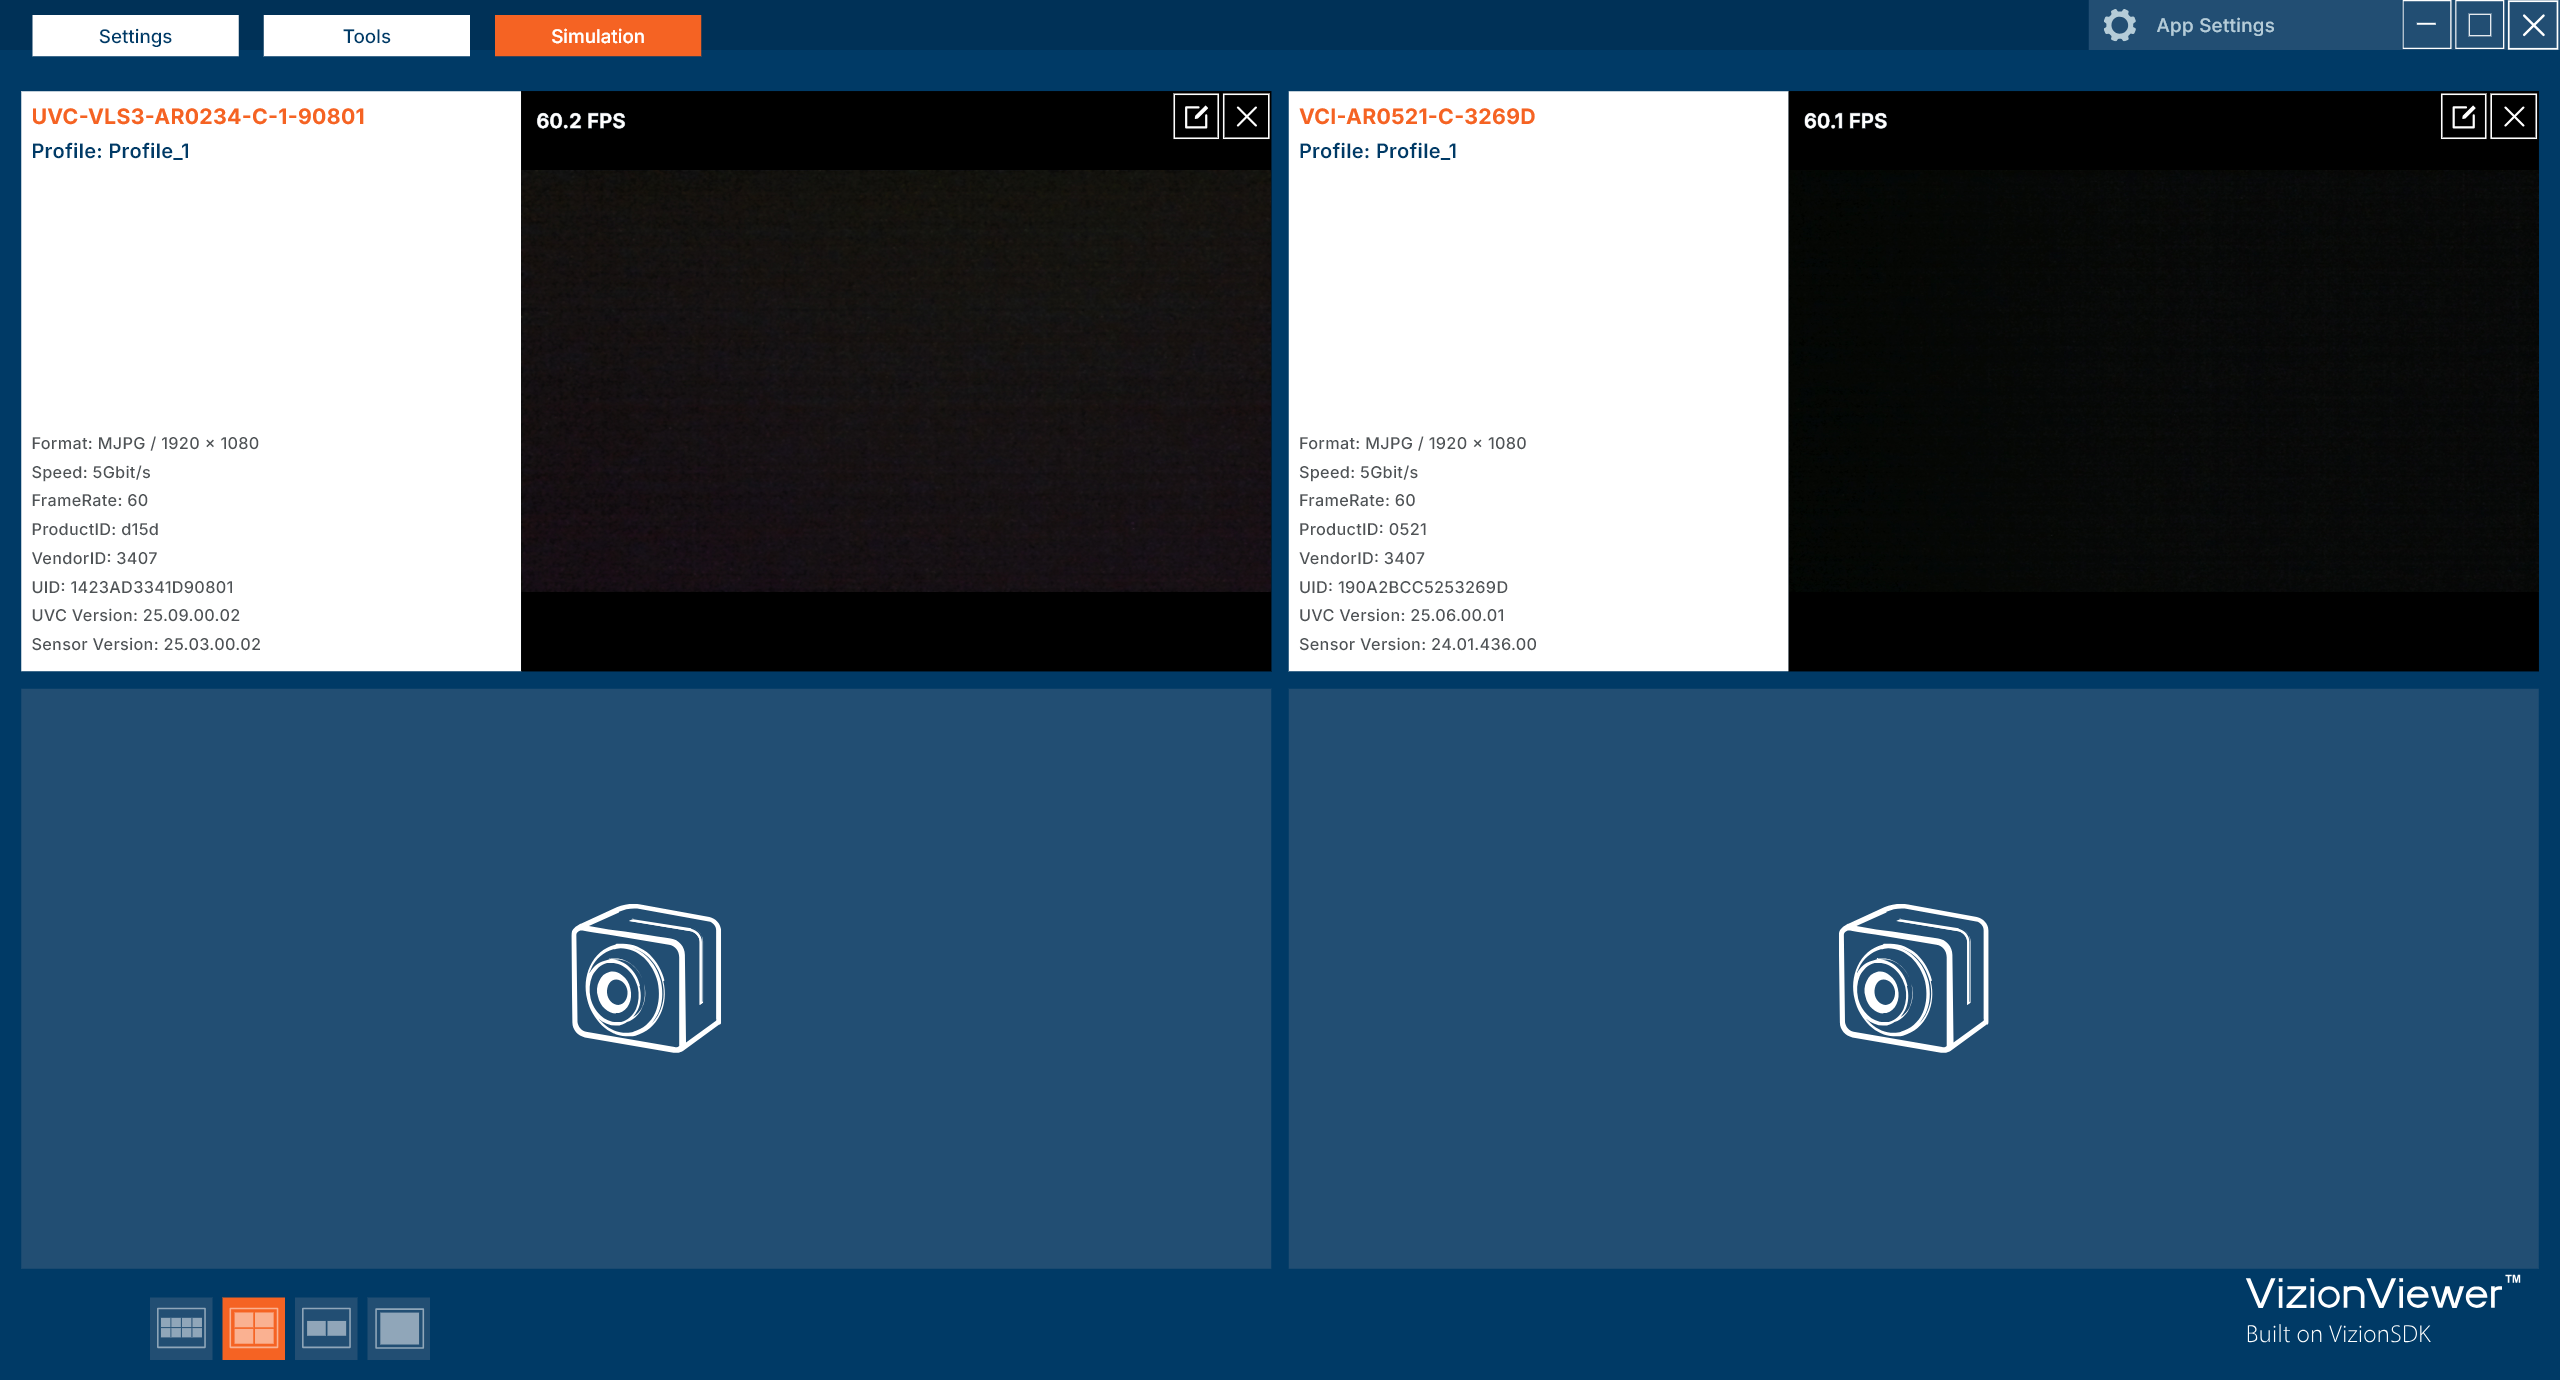
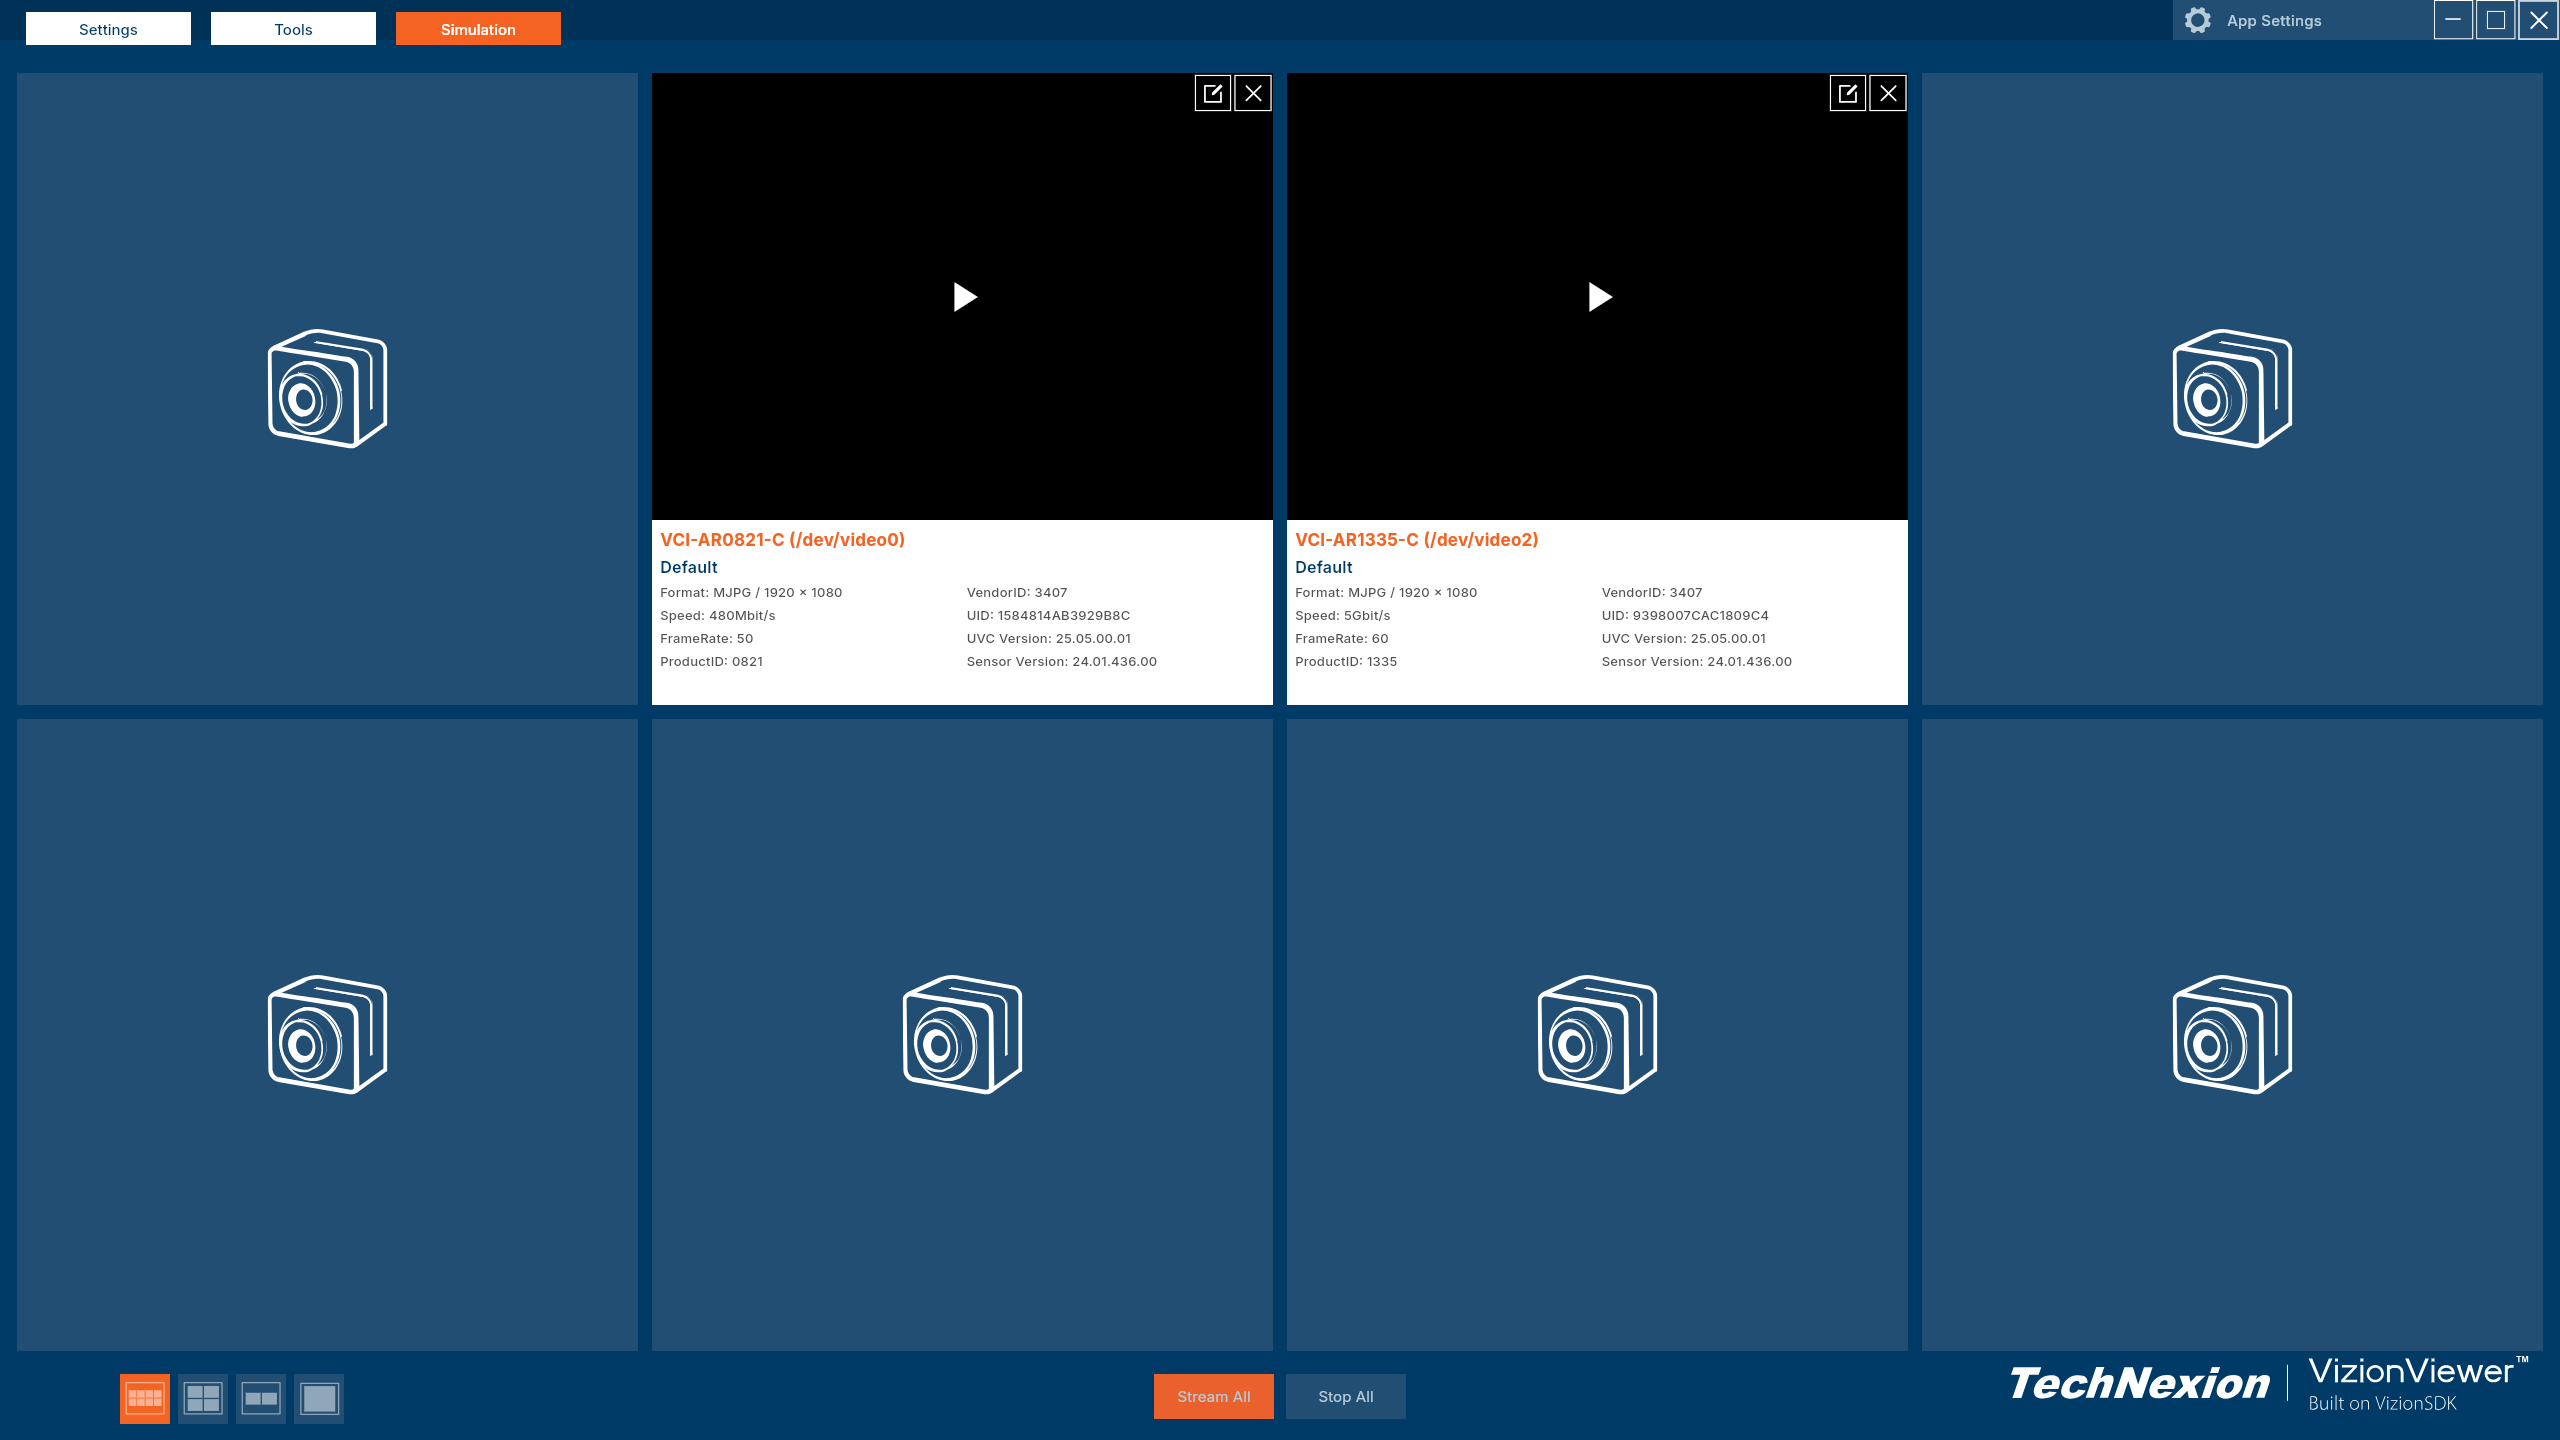
Camera Simulation
- View multiple cameras simultaneously: Observe up to eight camera feeds at once.
- Stream All / Stop All: Quickly start or stop streaming for all cameras at once with convenient control buttons.
Route Configuration (IMX93/95 Users)
For i.MX93 and i.MX95 platforms, you can load route configuration files to automatically set up camera media links. This feature enables the correct MIPI or GMSL camera connections for your system.
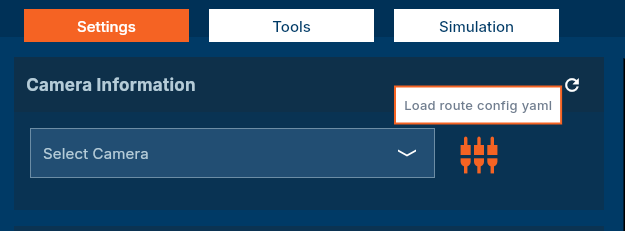
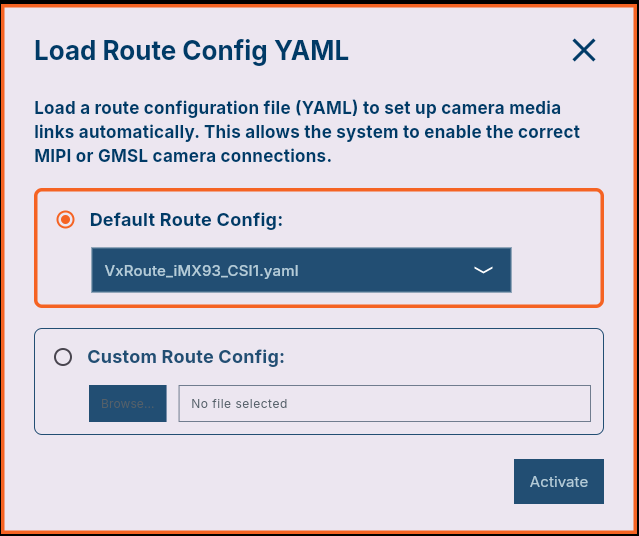
To load a route configuration:
- Click the route configuration button
- Select the appropriate YAML configuration file for your camera setup
- Click Activate to apply the configuration
The system will automatically configure the media links based on the selected route configuration file.
See more: Camera Media Route Configuration
Customize Layout with Drag-and-Drop
Layout Customization
Drag panel title bars to reposition interface elements.
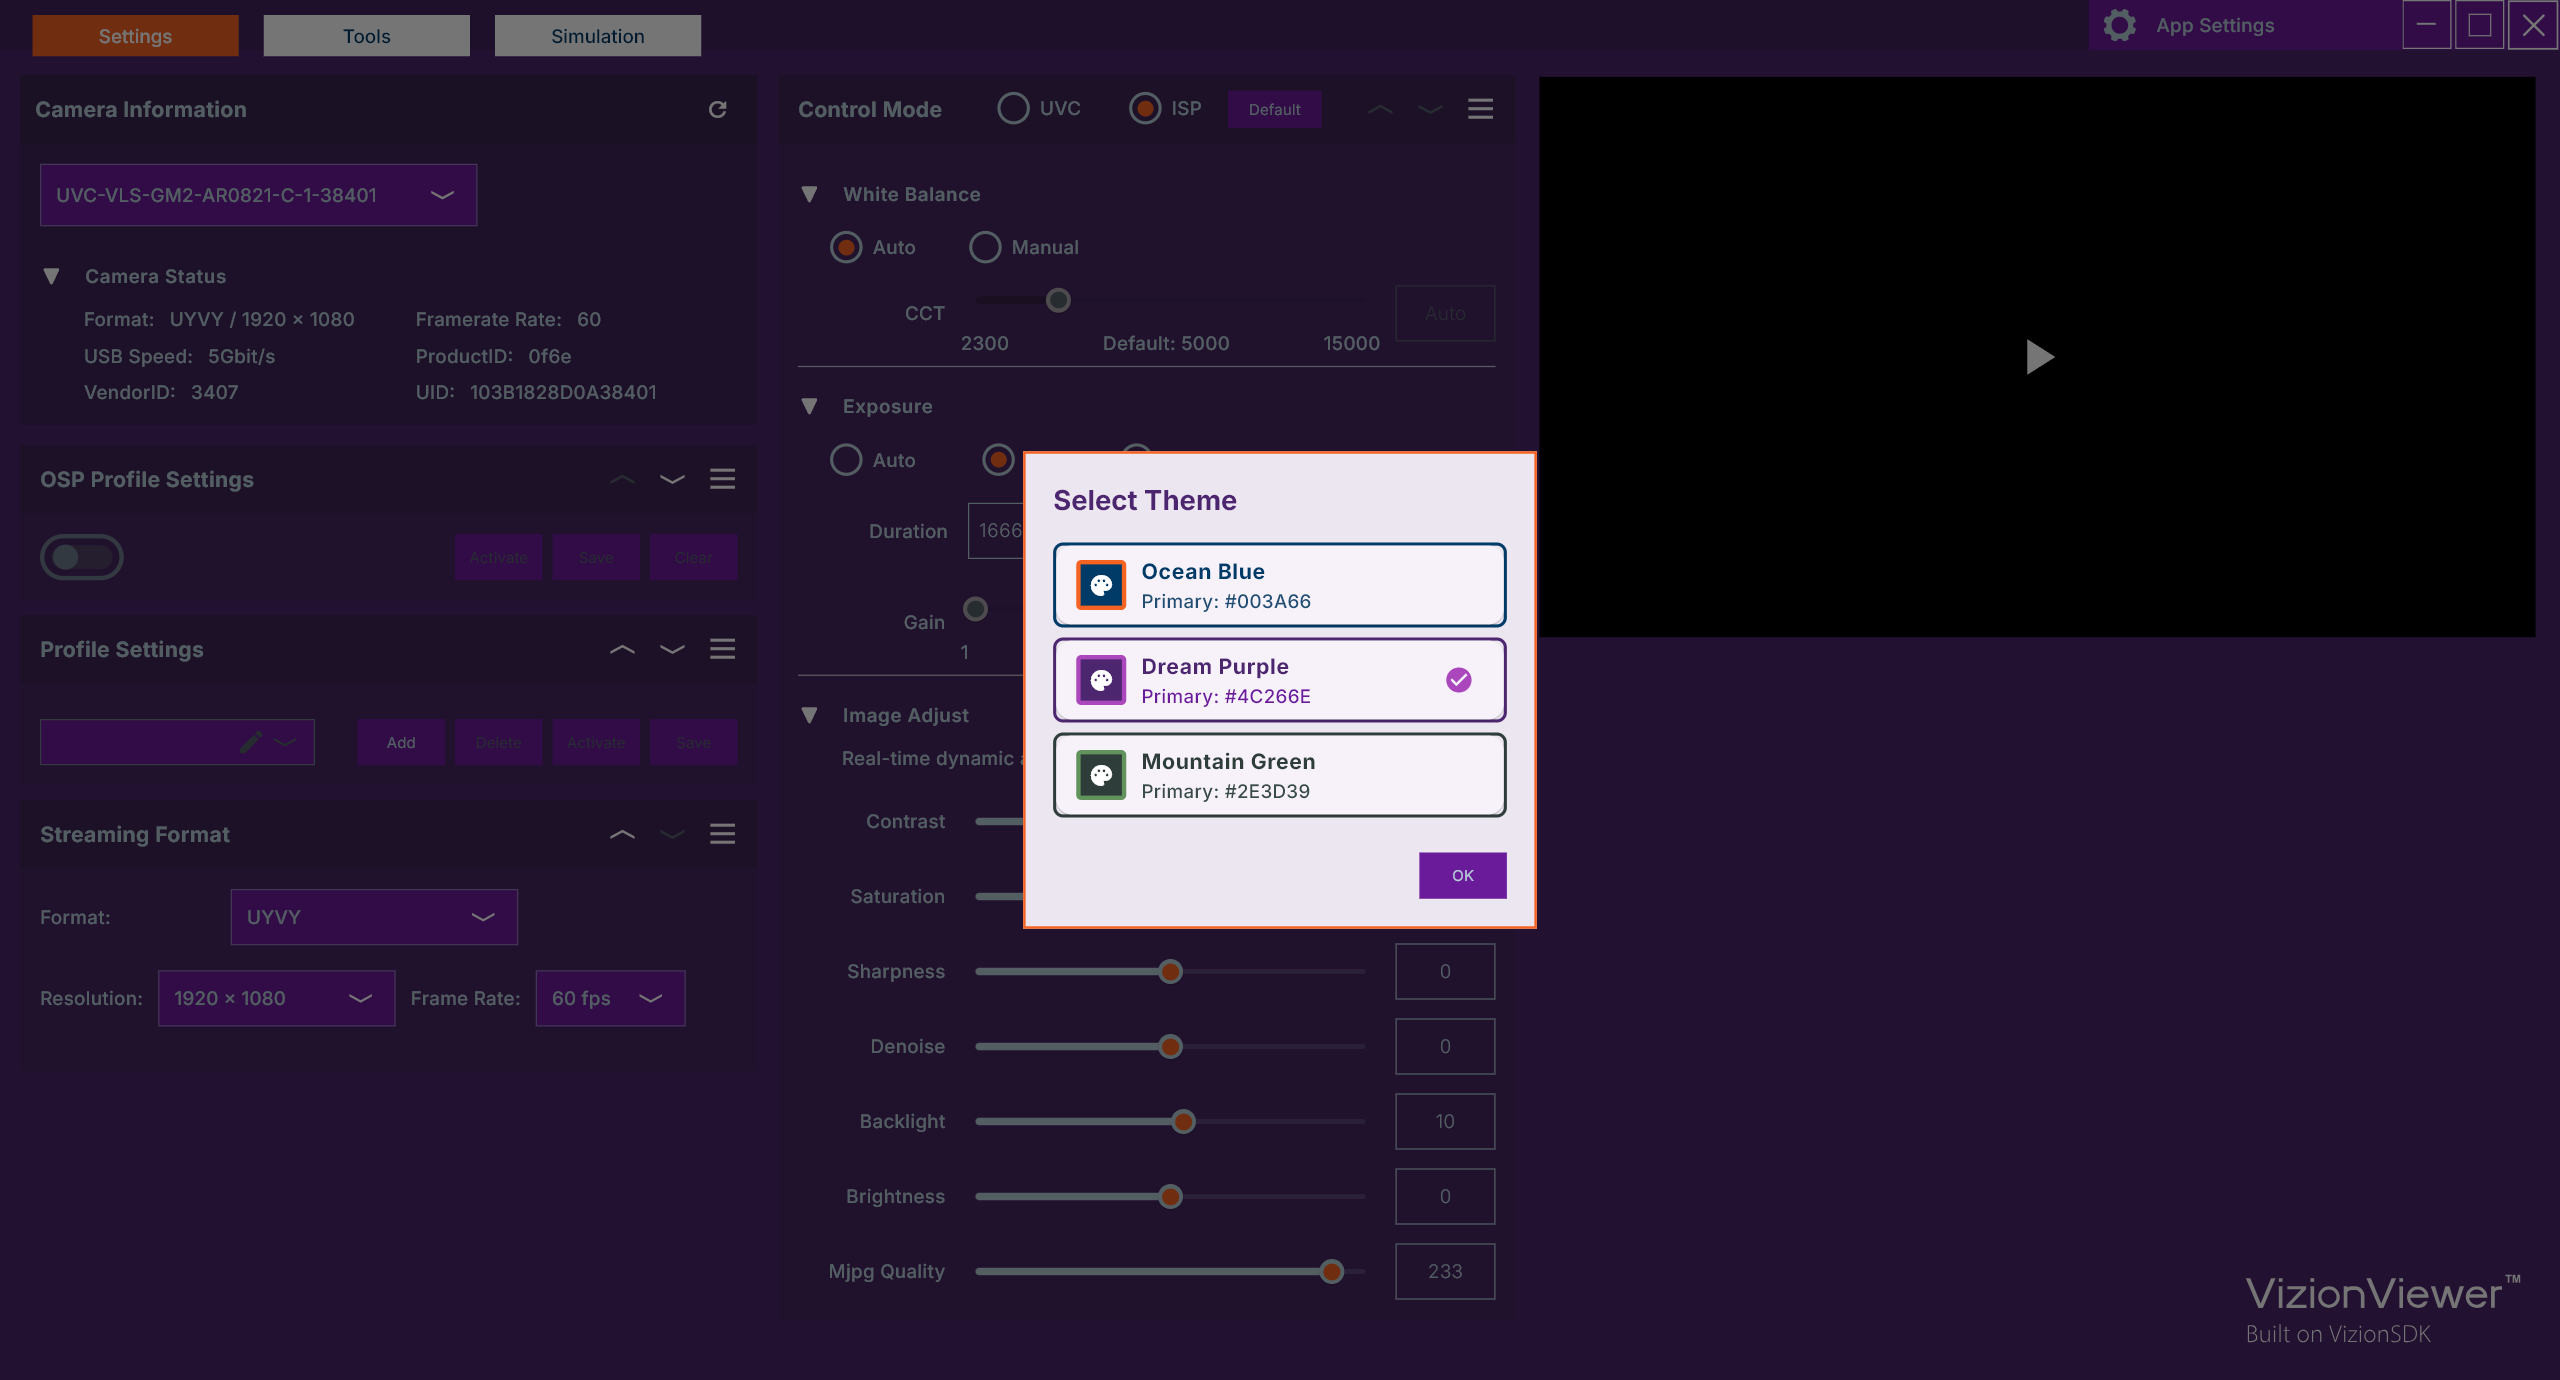
Change Color Theme
Select theme from Tools → Settings → Appearance (Ocean Blue/Dream Purple/Mountain Green).
Set Custom Logo
Logo Options
- Default Logo: TechNexion branding
- Hide Logo: No logo displayed
- Custom Text Logo: Enter custom text
- Custom Image Logo: Upload SVG image file
Configuration
- Access: App Settings -> Customize Logo
- Select logo type
- For Custom Image Logo: Browse and select file
- Supported formats: SVG
- Recommended size: 206×26 pixels (SVG with transparent background)
![]()
Support
If you encounter any issues with VizionViewer™:
- Go to Tools → File
- Export VizionViewer™ Log File
- Attach the report file
- Describe the issue
- Send to support.vision@technexion.com