TI Starter Kit EVMs Camera Usage Guide - Processor SDK Linux 11.01
🚀 Introduction
This article guides you how to get started using TechNexion camera modules on Ti starter kit.
📸 Supported Camera Modules
- TEVS Series
- TEVM Series
| Camera Series | Products |
|---|---|
| TEVS | TEVS-AR0144 TEVS-AR0145 TEVS-AR0234 TEVS-AR0235 TEVS-AR0246 TEVS-AR0521 TEVS-AR0522 TEVS-AR0544 TEVS-AR0821 TEVS-AR0822 TEVS-AR0830 TEVS-AR1335 TEVS-AR2020 |
| Camera Series | Products |
|---|---|
| TEVM | TEVM-AR0144 TEVM-AR0145 TEVM-AR0234 TEVM-AR0235 TEVM-AR0246 TEVM-AR0521 TEVM-AR0522 TEVM-AR0544 TEVM-AR0821 TEVM-AR0822 TEVM-AR0830 TEVM-AR1335 TEVM-AR2020 |
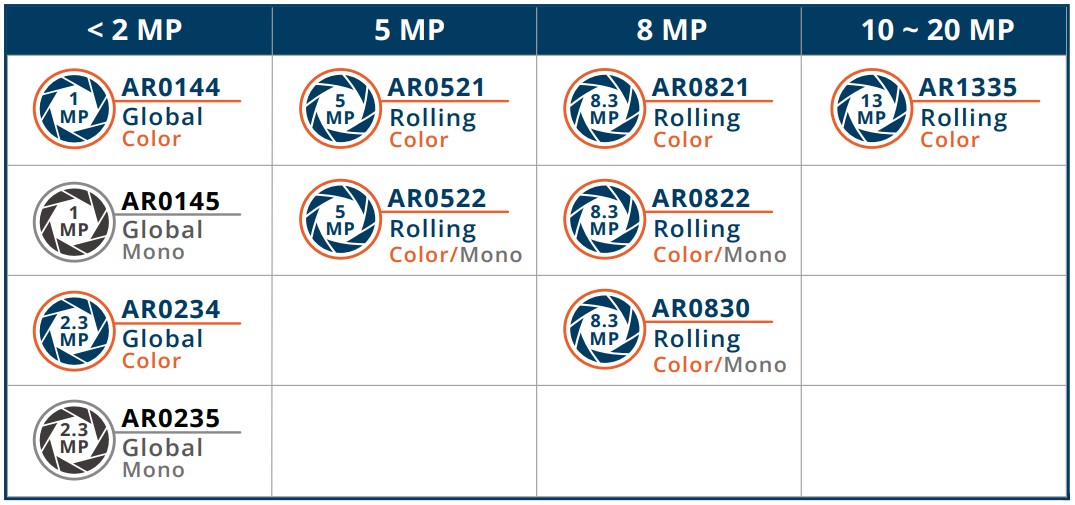
Check here ! 🔗 TechNexion Embedded Vision Solutions
Find out the solution which can accelerate your time to market for embedded vision projects.
TechNexion is using ti-processor-sdk-linux with 11.01 (Aug 2025), if you need to support other versions, you can grab the source codes from 🔗 GitHub – TechNexion TI EVK camera driver and build it by yourself.
🧩 Supported Ti Developer Kit
| SoM | Board |
|---|---|
| AM62A | Ti SK-AM62A-LP starter kit for low-power |
🔧 Hardware Setup Instructions
1. Connect the Adapter Board and Camera Cable
With different board you need prepare match adapter board and cable for the connect pins.
Here is the table for you can easily to confirm what you need for your solution.
| Developer Kit | Adapter board | Camera Kit |
|---|---|---|
| Ti SK-AM62A-LP | TEV-RPI22 Adaptor | TechNexion EVK RPI22 |
Follow this demo video to connect adapter and cable to the CSI connector on board.
🧰 Camera Installation Instructions
Method 1 - Using TechNexion Pre-built image
Prepare Yocto demo image for testing TechNexion camera
To test TechNexion TEVS Series cameras, you need a demo image that includes the required Device Tree Blobs (DTBs) and camera drivers.
Download and Select the Correct Image for Your EVK
Prebuilt demo images can be available for download via TechNexion's server.
Download Link:
🔗 SK-AM62A-LP Image Download Link
Flashing the Image
You can flash the image to an SD Card using the following methods.
The capacity must be higher 16GB.
- For Windows Users
- For Linux Users
Use balenaEtcher to write the image to your SD card:
🔗 
Use bmap-tools for a fast and reliable flashing process to the SD card:
sudo apt-get update
sudo apt-get install bmap-tools
Method 2 - Build custom Linux kernel with camera driver
-
Download the camera driver and device tree blobs.
$ git clone git@github.com:TechNexion-Vision/ti-evk-camera.git
$ cd ti_evk_camera/
~/ti_evk_camera$ git checkout tn-ti_6.12.35_11.01.07.05 -
Copy to your kernel source code.
~/ti_evk_camera$ mv -r driver/media/i2c/tevs/ <fetch_kernel_folder>/driver/media/i2c/
~/ti_evk_camera$ mv arch/arm64/boot/dts/ti/k3-j721e-sk-tevs.dtso <fetch_kernel_folder>/arch/arm64/boot/dts/ti/ -
Modify makefile to add driver
$ cd <fetch_kernel_folder>/driver/media/i2c/
~/<fetch_kernel_folder>/driver/media/i2c/$ vi Makefile
Add this line in Makefile.
obj-$(CONFIG_VIDEO_TEVS) += tevs/Modify Kconfig to add camera config
~/<fetch_kernel_folder>/driver/media/i2c/$ vi KconfigAdd this part under "Camera sensor devices" menu in Kconfig.
config VIDEO_TEVS
    tristate "TechNexion TEVS sensor support"
    depends on OF
    depends on GPIOLIB && VIDEO_DEV && I2C
    select MEDIA_CONTROLLER
    select VIDEO_V4L2_SUBDEV_API
    select V4L2_FWNODE
    help
        This is a Video4Linux2 sensor driver for the TechNexion
TEVS camera sensor with a MIPI CSI-2 interface. -
Modify makefile to add device tree.
$ cd <fetch_kernel_folder>/arch/arm64/boot/dts/ti/
~/<fetch_kernel_folder>/arch/arm64/boot/dts/ti/$ vi Makefile
Add this line in Makefile.
#For SK-AM62A
dtb-$(CONFIG_ARCH_K3) += k3-am62a7-sk-csi2-tevs.dtbo -
Compile the kernel & module driver
Finally you can start compile your new Image files, then copy and replace the Image files and add camera dtb overlay file in the SD card.
📸 Camera Testing Instructions
Specify Camera DTBO in uEnv.txt
- Find
uEnv.txtfile in prebuild image.
# Open on SK-TDA4VM, the directory should be here:
$ /run/media/BOOT-mmcblk1p1/uEnv.txt
# Open on HOST-PC, the directory should be here:
$ /media/username/BOOT/uEnv.txt
- Add camera dtb specifies the
name_overlaysvariable inuEnv.txt.
#SK-AM62A
    name_overlays= ti/k3-am62a7-sk-csi2-tevs.dtbo
🎥 Start Camera Video Stream via GStreamer
Check Camera Availability
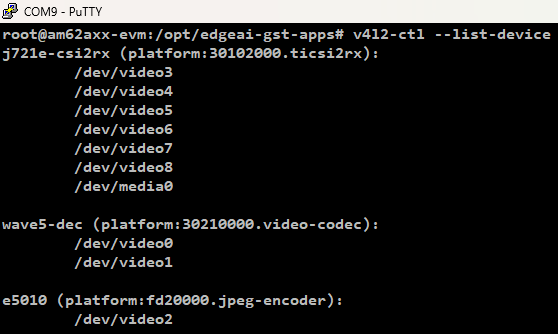
Use the v4l2-ctl tool to list connected video devices.
$ v4l2-ctl --list-device
Example output:
j721e-csi2rx (platform:30102000.ticsi2rx):
        /dev/video{X}
Launch GStreamer Pipeline
The following is example.
Bring up the camera (/dev/video3) with 1280x720 at 60 FPS by Gstreamer pipeline :
media-ctl -d /dev/media0 -V \
'"tevs 4-0048":0 [fmt:UYVY8_1X16/1280x720@1/60 field:none]'

media-ctl -d /dev/media0 -V \
'"cdns_csi2rx.30101000.csi-bridge":0 [fmt:UYVY8_1X16/1280x720 field:none]'

media-ctl -d /dev/media0 -V \
'"30102000.ticsi2rx":0/0 [fmt:UYVY8_1X16/1280x720 field:none]'

gst-launch-1.0 -v v4l2src device=/dev/video3 ! 'video/x-raw,format=UYVY,width=1280,height=720' ! fpsdisplaysink sync=false video-sink="kmssink force-modesetting=true" text-overlay=false
🚨 Troubleshooting
Take TEVS-AR1335 for example.
The pre-built image is based on TI's setup, so the default demo application does not support TechNexion cameras. To use TechNexion cameras, you can disable the demo service and launch the Weston desktop manually.
$ systemctl disable edgeai-init.service
$ systemctl restart weston
$ reboot
Find out the Camera
Boot up SK-AM62A-LP and check initialization of camera driver. it shows below messages, the driver is initialized correctly. If the drivers haven't been probed, please check the connector plugin correct.
$ dmesg -t | grep tevs
The message similar to the following :
root@am62axx-evm:/opt/edgeai-gst-apps# dmesg | grep tevs
tevs 4-0048: tevs_probe() device node: tevs@48
tevs 4-0048: CSI-2: 4 lanes, link 400000000 Hz, pixel rate 200000000, MIPI data rate 800 Mbps
tevs 4-0048: Version:26.6.0.1
tevs 4-0048: Product:TEVM-AR1335, HeaderVer:3, MIPI_Rate:800
tevs 4-0048: chip ID: 0x0153
tevs 4-0048: probe success
And then try to using media-ctl command to print the device topology from camera to CSI and the end to video device node.
$ media-ctl -p
We can get which v4l2-subdev is camera in this print message and then we can use v4l2-ctl by it.

Change Resolution
For kernel 6.12 architecture you cannot easily change resolution in gsteamer pipeline.
You must need to using v4l2-ctl to view and set the camera's supported resolutions.
1. Check camera supported resolutions via v4l2-ctl
$ v4l2-ctl -d /dev/v4l-subdev2 --list-subdev-framesize pad=0

root@am62axx-evm:/opt/edgeai-gst-apps# v4l2-ctl -d /dev/v4l-subdev2 --list-subdev-framesize pad=0
ioctl: VIDIOC_SUBDEV_ENUM_FRAME_SIZE (pad=0,stream=0)
        Size Range: 640x480 - 640x480
        Size Range: 1280x720 - 1280x720
        Size Range: 1920x1080 - 1920x1080
        Size Range: 2560x1440 - 2560x1440
        Size Range: 3840x2160 - 3840x2160
        Size Range: 4208x3120 - 4208x3120
2. Set Format
$ media-ctl -d /dev/media0 -V \
'"tevs 4-0048":0 [fmt:UYVY8_1X16/1280x720@1/60 field:none]'

$ media-ctl -d /dev/media0 -V \
'"cdns_csi2rx.30101000.csi-bridge":0 [fmt:UYVY8_1X16/1280x720 field:none]'

$ media-ctl -d /dev/media0 -V \
'"30102000.ticsi2rx":0/0 [fmt:UYVY8_1X16/1280x720 field:none]'