Using 'uuu' to flash e.MMC
- 28 Apr 2022
- 4 Minutes to read
- Print
- DarkLight
- PDF
Using 'uuu' to flash e.MMC
- Updated on 28 Apr 2022
- 4 Minutes to read
- Print
- DarkLight
- PDF
Article summary
Did you find this summary helpful?
Thank you for your feedback!
Introduction
This article takes you through the process to load e.MMC with the Universal Update Utility or uuu. This is the name of NXP's MfgTool 3.0. This tool is able to be executed under Windows and Linux environment and can be used to load and configure the e.MMC of images over a USB-OTG port. When running uuu and loading a blank e.MMC, you will need to put the SOC into serial download mode which, depending on the target platform, normally requires configuring boot jumpers or boot mode switches.
Obtain and install the 'uuu' tool
There are several ways that you can obtain the 'uuu' tool. You can download prebuilt versions of it, or you can build it from source.
Fetch a prebuilt binary from TechNexion's download site
Prebuilt binaries of uuu can be download from TechNexion's download site
These are conveniently packaged with boot images for most of our platforms as well.
NOTE regarding libusb on Windows
libusb-1.0.dll is required for uuu to be excuted under MS windows, but is absent in the link above.
Clone "uuu" on TechNexion github
You can clone the source for 'uuu' from our github repository.
https://github.com/TechNexion/imx-mfgtools-tn
Please follow the README within the repository to build the tool from source.
NOTE
For more information about how to use uuu, please refer to UUU.pdf in the link above.
Use uuu to flash image under Linux
- Install required packages for running mfgtool (
uuu). The following command will install them onto an Ubuntu host machine.
sudo apt-get install libusb-1.0.0-dev libzip-dev libbz2-dev
- While the target board is powered off, set the boot jumpers to boot from serial download. Then, USB Type-C peripheral cable to the board, and the other end to the host PC. If the target board is powered using another source than USB-OTG (via a Type C connector), then connect power to the unit.
Setting the Boot Configuration to Serial Download Mode
| Module | Board |
|---|---|
| PICO-IMX8M-MINI | PICO-PI-IMX8M-MINI |
| PICO-IMX8M-MINI | PICO-WIZARD-IMX8M-MINI |
| All EDM-G Modules | WB-EDM-G Baseboard Boot Mode Selection Button |
- Locate the image you want to flash. This will usually end in
.img, .sdcard, or .sdcard.bz2
Note regarding compressed images
uuu has the ability to decompress Bzip2 (.bz2) compressed files during the flashing process, however an /* but be appended to the image filename. It does not have the ability to parse xzip (.xz) files.
- Execute
uuuto start flashing process.
For .bz2 compressed images
cd imx-mfg-uuu-tool
sudo ./uuu/linux64/uuu -b emmc_img imx8mm/pico-imx8mm-flash.bin <path-to-image-to-flash>/<image name>.wic.bz2/*
For decompressed images
cd imx-mfg-uuu-tool
sudo ./uuu/linux64/uuu -b emmc_img imx8mm/pico-imx8mm-flash.bin <path-to-image-to-flash>/<image name>.wic
Older Yocto Revisions
For older Yocto revisions, the default name of the image ended in .sdcard, so please use the following:
For .bz2 compressed images
cd imx-mfg-uuu-tool
sudo ./uuu/linux64/uuu -b emmc_img imx8mm/pico-imx8mm-flash.bin <path-to-image-to-flash>/<image name>.sdcard.bz2/*
For decompressed images
cd imx-mfg-uuu-tool
sudo ./uuu/linux64/uuu -b emmc_img imx8mm/pico-imx8mm-flash.bin <path-to-image-to-flash>/<image name>.sdcard
- Once the flash process completes, power off the board, set the boot jumpers to boot from eMMC and apply power to the board to boot from eMMC.
Board jumper/switch configurations to boot from e.MMC
| Module | Board |
|---|---|
| PICO-IMX8M-MINI | PICO-PI-IMX8M-MINI |
| PICO-IMX8M-MINI | PICO-WIZARD-IMX8M-MINI |
| All EDM-G Modules | WB-EDM-G Baseboard Boot Mode Selection Button |
Use uuu to Flash Images Under Microsoft Windows
- First, with the board powered off, set the boot jumpers to boot into serial download mode.
Setting the Boot Configuration to Serial Download Mode
| Module | Board |
|---|---|
| PICO-IMX8M-MINI | PICO-PI-IMX8M-MINI |
| PICO-IMX8M-MINI | PICO-WIZARD-IMX8M-MINI |
| All EDM-G Modules | WB-EDM-G Baseboard Boot Mode Selection Button |
Then attach a USB Type-C peripheral cable to the board, and the other end to the host PC. If the board is powered with a source other than USB, power the board on.
Locate the image that you will want to program onto the e.MMC. This could come from one of TechNexion's demo images, or it could also be an image that you have built yourself. It will usually have a suffix
.wic, .wic.bz2, .sdcard, .sdimg, or .sdcard.bz2
Note regarding compressed images
uuu has the ability to decompress Bzip2 (.bz2) compressed files during the flashing process, however an /* but be appended to the image filename. It does not have the ability to parse xzip (.xz) files.
- Run
Windows Powershellorcmdwith administrator permission. - Run
uuuto start flashing process:
To program an uncompressed image file:
cd imx_mfg_uuu_tool
uuu\windows64\uuu.exe -b emmc_img imx8mm\pico-imx8mm-flash.bin <path\to\image>.sdcard
To program a compressed (Bzip2 format) image file.
cd imx_mfg_uuu_tool
\uuu\windows64\uuu.exe -b emmc_img imx8mm\pico-imx8mm-flash.bin <path\to\image>.sdcard.bz2/*

Here,imx-boot-pico-imx8mm-sd.bin is the bootloader.fsl-image-qt5-validation-imx-pico-imx8mm.sdcard.bz2 is the sdcard image compressed with .bz2 format
- Once the flash process completes. Power off the board, set the boot jumpers back to
Boot from eMMC, apply power to the board to boot from eMMC.
Board jumper/switch configurations to boot from e.MMC
| Module | Board |
|---|---|
| PICO-IMX8M-MINI | PICO-PI-IMX8M-MINI |
| PICO-IMX8M-MINI | PICO-WIZARD-IMX8M-MINI |
| All EDM-G Modules | WB-EDM-G Baseboard Boot Mode Selection Button |
Troubleshooting:
- After starting
uuu, the board should enter tofastbootmode and wait for request from host PC:
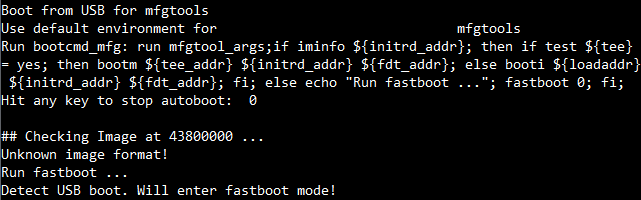
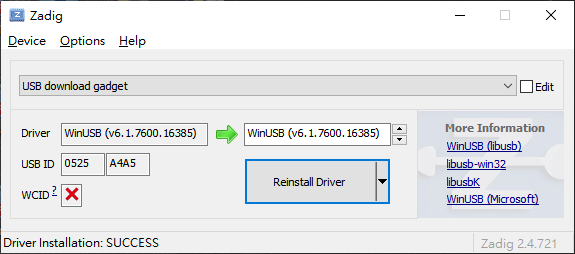
- If it stops in
fastbootmode, you might need to install USB driver under MS Windows. Please refer toUse zadig to install winusb driverchapter inUUU.pdfin MFGtool github.
- Enter shell mode is helpful to check
uuufails on what step. Add-sto enter shell mode. uuu.inputlog record all input commands you can use "uuu uuu.inputlog" next time to run all commands
.\uuu\windows64\uuu.exe -s -b emmc_all imx-boot-pico-imx8mm-sd.bin fsl-image-qt5-validation-imx-pico-imx8mm.sdcard.bz2/*
Was this article helpful?