Loading Software Images
- 14 Dec 2021
- 13 Minutes to read
- Print
- DarkLight
- PDF
Loading Software Images
- Updated on 14 Dec 2021
- 13 Minutes to read
- Print
- DarkLight
- PDF
Article summary
Did you find this summary helpful?
Thank you for your feedback!
Introduction
This article describes how to load software images onto the PICO-PI-IMX6UL/ULL development kits. There are several ways to do this, and these can be extended to custom baseboards as well, so long as the boards include a USB OTG connector.
Prebuilt demo images
You can program your own custom images, or you can also program prebuilt demo images which are available for download from our download site.
Demo images ending in .zip must be unpacked prior to programming. After unpacking, the content of the images is as follows:
| File Name | Description |
|---|---|
| {image_file}.wic.bz2 | bz2 compressed .wic image file - this is ready to be directly written to the e.MMC. Can also be written to an microSD card. |
| imx-mfg-uuu-tool-{version}.zip | Compressed prebuilt version of uuu tool. Can be run on both Windows and 64-bit Linux hosts |
| RELEASENOTES-TN | Text file containing release notes for the demo image |
Loading images using the Universal Update Utility (uuu)
Images can be loaded into the e.MMC of the PICO-IMX6UL/ULL module using uuu. This is the name of NXP's MfgTool 3.0. This tool is able to be executed under Windows and Linux environment and can be used to load and configure the e.MMC of images over a USB-OTG port. When running uuu and loading a blank e.MMC, you will need to put the SOC into serial download mode which, depending on the target platform, normally requires configuring boot jumpers or boot mode switches.
Obtain and install 'uuu'
There are several ways that you can obtain the 'uuu' tool. You can download prebuilt versions of it, or you can build it from source.
Prebuilt 'uuu'
Prebuilt binaries of uuu can be download from TechNexion's download site
These are conveniently packaged with boot images for most of our platforms as well.
NOTE regarding libusb on Windows
libusb-1.0.dll is required for uuu to be excuted under MS windows, but is absent in the link above.
Clone "uuu" on TechNexion Github
You can clone the source for 'uuu' from our github repository.
https://github.com/TechNexion/imx-mfgtools-tn
Please follow the README within the repository to build the tool from source.
NOTE
For more information about how to use uuu, please refer to UUU.pdf in the link above.
Use uuu to flash image under Linux
- Install required packages for running mfgtool (
uuu). The following command will install them onto an Ubuntu host machine.
sudo apt-get install libusb-1.0.0-dev libzip-dev libbz2-dev
- While the target board is powered off, set the boot jumpers to boot from serial download. Then, USB Type-C peripheral cable to the board, and the other end to the host PC. If the target board is powered using another source than USB-OTG (via a Type C connector), then connect power to the unit.
Set the Boot Configuration to Serial Download Mode
| Mode | PICO-PI-IMX6UL/ULL Jumper Settings |
|---|---|
| Serial Download Mode |  |
- Locate the image you want to flash. This will usually end in
.img,.sdcard,.wic.bz2, or.sdcard.bz2.
Note regarding compressed images
uuu has the ability to decompress Bzip2 (.bz2) compressed files during the flashing process, however an /* but be appended to the image filename. It does not have the ability to parse xzip (.xz) files.
- Execute
uuuto start flashing process (Linux host).
For .bz2 compressed images
cd imx-mfg-uuu-tool

# `/*` suffix after image file name indicates compressed image
sudo ./uuu/linux64/uuu -b emmc_imx6ul_img imx6ul/pico-imx6ul/imx6ul-SPL imx6ul/pico-imx6ul/imx6ul-u-boot.img {image-file}.wic.bz2/*
For decompressed images
cd imx-mfg-uuu-tool

# No need for `/*` suffix when programming uncompressed images
sudo ./uuu/linux64/uuu -b emmc_imx6ul_img imx6ul/pico-imx6ul/imx6ul-SPL imx6ul/pico-imx6ul/imx6ul-u-boot.img {image-file}.wic
- Once the flash process completes, power off the board, set the boot jumpers to boot from eMMC and apply power to the board to boot from eMMC.
| Mode | PICO-PI-IMX6UL/ULL Jumper Settings |
|---|---|
| Boot from e.MMC |  |
Use uuu to Flash Images Under Microsoft Windows
- First, with the board powered off, set the boot jumpers to boot into serial download mode.
| Mode | PICO-PI-IMX6UL/ULL Jumper Settings |
|---|---|
| Serial Download Mode | |
Then attach a USB Type-C peripheral cable to the board, and the other end to the host PC. If the board is powered with a source other than USB, power the board on.
Locate the image that you will want to program onto the e.MMC. This could come from one of TechNexion's demo images, or it could also be an image that you have built yourself. It will usually have a suffix
.sdcard, .sdcard.bz2, .sdimg, .wic,or.wic.bz2.
Note regarding compressed images
uuu has the ability to decompress Bzip2 (.bz2) compressed files during the flashing process, however an /* but be appended to the image filename. It does not have the ability to parse xzip (.xz) files.
- Run
Windows Powershellorcmdwith administrator permission. - Run
uuuto start flashing process:
For .bz2 compressed images
c:\ cd imx-mfg-uuu-tool

# `/*` suffix after image file name indicates compressed image
c:\ uuu\linux64\uuu.exe -b emmc_imx6ul_img imx6ul\pico-imx6ul\imx6ul-SPL imx6ul\pico-imx6ul\imx6ul-u-boot.img {path\to\image\file}.wic.bz2/*
For decompressed images
c:\ cd imx-mfg-uuu-tool

# Omit the `/*` suffix for uncompressed images
c:\ uuu\linux64\uuu.exe -b emmc_imx6ul_img imx6ul\pico-imx6ul\imx6ul-SPL imx6ul\pico-imx6ul\imx6ul-u-boot.img {path\to\image\file}.wic.bz2
- Once the flash process completes. Power off the board, set the boot jumpers back to
Boot from eMMC, apply power to the board to boot from eMMC.
| Mode | PICO-PI-IMX6UL/ULL Jumper Settings |
|---|---|
| Boot from e.MMC | |
Troubleshooting uuu
- After starting
uuu, the board should enter tofastbootmode and wait for request from host PC:
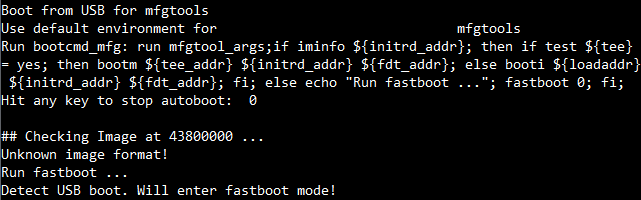
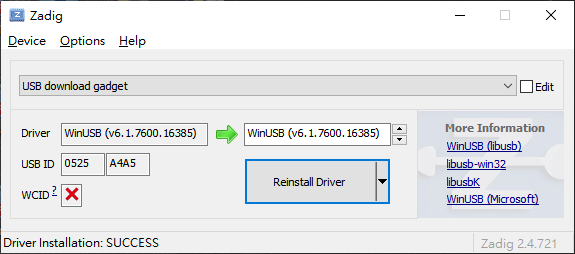
- If it stops in
fastbootmode, you might need to install USB driver under MS Windows. Please refer toUse zadig to install winusb driverchapter inUUU.pdfin MFGtool github.
- Enter shell mode is helpful to check
uuufails on what step. Add-sto enter shell mode. uuu.inputlog record all input commands you can use "uuu uuu.inputlog" next time to run all commands


# Add -s to enter shell mode.
.\uuu\windows64\uuu.exe -s -b emmc_imx6ul_img imx6ul\pico-imx6ul\imx6ul-SPL imx6ul\pico-imx6ul\imx6ul-u-boot.img {path\to\image\file}.wic.bz2/*
Using U-boot's ums Command to Write Flash Storage
This section discusses another methods used to load the Flash. This method is to use U-boot's ums command. The main advantage of this method is convenience. You don't have to change any boot mode settings on the board (e.g. configuration jumpers or boot mode switches), and you can use off-the-shelf tools to perform the actual transfer via USB OTG.
The main drawback of this method is that you also have to have a serial console connection to the target board in order to execute the necessary U-boot commands.
Requirements
U-boot must be running on the target system
One requirement to use this method is that the board must also boot from either e.MMC or microSD card with a version of U-boot that has the ums command enabled. This command is enabled as a standard setting in our maintained version of U-boot version 2018.03 and later. This is the version of U-boot we utilize in Yocto 2.5 (Sumo), as well as Android 9 (Pie), and will be supported in all subsequent versions.
USB OTG connection
The target must also have an operating USB OTG connection. This is a standard feature on all TechNexion development kits. It is extremely useful for loading e.MMC. With Android, it is also the default communications port for the Android Debugger (ADB). If you're using a custom baseboard (or carrier board), you are highly recommended to put a USB connector on the board and to connect it to the USB OTG port on the SOM connector. You can use our baseboard schematics as a reference for this.
Note
While TechNexion kits have a true dual-role (USB OTG) port, if you're using the USB port to load Flash or to debug, it only needs to operate as a device port.
Serial Console
To access the U-boot command prompt, you have to have a serial console connection between the target board and a host computer (usually the one you're using to load the flash). This can vary based on your baseboard.
On PICO-PI-IMX6UL/ULL, the serial console is available via an on-board USB-UART adapter connected to a microUSB connector on the top of the board as shown below.

Location of serial console on PICO-PI-IMX6UL/ULL
Using the ums command
UMS stands for USB Mass Storage. Fundamentally, what this command does is it exports a chosen block device as a mass storage device over a chosen USB port. On the host computer, this causes the port to look like mass storage device (like a USB Flash drive). This flash drive can then be accessed using programs and applications on the host computer.
You may need to reboot your board in order to get into the U-boot prompt. As soon as your board boots, you need to hit any key to terminate the normal boot process and get to a U-boot prompt:

Once you have a prompt, you need to discover the number of the MMC device corresponding to e.MMC or microSD card. You can use the mmc list command to do this:
=> mmc list
FSL_SDHC: 0 (eMMC)
FSL_SDHC: 1
In this example, for PICO-PI-IMX6UL running U-boot 2020.04, the e.MMC device is MMC device 0.
Note
The MMC device number of the e.MMC may change from revision to revision of U-boot, so we advise verifying this with the 'mmc list' command.
Now, you can run the ums command as follows:
u-boot=> ums [USB device number] mmc [mmc device number]
Where the USB device number is always 0 and the mmc device number is the one you discovered when running mmc list. Thus:
u-boot=> ums 0 mmc 0
UMS: LUN 0, dev 1, hwpart 0, sector 0x0, count 0x1d34000
-
While UMS is running, you will see a rotating cursor (like a pinwheel), and you won't get another boot prompt until after you are done and have exited UMS.
At this point in time, your host computer should see a USB mass storage gadget connected. This should appear as a USB mass storage device (a block device). If there is no boot partition or anything else loaded onto it (i.e. the EMMC could be blank), you won't see any drives available.
Loading the image
At this point you can use a number of tools to load the device, depending on your host computer.
Linux Hosts using dd
On Linux host computers, a popular tool to use is the dd utility. First, you need to discover the device file that was assigned to the target's USB mass storage device. For this, you can open a terminal and use the lsblk command:
~$ lsblk
NAME   MAJ:MIN RM   SIZE RO TYPE MOUNTPOINT
sda      8:0    0    40G  0 disk
├─sda1   8:1    0   512M  0 part /boot/efi
├─sda2   8:2    0     1K  0 part
└─sda5   8:5    0  39.5G  0 part /
...
sde      8:64   1   3.5G  0 disk
├─sde1   8:65   1  25.4M  0 part /media/john/boot
└─sde2   8:66   1   1.6G  0 part /media/john/root
In above test, /dev/sde is the e.MMC device on the host computer for our attached target. It is already loaded with a couple of partitions that are mounted on the host. In order to write to them, we need first unmount the partitions:
    ~$ sudo umount /dev/sde1
    ~$ sudo umount /dev/sde2
Then, you can write your image to the disk using the dd command:
~$ sudo dd if=<path/to/your/image/file> of=/dev/sde bs=1M status=progress
Attention
It is very important to only write uncompressed image files (no .xz or .bz2 files) using dd. If you write a compressed image file, the SOC will not be able to load a bootable image from the storage media and then your board will not boot afterwards.
Once completed, you can then sync:
~$ sync
Then you can CTRL-C out of UMS in U-boot, and then reboot your board.
Mac OS hosts using dd
Loading with a Mac OS host is similar to using a Linux host when using the dd tool. There are a couple of differences.
First, you can open a terminal and get the device file for the target's USB mass storage device. On Mac OS, you would use the diskutil command:
    % diskutil list
    /dev/disk0 (internal, physical):
       #:                       TYPE NAME                    SIZE       IDENTIFIER
       0:      GUID_partition_scheme                        *960.2 GB   disk0
       1:                        EFI EFI                     209.7 MB   disk0s1
       2:                 Apple_APFS Container disk1         960.0 GB   disk0s2
    ...
    /dev/disk2 (external, physical):
       #:                       TYPE NAME                    SIZE       IDENTIFIER
       0:     FDisk_partition_scheme                        *15.7 GB    disk2
       1:             Windows_FAT_32 Boot pico-i             33.6 MB    disk2s1
       2:                      Linux                         1.5 GB     disk2s2
In this case, the device is /dev/disk2 and there is currently a partition from the target device already mounted at /dev/disk2s1.
You need to unmount any mounted partitions:
     % diskutil unmount /dev/disk2s1
    Volume Boot pico-i on disk2s1 unmounted
Then, you can use the dd command in a similar fashion as on a Linux host. The main differences are that on a Mac, there are two devices you can use to access the disk. A "Raw Disk" device and a buffered disk device. Raw disk devices (/dev/rdiskN) are much faster to access than buffered disk devices (/dev/diskN).
Also, the block size (the bs parameter) uses an uppercase 'M' to refer to megabytes in Mac OS:
% dd if=<path/to/disk/image> of=/dev/rdisk2 bs=1M
Attention
It is very important to only write uncompressed image files (no .xz or .bz2 files) using dd. If you write a compressed image file, the SOC will not be able to load a bootable image from the storage media and then your board will not boot afterwards.
Once completed, you can then sync:
% sync
Then you can CTRL-C out of UMS in U-boot, and then reboot your board.
Cross Platform Tool: Balena Etcher
Balana Etcher is a cross-platform tool for loading raw disk images. There are versions for Linux, Windows, and Mac OS hosts.

Etcher will automate a number of tasks that we manually run if we are using 'dd'. For example, it understands how to parse compressed data file formats (e.g. .xz, .bz2, .zip files). It automatically detects the target devices that you may want to flash, unmounts any mounted partitions, and ejects the device after writing. After writing the data to the device, Etcher also performs a verification step as well.
Returning a Module to Factory Default Settings
This is a step-by-step process to return a module to its factory default settings. This just involves writing the TechNexion Software Loader (TSL) image into the e.MMC of the device.
Download UUU (mfgtool)
Download the UUU tool from our website:
Unzip the package
After you download it, you will need to unzip the package:
unzip imx-mfg-uuu-tool-20210421.zip
If you are using a Linux-based host, by default files unpacked using unzip are not executable. You may need to set the execute flag on the ‘uuu’ binary in order to execute it (run it).
cd imx-mfg-uuu-tool
chmod +x uuu/linux64/uuu
Download a default TechNexion Software Loader image for your board
The following table lists the URLs based on the SOM and baseboard you are using. Please make sure to correctly identify the board you have.
http://rescue.technexion.net/rescue/pico-imx6ul/pi-lcd800x480/rescue.xz
Note
For historical reasons, the filename starts with 'rescue' (as the original system was called the 'rescue loader')
Unpack the rescue loader binary image
After download, you’ll need to unpack the rescue loader binary from the “xz” archive. This results in a file named “rescue” in the current directory, and the archive file (rescue.xz) is deleted.
unxz <path/to/file/rescue.xz>
Caution
If you directly write the archive file (“rescue.xz”), the process may appear to complete successfully, but in fact this is quite incorrect and the board will not boot. ‘uuu’ is smart enough to look into .bz2 archives, but not .xz archives.
Put the board into Serial Download Mode
With the board powered off, place the boot configuration jumpers as shown below, then power the board back on.
| Mode | PICO-PI-IMX6UL/ULL Jumper Settings |
|---|---|
| Boot from e.MMC | |
Write the rescue loader image to EMMC
This assumes that you are in imx-mfg-uuu-tool directory.
For Linux Hosts:
sudo ./uuu/linux64/uuu -b emmc_imx6ul_img imx6ul/pico-imx6ul/imx6ul-SPL imx6ul/pico-imx6ul/imx6ul-u-boot.img <path/to/rescue>
Set the boot jumpers back to boot from eMMC
Power the board off, then place the boot configuration jumpers into "Boot from e.MMC" mode and power the board back on.
| Mode | PICO-PI-IMX6UL/ULL Jumper Settings |
|---|---|
| Boot from e.MMC | |
If you have an LCD display attached, you should be presented with the TechNexion Software Loader UI.
Was this article helpful?